Free Shipping
Compact Sleeps 4 Cabin Trailer Plans
Build a Vintage Luxury 12 Foot Camping Trailer
|
Compact Sleeps 4 Cabin Trailer Plans
Build a Vintage Luxury 12 Foot Camping Trailer
 |
PDF Format |
|
|
All Orders Processed
On a Secure Server
|
Price $12.95
|
|
Get a restored copy of these vintage Luxury 12 Foot
Cabin Trailer Plans with 15 Pages of Enhanced and Enlarged Figures
and Illustrations and Searchable Text.
|
We will email these plans, to the address provided
with your payment, within 48 hours following receipt of your order.
|
|
|More
Vintage Trailer Plans|
|
|

|
|

By E.S. Purdom
|
|
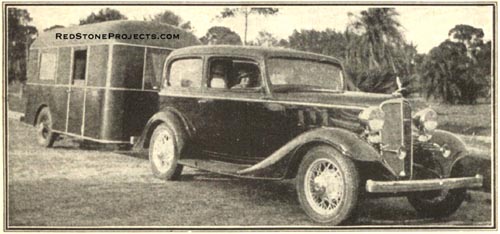
"Wanderer" the king of trailers, represents the
last word in luxury on wheels. Sturdy as an oak, she'll stand the hardest
traveling with a creak. Four passengers can ride comfortably in her quarters.
|
| Hundreds of requests have come for a trailer that would
accommodate comfortably three or four people on a cross-country jaunt -
a trailer that would be a veritable hotel on wheels, filling all traveling
needs.
This trailer, which its designer has dubbed "Wanderer,"
is the answer to those requests. It couples to any passenger car in a few
moments, and pulls with remarkable ease. It is the most economical means
of traveling, for with it you eliminate hotel and restaurant bills and
you can stop when and where you like, regardless of weather conditions.
This trailer car is safe at all speeds, for the center
of gravity is lower than in the average car. The width is 67 inches, which
is two inches less than a small auto; the overall height is surprisingly
low; the length is 12 feet, or two feet less than a small car.
As for equipment, it has 32 cubic feet of cabinet space
including a 3-foot refrigerator, a sink, running water, gasoline stove,
racks for dishes and cooking utensils, a dressing table, three quarter
bed and a pullman type berth, a large folding table, radio and two complete
lighting systems, 6 and 110 volts. What more could you want?
"Wanderer" is designed to be as light as possible at no
sacrifice in strength. In fact, the weight complete is only 1,225 lbs.
Keep this constantly in mind when building, for this is one of the principal
reasons why I cannot recommend too strongly that you follow the construction
plans exactly. |
|
|
|
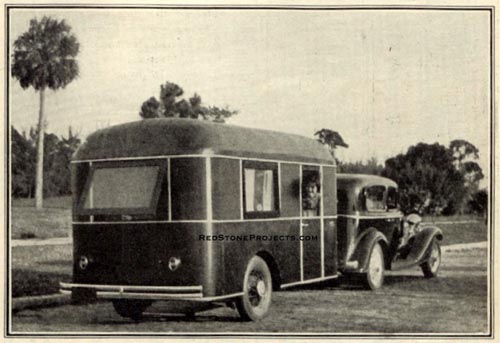
"Wanderer" Luxury Cabin Trailer on the road.
|
|
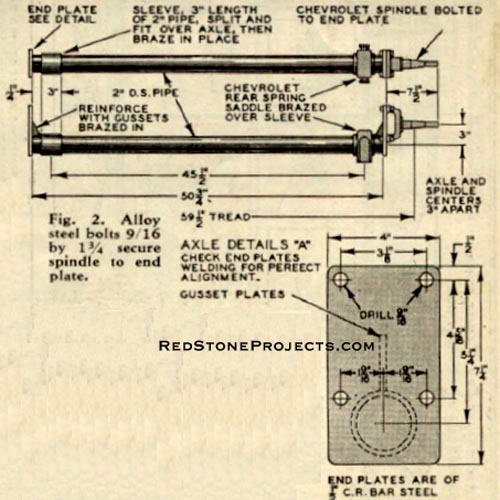
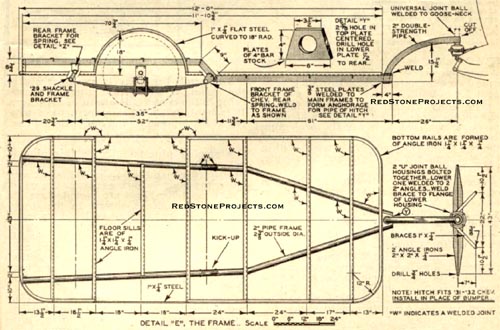
| If you decide to make the frame and axle yourself, follow
plans carefully, being sure both ends of pipe frame are in the same plane
before welding. See Fig. 2. Be sure the frame is spaced properly over the
axle spring saddle.
V out the lower side rail angle to make corner turns.
Get a piece of sheet metal and make a template to check these turns, as
they must be exact. Do not use galvanized pipe or angle.
Fumes from the zinc are dangerous and you can get a better
weld on black steel. Drill axle end plates before welding. After aligning
plates carefully weld them in place. |
|
|
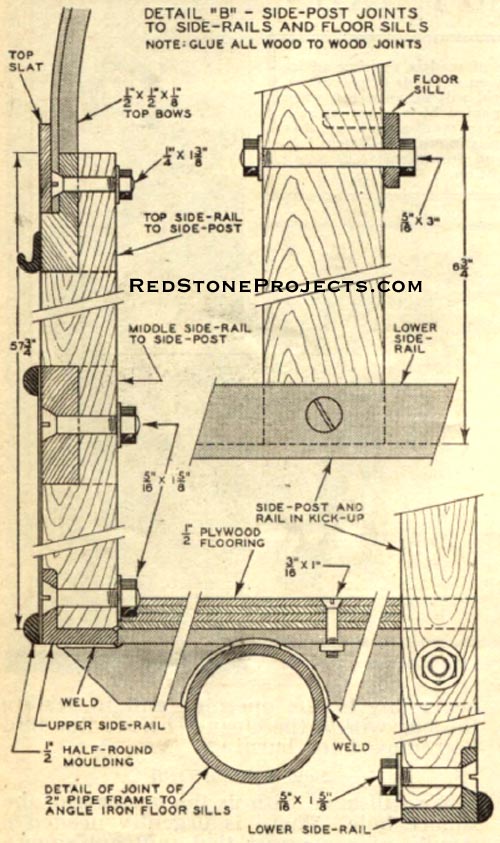
Figure 1. Details of Side Post Joints, Side Rails
and Floor Sills.
|
Then set up in the lathe and take a light cut from the
outer face of each plate. This operation will
give perfect alignment of the spindles.
The spindles are Chevrolet '29 to '32. All work necessary
on spindles is to ream out bolt holes to
1/2 inch and saw off the boss from upper side so spindle
can fit flat against axle end plate. Braze Chevrolet rear spring saddle
to axle as they are malleable castings.
Assemble wheels "Chevrole '29 to '33 and springs "Chevrolet
'29 to '33 eight-leaf rear.
Use old style or '29 spring shackles and bolts. After
assembling the chassis block up all four corners and level the frame carefully,
for you will find this a great help later on. |
|
|
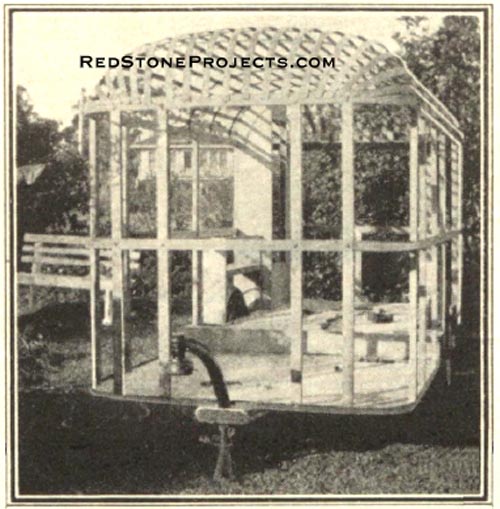
Luxury Cabin Trailer Front of Framework, showing
the Coupler.
|
| Constructing the Body
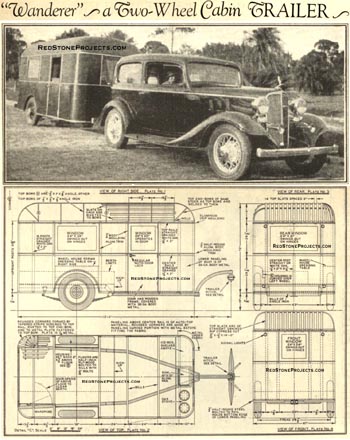
You are now ready for the body. (See Fig. 3.) Have your
mill supply straight grained white oak post and side rails in net sizes.
They are all of one and one-fourth by two-inch stock. Cut 18 posts 57 3/4
inches long and one post 311/4 inches to go under rear window. Cut four
side rails 9 feet 11 1/2 inches long. Also have mill cut 8 oak 1 1/4 x
2-inch corners. Use your 12-inch radius template to lay out. |
|
|
Figure 2. Alloy steel bolts, 9/16 by 1 3/4 -inch,
secure the spindle to the end plate.
|
| Cut four end rails 47 inches long. On two sides, two
end rails, and four corner pieces have the mill rabbit upper outside edge
3/16 inch deep and 1 inch wide as shown in detail B.
Mortise post and rails as shown in detail B, but do not
fit the mortise too tight as it will have a tendency to spring the post
and rail out of alignment.
Assemble post and side rails, glue all joints and check
for squareness and alignment before glue sets. Bolt post to frame with
5/16 inch flat-head stove bolts.
Countersink the bolt head in the frame rail.
Now square up and align end and side assemblies and firmly
brace in place. |
|
Figure
3. Uprights and side rails of the body are straight-grained white oak,
all of 1 1/4 x 2-inch stock. Glue all joints and check for squareness and
alignment before the glue sets. To fasten corners in place use 2 x 1/8-inch.
steel plate 6 in. long screwed to each end.
Side panels are 24-gauge auto body metal. Drawings
also show arrangements of interior furnishings. Note that two tiers of
bunks occupy side, while cooking equipment takes up front section. Roof
is covered with tan awning material, with auto top material stretched over
that.
Note that regular auto door locks are used. They can
be taken from an old car.
|
Get a restored copy of these vintage Luxury 12 Foot
Cabin Trailer Plans with 15 Pages of Enhanced and Enlarged Figures
and Illustrations and Searchable Text.
All Orders Processed
On a Secure Server
|
How to Fit Corner Pieces
You are now ready to fit corner pieces. I find an easy
way to do this is to use a carpenter square, fitting the square between
the posts, marking on it their position. Then lay the square on top of
corner piece.
You can mark and cut for an exact fit. To fasten corners
in place use 2 by 1/8-inch steel plate 6 inches long screwed to each end.
To brace ends and corners and form bottom of upper cabinets, cut from 1/4-inch
plywood two pieces 12 inches wide and 66 5/8 inches long. Cut ends to fit
corner curve, then glue and screw to top of upper end and corner rails.
The floor is 1/2-inch plywood. Lay and bolt it down with
3/16 flathead stove bolts as shown in Fig. 1.
Now for the top bows. Cut the lower ends of bows to fit
rabbet in side rail and bolt as shown in detail B. Before bolting up bows
lay a straight edge or line along center and along each side from bow 2
to 8, then adjust all bows to this level to get a smooth, level top.
For top slats have mill supply 14 ft. x 3/16 inch by 1
3/8 inch straight-grained rip cypress.
Soak ends of slats in water for a few minutes and they
will bend readily. Bolt center slat first and work each side down together.
Side panels are 24-gauge auto body metal. Nail only upper
edge and ends. Lower edge is held in place by 3/16 x 5/8 steel molding
bolted through side panel and rail as in detail B. Allow 1/2 inch from
top of side panel to top of middle side rail for upper side cover nailing
space.
At this stage I prefer to build inside trim and cabinets.
For the upper end cabinets, we already have the bottoms in, so we frame
up with 3/4 x 1 3/4-inch stock and panel with 1/4-inch plywood. Make door
from 1/4-inch plywood and swing from top.
Front lower cabinet includes refrigerator, sink, table,
stove and two storage cupboards. Build in as in Fig. 3. Use 1/2-inch plywood
for top, cut ends to fit body corners, glue and screw to top of middle
end and corner rails. Ice box is insulated with two layers of Celotex on
sides and top, bottom four layers. Use 26-gauge galvanized iron for box
lining. |
|
|
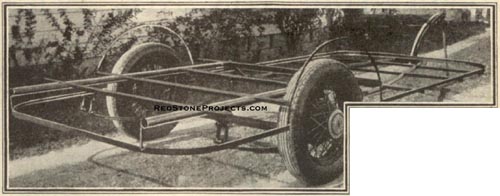
Here's the chassis ready to take the body. It's
advisable for you to have a local welding shop do the frame and axle assembly
job.
|
| Trailer Has Built-in Wardrobe
Build in wardrobe and right wheel housing as in plates
1, 2, 3, 4. The top of the wheel housing makes the dressing table. Left
housing is made from a '25 or '26 Chevrolet rear fender cut off and bolted
between lower side rail arch bar and side panel. Use half circle of body
metal left when you cut out wheel clearance from side panel to side up
inside of left wheel housing.
The next step is the painting. I painted all inside a
dark green except door panels which were 1 stained and varnished. Paint
outside lower panels to match tow car.
After painting comes the top and side covers. You will
find it makes a much better job to first cover top and upper sides with
tan awning material, and then stretch auto top material over that.
When cutting be sure grain in material runs lengthwise
with the car. I would advise having an auto top man cut and fit the top,
as an ordinary sewing machine will hardly handle the job. |
|
|
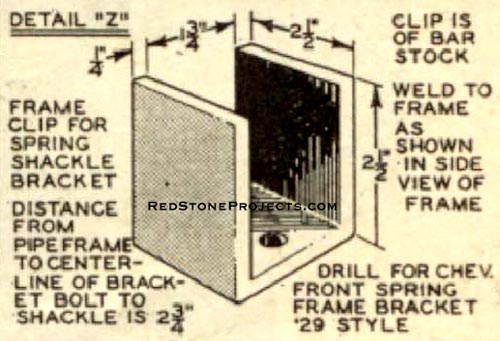
Detail Z. Frame Clip for Spring Shackle Bracket
|
| Top Covered by Auto Material
For the top use two pieces of 54-inch double texture auto
top material, stretched over top of trailer with seam in center. Fold under
3/4 inch and lap over the other side to make center seam and temporarily
tack in place, but leave both ends loose for about 30 inches. Pull down
and temporarily tack sides.
Now pull in end centers, lap over and temporarily tack.
Cut corners as in the drawing. Pull out most of the wrinkles, lap over
and tack.
Chalk mark all seams, allowing 3/4 inch for turn-under.
Pull tacks, remove cover, and sew with heavy waxed thread. Then put cover
back on top.
Starting with a tack in center of each end, pulling out
all wrinkles as you go, next tack center of each corner and so on. It may
be necessary to dampen the underside of material at corners. It also makes
a smoother job to pad corners and end.
Use 3/4-inch aluminum running board molding to bind sides
of windows and doors. To bind bottom edge of upper side panel, use 5/8-inch
aluminum crown molding. For edge of top and side panel use aluminum drip
molding. The top material and moldings can be purchased from any auto trimmers
supply company or from your Chevrolet dealer. |
|
|
Detail E. The Frame
|
| Next job is to hang windows and doors. Swing the windows
from the top. Hang the door with hinges to the front. Go to a junk yard
and buy a lock and control board assembly from a right front door of a
'25 or '26 Chevrolet closed body. Cut off and install complete on your
door.
For water supply use a galvanized tank 10 inches in diameter
and 24 inches high, installed in left front corner under sink, with a radiator
filler cap on outside of body. The discharge pipe comes in at the bottom
of tank, and a tire pump is valved in at top of the tank.
Fill tank 2/3 full of water, give pump a few strokes and
there you are.
Installing the Bunks
For the bunks I use a standard 3/4 bed spring. Weld on
short angle legs and bolt to floor. For upper berth use single or double
canvas cot hooked to brackets screwed to side posts over lower berth. To
support outer edge use two folding legs to rest on floor. When not in use
you can swing whole assembly up and hook to roof bows.
Use a four-wire, rubber-covered cable from trailer to
plug-in on car. Install storage battery (6v) in trailer, ground the negative
terminal to the frame and to ground wire in cable. Then connect positive
wire in cable which continues to battery side of generator.
Use Chevrolet '31 or '32 stop and tail lights, bolting
one on each side of lower back panel. As lights and panel are grounded
through frame and cable to car, all we have to do is continue tail and
stop light wires from the car through the cable and then to their respective
terminals on trailer lights.
Install an auto dome light on the forward side of the
wardrobe, and another in bottom of forward upper cabinet directly over
icebox.
This trailer gives the constructor an unlimited opportunity
for making those little fittings and cabinets and gadgets that so delight
the builder. |
Any 2 Vintage Trailer Plans
$19.95 FREE Shipping |
|
Select 2 Vintage Travel Trailer Plans
|
|
|