Free Shipping
10 Foot Folding Boat Plans
Build a Portable Boat for Camping, Hunting and Fishing

|
10 Foot Folding Boat Plans
Build a Portable Boat for Camping, Hunting and Fishing
 |
PDF Format |
|
|
All Orders Processed
On a Secure Server
|
Price $12.95
|
|
Get a restored copy of these vintage 10 Foot Folding
Boat Plans with 12 Pages of Enhanced and Enlarged Figures and
Illustrations and Searchable Text.
|
We will email these plans, to the address provided
with your payment, within 48 hours following receipt of your order.
|
|
| More Vintage
Boat Plans |
|
|

|
|
|
|
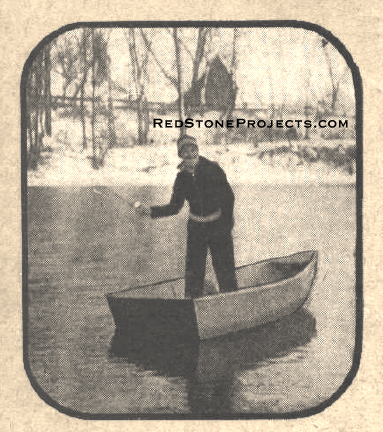
When this fisherman wanted to practice his bait
casting in winter, he folded up his boat, tucked it under his arm, walked
down to the water, unfolded his boat, launched it, and there you are!
|
| Designed as a portable boat for camper, hunter, fisherman,
and outdoor man who wishes a boat for use anywhere but without the bulkiness
of the average rigid one-place craft. It folds to a compact flat bundle
that may be stowed aboard any cruiser, auto, airplane, loaded on a donkey,
or easily carried to point of destination. It is suitable for those hard-to-reach
places where conventional or rigid boats are difficult or impossible to
transport or where boats are not available. Its Super-Harbord marine plywood
construction makes for easy and strong fabrication. |
| Specifications
LENGTH - 10 ft.
BEAM - 41 in.
DEPTH - 15 in. Amidships
WEIGHT COMPLETE - 80 lbs.
SEATING CAPACITY - 3 Passengers
CONSTRUCTION - 3/8 in. Super - Hardboard Marine
Plywood over shaped forms
TYPE - Flat bottom, canvas bound edges |
|
|
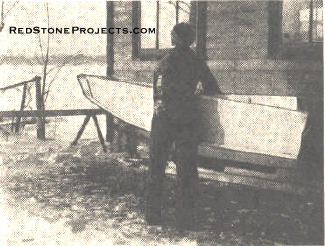
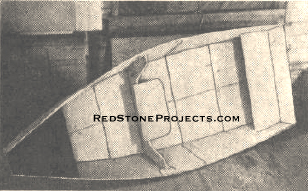
Carrying the folded boat down to the lake. Notice
the folded bottom projecting above the side piece.
|
| Outdoor sportsmen encounter numerous waterways or adverse
conditions where it is impossible to use the ordinary rigid boat, or where
its use is restricted making it more of a liability than a convenience
on a trip. The portable folding boat is not meant to dispense completely
with the rigid boat, but to supplement its uses and to offer a ready means
of water transportation where conventional type boats are excluded.
Weighing only 80 lbs., costing about five to six dollars
for materials, simple and easy to construct, easily rowed or propelled
with small outboard motors from 1 to 5 hp., this portable folding boat
provides a lifetime of usage, under conditions unapproachable by conventional
craft. The hull may be folded or unfolded in one minute's time. It will
stow away inside any auto, airplane, house trailer, or it may be packed
under the arm and carried easily. |
|
Figures
1 and 2. Patterns for sides and bottom with dimensions.
|
Get a restored copy of these vintage 10 Foot Folding
Boat Plans with 12 Pages of Enhanced and Enlarged Figures and
Illustrations and Searchable Text.
All Orders Processed
On a Secure Server
|
|
| Another very important service this folding boat can
render is its use as a yacht dinghy on larger boats where the usual dinghy
must be towed or where space is not available. The folding boat is simply
stowed aboard until occasion for its use arises. Many other uses will be
found for this portable boat. Despite its folding, portable properties,
the hull will support three persons and remain stiff and sturdy and seaworthy. |
 |
|
Center piece and transom are removed when the
rest of the boat is folded up.
|
| Construction of the portable boat is extremely simple.
Begin by scanning the material list. Collect the various items. Be sure
to use resin-bonded marine plywood for the planking. With the sheets of
3/8 in. marine plywood at hand, transfer the side and bottom plank patterns
as indicated, mark and saw to shape. With one side sawed to shape, use
it as a pattern for the other side. There are two identical side pieces
and two identical bottom pieces. Lay these aside, and saw to shape the
transom, transom seat, center section, seat, and seat support from 3/4
in. marine plywood. |

|
|
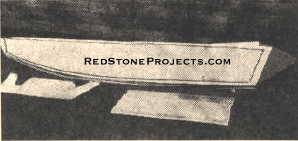
Just a few pieces of marine plywood go into the
making of Handy Andy, the folding boat.
|
| Putting the Bottom Together
The assembly begins by attaching the two bottom pieces
or bottom planks together. Align them side by side, edges touching and
with a strip of canvas two inches wide the full length of bottom pieces;
coat face of plywood where canvas is to be attached with C quality marine
glue. Lay the canvas in position in the exact center of the two bottom
pieces and proceed to secure canvas to bottom pieces each side with 1/4
in. x 3/4 in. lock strips. These strips are to run the full length of the
bottom pieces. Leave a 1/2 in. space between strips and fasten strips to
bottom with screws or clout nails. The easiest and quickest way to fasten
these lock strips in position to all parts of the boat is with 1 in. clout
nails, but lacking these use 3/4 in. No. 6 f.h. screws. Space either nails
or screws about two inches apart. For an ultra-strong job, copper rivets
are best, but either the nails clinched or the screws are quite satisfactory. |
 |
|
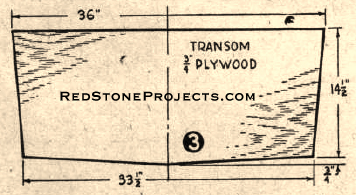
Figure 3. Transom with dimensions.
|
| Attaching the Side Planks
With the two bottom pieces locked together the hull side
planks are next attached to the bottom planks. Begin by temporarily assembling
bottom and side plank pieces to transom with a few screws located so they
can be easily removed later and the holes plugged.
Measure for the correct placement of the center section
and fasten this part temporarily to sides and bottoms with a few screws.
Starting aft, bottom and sides are secured with small strap hinges riveted
in place. Use 1/2 in. copper rivets on each side, first drilling lead holes
for them. Measure for these hinges at points indicated upon plans and continue
forward. Before the pairof hinges is installed forward of the center section,
pull the ends of side and bottom planks together with a rope or clamps
and then secure these forward hinges. Allow about 1/8 of an inch clearance
between plank edges when fastening hinges. Fasten the 1/4 in. plywood nose
pieces to inside of side pieces with nails or screws. |
|
Figure
4. Seat and Center Section with dimensions.
|
Get a restored copy of these vintage 10 Foot Folding
Boat Plans with 12 Pages of Enhanced and Enlarged Figures and
Illustrations and Searchable Text.
All Orders Processed
On a Secure Server
|
|
| Starting at the transom, coat edges along sides and bottom
with marine glue. Lay a 2 1/2 in. full-length strip of waterproof canvas
over the side-and-bottom joint allowing some looseness of the cloth for
folding and proceed to fasten two 1/4 in. x 3/4 in. lock strips to canvas
surface alongside and bottom edges. Use clout nails or 3/4 in. No. 6 f.h.
screws, spaced two inches apart. Fasten both sides similarly, working towards
bow and let the lock strips extend over bow to be trimmed later. |
|

|
|
The two bottom pieces are joined along the keel
line with a strip of canvas locked in place with two wooden strips. Marine
glue makes it tight.
|
|
| The bow ends of side pieces and bottom pieces are held
together by a piece of waterproof canvas, making literally a canvas bow
stem. This piece of canvas will measure about seven inches wide, to let
it lap over ends of side planks, allowing enough separation between bow
ends for folding. |

|
|
Here's the bow end, showing the use of canvas
which serves as hinges for the bottom and sides.
|
| Coat bow ends of side planks with marine glue and place
canvas bow stem in position, lapping over sides and securing with shaped
1/4 in. thick plywood nose pieces screw fastened to side ends. The bottom
of canvas stem piece is slipped under the bottom lock strips and fastened.
Trim the lock strips to fit the nose blocks. |
|
Figure
5. Construction details plan and elevation views with dimensions.
|
Get a restored copy of these vintage 10 Foot Folding
Boat Plans with 12 Pages of Enhanced and Enlarged Figures and
Illustrations and Searchable Text.
All Orders Processed
On a Secure Server
|
| Now return to the transom and remove the temporary fastenings.
Clamp or rope the sides to hold them securely against transom. Coat sides
and bottom of planking along transom edges with marine glue. Stretch a
piece of the heavy waterproof canvas in place against the transom and lap
over sides and bottom about three inches. Fasten over-lapped canvas to
side and bottom planks with 1/4 in. x 2 in. plywood strips nailed or screwed
in position. This canvas outer transom is not fastened at any point to
the 3/4 in. plywood transom, as the plywood transom is removed when the
boat is folded. |
|
|
The completed boat with canvas “deck” stretched
across the bow. Removable center section with seat, plywood transom, and
transom seat hold the boat rigid when it is opened up. The parts named
can be taken out and installed quickly.
|
| The 3/4 in. plywood transom is held securely in place
and reinforced especially where outboard motors are used by the installation
of small T-shaped hinges, one to each side (long end of hinge screw fastened
to transom and the short ends held securely to sides of hull with 1/2 in.
x 1 in. r.h. stove bolts and wing nuts). These bolts are removed when the
hull is folded. The 3 in. thick plywood transom fits into two rests which
are simply 3/8 in. shaped and notched plywood pieces screw-fastened to
sides of hull with 3/4 in. No. 6 f.h. screws, place these notched seat
rests so the transom will be held securely against the transom canvas with
enough tension to prevent loosening. |
|
|
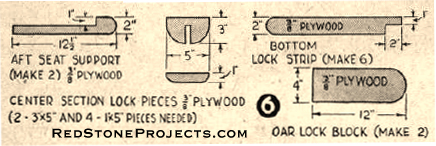
Figure 6. Center Section Lock Pieces with dimensions.
|
| Finishing Details
The center seat is now attached to the center section
with strap hinges as indicated and the seat support is similarly hinged.
This allows the entire assembly - section, seat, and seat support - to
fold compactly together. The center section is held securely in place with
a notched lock piece of 3/8 in. plywood as indicated. This piece is fastened
to sides with 3/4 in. No. 6 f.h. screws. |
|
|
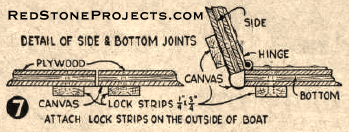
Figure 7. Details of Side and Bottom Joints.
|
| Notched bottom locks secure the edges of the two halves
of bottom together and are fastened to bottom with 3/4 in. No. 6 f.h. screws
at points indicated.
At the point where side-mounted oar locks are to be installed,
3/8 in. x 5 in. plywood oar blocks are fastened to sides of hull with 3/4
in. No. 6 f.h. screws. |

|
|
Canvas encloses the transom end of the boat. It
is stretched tight when the plywood transom and transom seat are in place.
|
| The sheer molding consists merely of two Pieces, 1/4
in. x 3/4 in. strips, which are nailed or screw-fastened to sheer edges,
screws spaced about four inches apart. Before fastening the bow ends of
moldings in place stretch a piece of the heavy waterproof canvas in place
for the deck and then secure this along edges with the well-fastened moldings.
Mount the oar locks. |
|
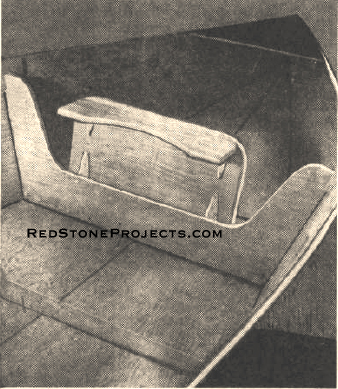
The hinged seat folds up and is removed with the
center
section, which is locked in place when the boat is
in use.
|
| Handy Andy is now ready for finishing This should be
a priming coat of equal parts linseed oil and turpentine, followed by three
coats of spar varnish inside and out.
To fold the hull, simply lift transom and seat out first,
then the center section and seat, and press the bottom inward - and the
job's done. Provide a web strap for holding the folded hull closely together
when carrying it. |
|
|
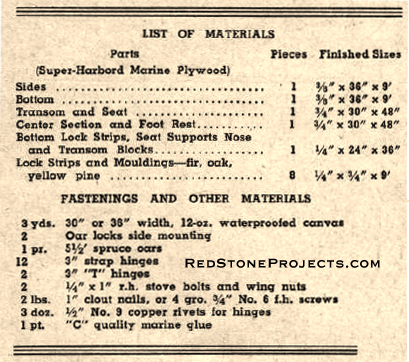
Handy Andy Folding Boat List of Materials
|
|

