Free Shipping on All U.S. Orders
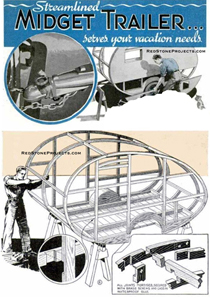
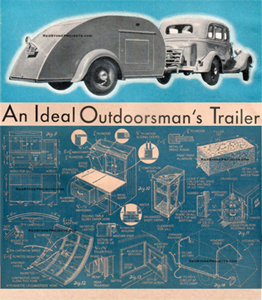
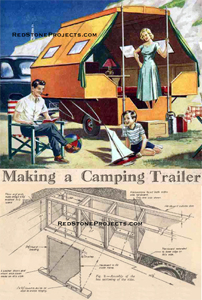
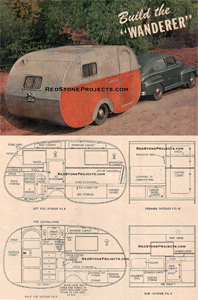
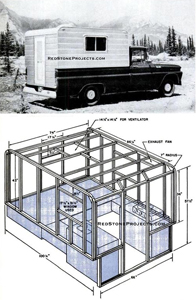
Build a 1948 Australian Caravan
Plans For Building The Lightweight
Parlour Car Camping Van

 
Build the Parlour Car, a Vintage Australian Caravan
The great Australian love of the outdoors has prompted the Editors of this journal to prepare plans for an outdoor home, so the services of Mr. G. R. Nisbet, a consulting engineer, of Hampton, Melbourne, were engaged to prepare plans of a practical caravan for a family of four - and what is most important these days - one that can be made of what materials can be bought on the open market.

What is also necessary, in view of Australia's mountain grades, is that it is a lightweight made of stretched canvas which can be attractively painted in any two-tone combination to match the owner's car. Being light it will naturally take less of our rationed petrol to pull it. 

Size can be altered to suit individual makers, but we have chosen an overall length of 21 feet 7 inches with a width of 6 feet 8 inches.

This skeleton frame of the van has to be made ridged enough so that there will be no contortion, or movement as this will cause the canvas skin to either stretch and ripple, or it may cause leaks at the tacked points. These faults will not develop if the frame is carefully screwed and glued.
Outline of Manufacture

1. TIMBER - Hardwood (Selected), or better still, Spruce.

2. GLUE - Casein, (Stick strictly to instructions for making same), if glue is bought loose make up by mixing equal parts of powder and water together until thickens. Then leave for about 15 minutes until glue starts to "cream." It is then ready for use.

3. COVERING - Duck, fairly heavy. Alter putting duck on to frame dope with a good quality fabric dope obtained from a reputable paint house.

4.  Build up the FLOOR frame first, then mark positions of studs.

5. Having bent FRAMES on FORMERS for roof make up into complete frames.

6. Place FORMERS on to floor frame, hold in position until glue dries with a couple of diagonal cleats across the lot at the top of the roof.

7.   Place END STUDS in position, mark and fit, wait until glue dries (about 4 or 5 hours, and about 12 hours to get hard).

8. The Roof - Screw on STRINGERS or lathes to roof and allow glue to dry. Every care should be taken at all joints to see that they will be thoroughly waterproof. It will be handy to have sour white lead putty on hand or other suitable water proofer. 

9. Place CANVAS or DUCK roughly in position and tack in a couple of places. On no account tack down one side completely, but instead start from the center of each side and work towards corners. Thus, one tack in center of each side and end. then around again by dividing the two halves into halves again and this time two tacks, then divide those distances into halves and tack, this time 4 tacks and so on.

10. WALLS can be covered by same method as roof. Don't cut out door or windows until duck is tacked down all round.

11. Next screw BEADING on as illustrated, this Is the first stage in tightening the canvas, 

12.  Then paint, or better still, spray on DOPE. This is the last stage in stretching the canvas.  But be sure every part of canvas edge is tacked down, for the shrinkage caused by the dope will wreck the job otherwise. 

13.  Now PAINT or lacquer to desired colors.

14.  Use normal Tasmanian Hardwood FLOORING, if possible.

15.  FURNISHINGS to choice - layout as suggested.

16.  Fit LIMIT LIGHTS and TAIL LIGHT.

Construction details of caravan building are shown in these close-up joints. There are no shortcuts in building a caravan that is subjected to all the shudder of our second-rate roads.
 
Chassis Troubleshooting Beforehand

Springing is a pitfall for the amateur. If this is too flexible the caravan will set up tendency to roll more than would shorter, stiffer springs. If the caravan develops nose-bobbing it is caused by too heavy a nose on the flexible rear springs of the car.

Trailer weave is commonly caused by too much weight in the rear of the caravan, and the weight should be more evenly distributed.

Width of the caravan axle is another factor that should be taken care of. Roll will develop on the highway if a too narrow a width axle is used.

Toe-in has also to be taken into consideration in accord with the amount of camber provided. Due to the pull wear on bearings can be lessened by setting the toe-in about 1/16 to 1/8 of an inch.

Parlour Car Caravan Materials List
The chassis is best bought from one of the many specialist firms who make them. Generally speaking, car axles are unsuitable for caravans as the track Is too narrow and the height of a caravan. exceeding the car, is likely to cause a lot of sway if used. Therefore, we recommend the wide track caravan axles as a necessity. Springs taken from a car may also be too tight and may cause a loaded caravan it continually "hit bottom" with drastic effects.

Further construction details are shown in the following diagrams.

Parlour Car Caravan Construction Details Sheet 1
Parlour Car Caravan Construction Details Sheet 2
Caravan Wiring

During the construction of the van the builder should have the wiring for the lighting well stapled to avoid chaffing as a short can often cause a fire. It is advisable to run two circuits - one for the car battery and one for 240 volts from the main. This is likely to be used when the caravan is garaged or for a lengthy period at a recognized caravan park where facilities exist for plugging in to the mains.

Caravan Wiring Diagram
Connecting the Circuit to the Car

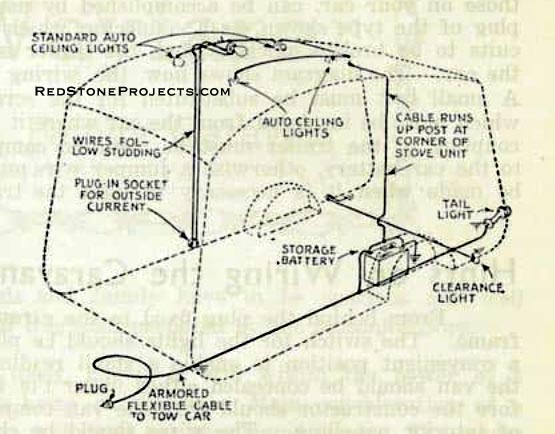
It is suggested that as the lead wire from the car to caravan is open to all weathers it should be encased in flexible tubing and there are many plastic types now available. This caravan circuit could be fitted with a separate fuse so that should any fault develop, it will not short the wiring in the car. The home builder can always get the wiring done by a licensed electrician and thus avoid pitfalls of the inexperienced.

Wiring for Lighting

Flex sold for radio is not suitable for the purpose of caravan lighting, being far too small to carry the current required. The current for a 24-watt headlamp bulb fed from the 6-volt battery of the car is some 4 amps, and in order that the full 6 volts be available at the lamp terminals, wires capable of carrying this current must be installed, therefore the caravan wiring must not be less than 3.029's to provide these results. In planning the interior keep the number of lights down to the minimum, for each light drains the car's battery, unless the battery is in good condition and the car in daily use.

Using the Car Battery

Run a pair of 3.029 cables from the car battery direct to a position at the rear of the car, close to the coupling so as to attach a 5 amp. two-pin plug to the car's body. Plugs may be obtained from an electrical dealer, flush types being available. Twin cab-tire cable is the wire recommended for this work; it should be clipped to the car's chassis. A similar plug should be fixed on the caravan. A length of cab-tire flex capable of carrying the current (70/36's) is ideal for this job, each end of this flex should be fixed to the plug tops supplied with the bases. This flex should be at least 6 yards long to allow for the car being parked some distance from the caravan.

Caravan to Car Connections

A trailer tail lamp and stop light, to synchronize with those on your car, can be accomplished by using an electrical plug which permits the circuits to be broken quickly, when the trailer is detached from the car. The coupling of the trailer most be metal to complete the circuit to the car battery, otherwise a jumper wire must be used. The same arrangement may be made when it is necessary to light the trailer from the car battery.

Hints on Wiring the Caravan

From behind the plug fixed to the caravan run 3.029 cab-tire, clipped to the frame. The switch for the lights should be placed in hand positions; a plug fixed in a convenient position to enable a small reading lamp to be used. All the wiring of the van should be concealed either under the floor or else between the lining, therefore the constructor should wire the van complete before making a start on the work of interior paneling. The wires should be clipped to the van's framework as near to the actual position of the light as possible, leaving enough spare length to pass through the panel in the exact spot required. In the event of a prolonged stay at one spot being expected, some auxiliary system of lighting should be provided, for continued use of the car's battery involves such a drain that even the largest battery will not cater for indefinite use.

Remember the Radio

Select a suitable position for the radio and, before the interior panels are fixed, install the required aerial and earth wires in a manner similar to the lighting wires. In the case of a main supply a power switch will be needed.

You can take it with you.

Camper and Camping Trailer Plans
Midget teardrop trailer plans
Sportsmans trailer plans
Car top sleeper plans
Pop up camper plans
Canned han trailer plans
Truck bed camper plans
See More Camper and Camping Trailer Plans

RedStoneProjects.com Home
SAVE With Multi-Plan Deals!
Project Plans
Concealment End Table Plans
Quilt Rack Plans
Crossbow Plans
Catapult Plans
Craftsman Style Plans
Water Screw Plans
Tobacco Pipe Rack Plans
Reloading Bench Plans
Closet Reloading Bench Plans
Small Reloading Bench Plans
Corner Reloading Bench Plans
Brass Cleaning Bench Plans
Two Sided Shooting Bench Plans
Nativity Stable Plans
No Weld Trailer Plans
No Weld Teardrop Trailer Chassis
No Weld Utility Trailer
Vintage Trailer Plans
Vintage Travel Trailer Plans Collection
1947 Teardrop Trailer for Two Plans
1935 Pullman Trailer Plans
1940 14 Foot Cabin Trailer Plans
1951 Lightweight Sportsman's Trailer
1956 Roamabout 18 Foot Travel Trailer Plans
1934 17 Foot House Trailer
16 Foot Canned Ham Trailer Plans
1937 Runlite Lightweight Travel Trailer
Bungalow Folding Tent Camper Trailer Plans
Craftsman Hardside Folding Camping Trailer Plans
Home of a Thousand Addresses Travel Trailer Plans
DIY Pop Up Camper Trailer Plans
Fold Up Trailer with Slide Out Plans
Wild Goose Kamp Master Trailer Plans
1935 Jim Dandy Cabin Cruiser Trailer Plans
How to Build Trailers Book
Wanderbug Lightweight Vacation Trailer Plans
Streamline 15 Foot Family Trailer Plans
Tent On Wheels Folding Trailer Plans
Micro Camper Trailer Plans
Traveler Wood Framed Travel Trailer Plans
Roadside Camp Kitchen Chuckwagon Trailer Plans
Pickup Truck Pop Up Camper Plans
Hardside Roof Top Pop Up Sleeper Plans
Low Profile Pickup Truck Camper Plans
Vintage Streamline Teardrop Trailer Plans
Vintage 1956 Camp Trailer Plans
Modern Conestoga Trailer Plans
Post War Trail Scout Camping Trailer Plans
Vintage Bolt Together Tent Trailer Plans
Vintage 1947 Wanderer Canned Ham Trailer Plans
Mobile Vacation Home Plans
Lightweight Expanding Trailer Plans
Simple and Rugged Truck Camper Plans
Sleeps 4 Expanding Truck Camper Plans
Build a 3-4 Berth Caravan Plans
Hardtop Popup Camper Plans
Jeep Woody Camper Plans
Handy Andy Folding Camp Trailer Plans
Telescoping Vacation Cabin Trailer Plans
Camping Tent Platform Trailer Plans
Quick Folding Car Top Camper Plans
Folding Station Wagon Penthouse Plans
Vintage Calico Truck Camper Plans
Vintage 1970 Truck Camper Plans
Easy To Build Folding Camp Trailer Plans
How To Put a Tent On Wheels Plans
1953 Auto Roof Pop Up Tent Plans
Telescoping Truck Camper Plans
Ideal Outdoorsman's Trailer Plans
Cruisemite Deluxe Travel Trailer Plans
Collapsible Camper Trailer Plans
Build Your Own Motor Caravan Plans
1936 Honeymoon House Trailer Plans
Crank Up Hardtop Camping Trailer Plans
Vintage Project Plans
Mini Steam Engine Plans
Power Cycle Mini Bike Plans
Roller Action Bending Brake Plans
All Wood Clock Plans
Build a 6-Wheel ATV Plans
Vintage Boat Plans
Sea Craft 25 Foot Cabin Cruiser Plans
21 Foot Shanty Boat Plans
20 Foot Budget Houseboat Plans
2-Berth Towable Cabin Cruiser Plans
Build Three Working Model Catapults
Build Five Craftsman Style Tobacco Pipe Racks
Build a Reloading Bench and a Reloading Brass Cleaning and Sorting Bench
Vintage Trailer Mugs
Trailer Articles
Pulling a Motorcycle Trailer
Building a Motorcycle Trailer
DIY Tent Trailer
Build a Budget Tent Trailer
The Trailer Grows Up
Luxury Trailers Create an Army of Modern Gypsies
Build an Australian Camping Caravan
Motorcycle Rallies
Americade Motorcycle Rally

 
Contact Us Privacy Policy Plans License