Free Shipping
Family Size Folding Trailer Plans
Build a Roomy Hardside Pop Up Camper
|
Family Size Folding Trailer Plans
Build a Roomy Hardside Pop Up Camper
 |
PDF Format |
|
|
All Orders Processed
On a Secure Server
|
Price $12.95
|
|
Get a restored copy of these vintage Family Size
Folding Trailer Plans with 14 Pages of Enhanced and Enlarged
Figures and Illustrations and Searchable Text.
|
We will email these plans, to the address provided
with your payment, within 48 hours following receipt of your order.
|
|
|More
Vintage Trailer Plans|
|
|

|
|
 |
|
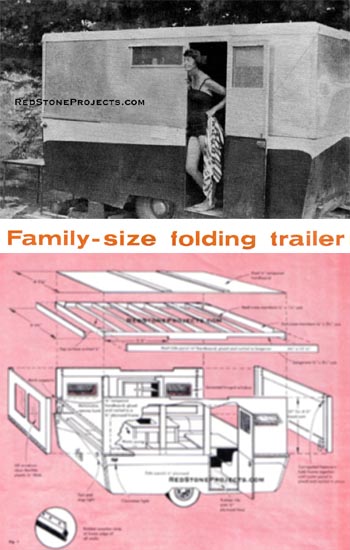
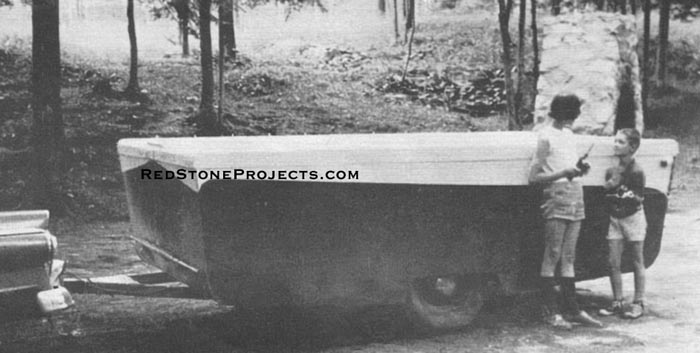
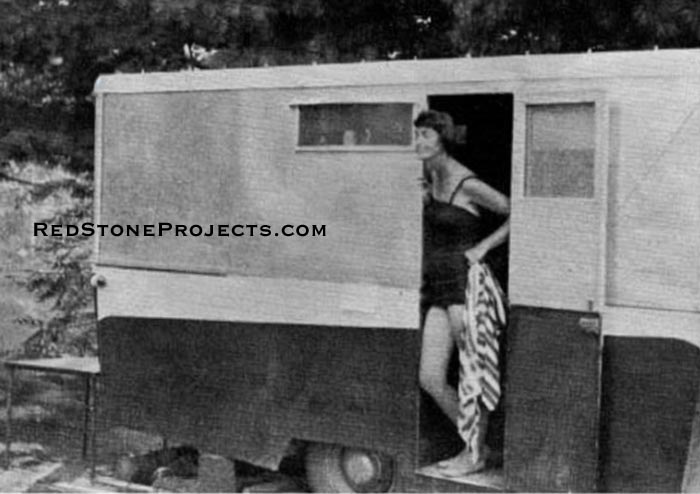
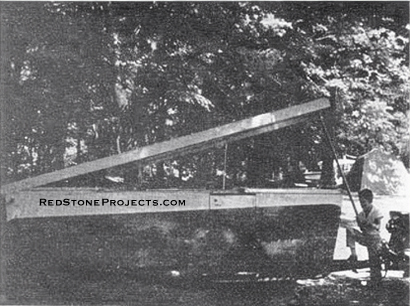
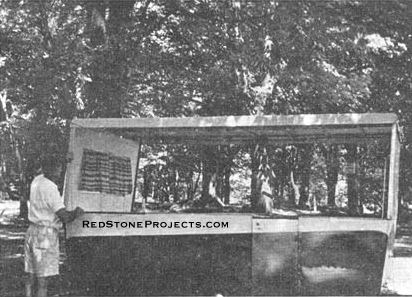
The Maxwell's trailer is shown in its folded
position, ready for towing. In the position, the lower half of trailer
door opens, a handy feature for roadside stops.
|
Winter Project for Craftsman to Copy or adapt
W.W. Maxwell
|
| A COMPACT folding trailer makes good sense. When traveling,
you tow a small lightweight vehicle that tags along effortlessly. When
you stop, the trailer expands easily to a full-size unit that is complete
with double bed, dining nook, sink, water supply, icebox, electric lighting
and bunks for sleeping three children. When your trip is over, you will
find the trailer is easily stored, occupying small space in the home driveway
or garage.
I designed and built the trailer shown here. It has traveled
10,000 miles through three vacations and has proven to be a thoroughly
practical and economical project. You can build it with normal home workshop
facilities and the plans and specifications given on these pages.
Before you start to build any trailer, give some careful
thought to your camping needs and then provide for them in your unit. Here
are a few things that I have found add pleasure to a camping trip in a
compact trailer.
Awning to provide shelter and shade for living outdoors.
Built-in trailer type icebox of large capacity.
Portable camp kitchen. This handy unit contains utensils,
dishes and a camp stove. The luggage-type container is fitted with folding
legs and opens out to form a table for cooking. Several varieties of camp
kitchens are available on the market.
Folding tables and chairs for outdoor eating and relaxation.
Pressure lamp for outdoor lighting. Many trailer camps
provide 110-volt power supply, so the trailer should be wired for this
voltage.
Sleeping bags for use in the bunks. |
|
|
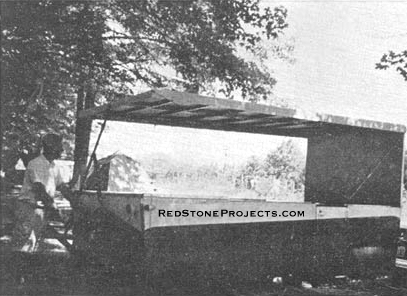
At camp, the folding sides are raised to make
a full-sized trailer with double bed and bunks to sleep three more. It
was built in a home workshop using plans published here.
|
|
| General Construction
The trailer is built on a steel frame. The lower body
is of plywood and the folding side walls and the roof are of tempered hardboard
on wood frames. If you wish to do so, the trailer can be partially covered
with aluminum sheeting of a standard trailer gauge.
Experience has indicated that aluminum is desirable but
not essential for the lower body and roof side plates. Hardboard is preferable
for the roof because of its insulating quality. Metal on the folding side
walls adds a small but necessary weight. Whether you use aluminum or not
is up to you. The construction narrative is detailed to enable you to make
the choice.
Waterproof marine glue and cadmium or zinc plated screws
should be used for glued and screwed joints.
|
|
Figure
1. Exploded detailed view of camper trailer construction showing the roof,
hard sidewalls and lower body with dimensions.
|
Get a restored copy of these vintage Family Size
Folding Trailer Plans with 14 Pages of Enhanced and Enlarged
Figures and Illustrations and Searchable Text.
All Orders Processed
On a Secure Server
|
| Frame Construction
Obtain the axle, wheels and hitch. A drop type axle is
recommended because it reduces the overall height of the trailer and improves
towing characteristics. Electric or hydraulic brakes are not essential
but are very desirable for safety reasons. Make certain that your hitch
is of good quality. A hitch and running gear designed to carry an overall
weight of 2000 pounds are satisfactory.
If you buy your running gear from an auto graveyard, try
to get a front end drop axle and wheel assembly from a two-ton truck. Get
the axle complete with leaf springs, spring to frameattachments, and shock
absorbers. The wheels are locked by welding the kingpin hinge joints together.
Make sure the wheels are welded at a right angle to the axle. Before installing
the running gear you should check, clean and lubricate the springs and
wheel bearings. If necessary, recondition the shock absorbers, brake cylinders
and brake linings. |
|
|
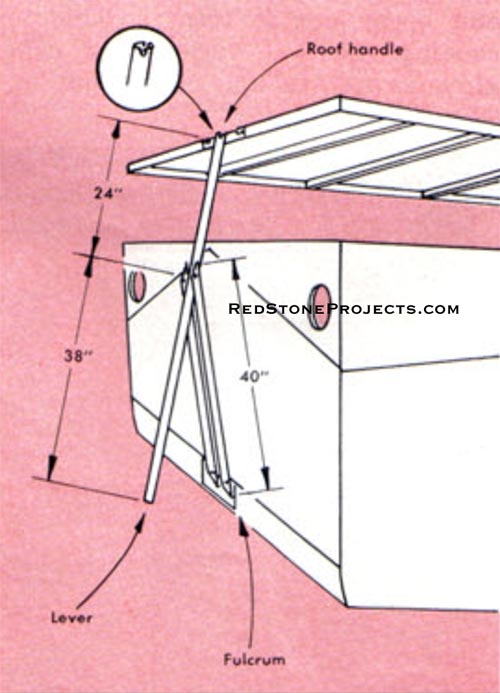
Lever to aid in raising trailer sides.
|
|
The lever, shown here in both photo (above)
and detail drawing (below), is an important feature of this trailer, for
it makes raising the trailer sides and easy job for just one man. Then,
when not in use, it fits very compactly in a rack at the front of the trailer.
|
|
|
Figure 2. Lever to aid in raising trailer sides
configuration and dimensions.
|
|
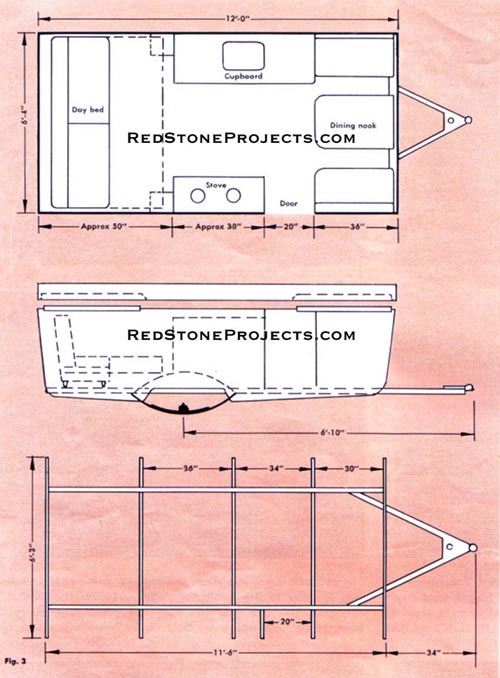
| The frame longitudinal members are made of 3-in channels
and the cross members of 2-in steel angles. Fig. 3 gives the frame layout
but does not give the spacing of the longitudinal members. This dimension
depends on the particular axle you use.
When the frame is completed, install a trailer hydraulic
brake master cylinder to the frame, near the hitch point where it can be
easily serviced. Connect the master cylinder to the wheel cylinders with
brake line tubing; use flexible rubber lines between the wheels and tubing.
Fill the system with brake fluid and check the operation of the brakes.
The master cylinder can be obtained from a trailer parts supply house.
When all work on the frame is completed, wire brush all
loose welding scale from the frame and give it two coats of iron oxide
paint or other metal preservative.
Floor Construction
The floor is made of 3/4-in exterior grade plywood. Screw
and glue 3/4-in x 4-in battens to the undersurface of the floor at all
joints. Paint the undersurface with wood preservative. Bolt the floor to
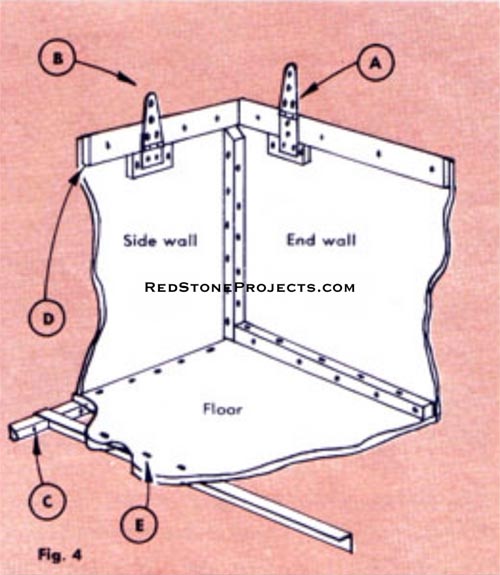
the frame with 1/4-in x 1 1/2-in carriage bolts. See Fig. 4, detail E,
in the drawing below.
Cut the semicircular wheel housings from 3/4-in plywood.
The top surface of the wheel housing is made of galvanized iron nailed
to the semicircular side pieces. When the springs are fully depressed there
should be 1-in of clearance between the top of the tire and the housing
and 3-in of clearance between the tire and the ends of the housing.
Bed and Appliances
Obtain a stove, icebox, sink and day bed. The dimensions
of these items will dictate the overall dimensions of the cupboard and
stove frames. The day bed in the bed position will occupy about 50-in of
the floor space (see Fig. 3). Build the cupboard to allow the necessary
bed space. The height of the trailer from finished floor surface to the
top edge of the box is 32-in. This should be sufficient to accommodate
your appliances and allow 1 1/2-in for storage of the folding side walls.
If this space is not sufficient for your particular appliances, increase
the height of the box accordingly but remember to subtract a similar distance
from the height of the folding side walls. See Fig. 1 and Fig. 4. |
|
|
|
The trailer sets up as shown in the photos
above and below; You raise one end of the roof with the lever, then raise
the hinged front wall of the trailer into place. Next the lever is brought
around to the rear of the trailer and the rear end of the roof is raised.
|
|
|
|
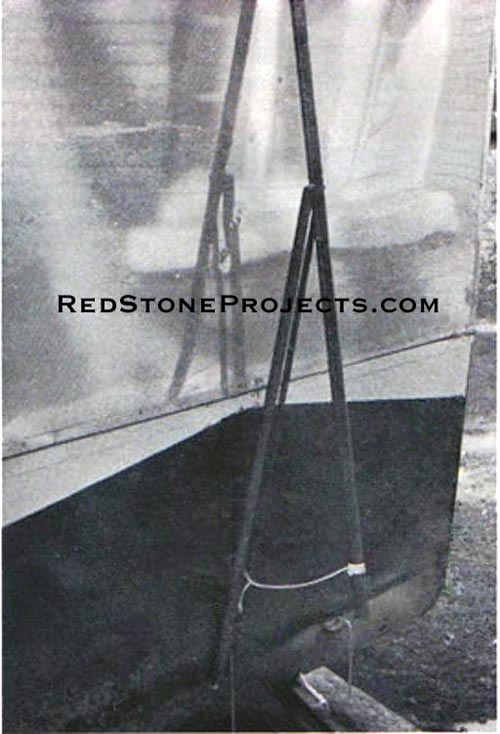
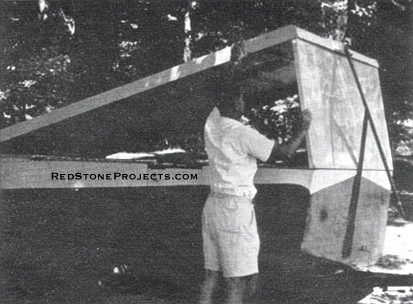
The end wall is put in place, and rope steadying
stays fastened. Now it's time to step inside the trailer and
raise the right-side wall; then the left side wall goes into place. The
Maxwells have the time for setting up their trailer down to 5 minutes.
|
| Fixed Side and End Panels
If the exterior of the trailer is to be covered with aluminum
sheeting, the side and end panels are made of 3/8-in exterior grade plywood,
good side in. If you do not intend to cover with aluminum, the panels should
be of 1/2-in plywood, good on both sides.
Fit the end panels first They are 3-in from the perpendicular
and have a vertical height of 32-in. Butt the end panels to the floor surface
and secure them as shown in Fig. 4. The side panels are 32-in in height
from the floor surface. The lower edge is contoured to cover the frame
members and wheel housing. Mark and cut out the side panels to the desired
contour. The panels are glued and screwed to the undersurface of the floor
using 1-insquare pine stock as shown in Fig. 4, detail C.
After the four panels are installed, glue and screw a
1/2-in x 1 1/2-in pine strip completely around the inside top edge of the
trailer body. Plane the top edge to a slight angle so that there is a watershed
to the outside as in Fig. 9, detail D.
|
|
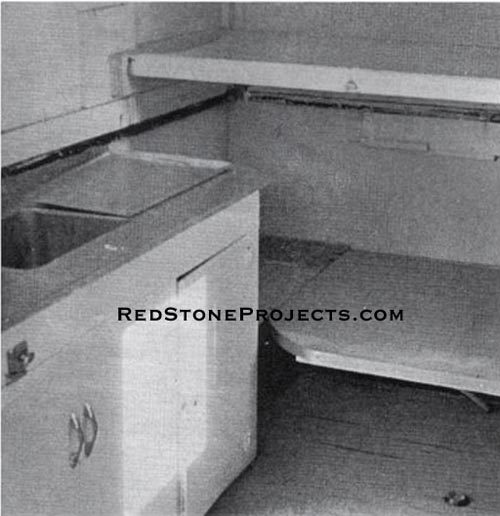
This is an interior view of the trailer looking
forward, with the front bunk in place and single bed arrangement made by
lowering the table down to the same level as the dining nook seats.
|
| Interior Fittings
Assemble the stove and cupboard frames and fasten them
to the floor and side panels with glue and screws. Cut and assemble the
dining nook seats. The interior of the right seat can be used for storage
space; a water tank with exterior filling connection can be placed in the
left seat. The table does double duty. It is fitted with a hinged leg and
wall brackets to permit it to fold down, forming a single bed with the
two seats and cushions. See the photos. |
|
|
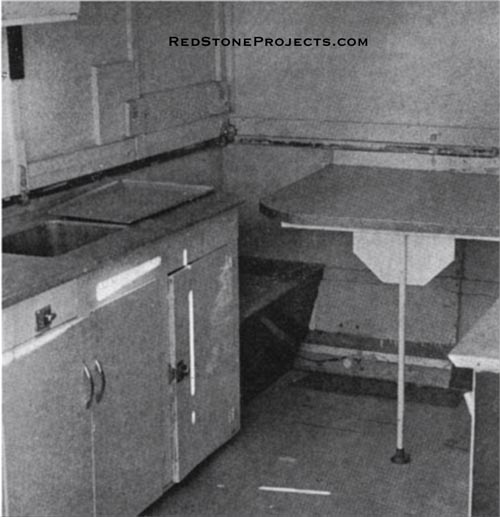
For eating purposes, the table is raised to
its proper level. The cupboard with sink is fitted with a water pump and
icebox, at right under the sink, can be reached when trailer is closed.
|
| Folding Walls
The folding side walls are made of 1/8-in tempered hardboard
over a frame of 3/4-in by 4-in wide plywood. The plywood frame is cut to
size and assembled with corrugated fasteners which serve to hold the frame
together until the hardboard panel is glued and nailed in place. |
|
|
Figure 3. Family Size Folding Trailer Frame
and Body Dimensions
|
| Four strap hinges are secured to each side wall. The
hinge axis is 1 1/2-in below the lower edge of the wall (see Fig. 4, detail
B). The height of the side wall will depend on your personal needs. As
shown in Fig. 1, a 39-in folding side wall over a 32-in side panel will
give 6 feet of headroom in the trailer. Study Fig. 1 for full detail of
the outline form and construction of the folding side walls. |
|
|
Figure 4. Cutaway view of the trailer body
detailing front, rear and side wall panel hinges.
|
| The folding end walls are made in the same way as the
side walls, except two hinges are installed with the hinge axis at the
lower edge of the wall (see Fig. 4, detail A).
Fit the walls to the trailer with one screw attaching
each hinge to the folding wall. The walls are held upright with a hook
and eye at each upper corner. Fold each panel several times to be sure
it fits neatly and squarely within the body of the trailer, then fit the
remainder of the screws to each hinge. Sponge rubber pads are glued to
the walls at the points where the folded walls bear on the table, cupboard
tops, etc. Finally, fit weather stripping and corner sealing angles as
shown in Fig. 1. |
|
|
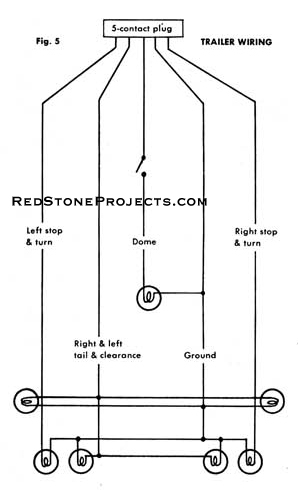
Figure 5. Trailer Wiring Diagram
|
| Lever Construction
The lever is made of 1 1/4-in steel wall tubing bolted
to a fulcrum of 3/4-in steel angles. The top of the lever is notched to
receive the roof handle. The fulcrum sits in a bracket bolted to each end
of the trailer body. The bracket at the rear is placed behind the license
plate frame. Use a hook and eye to hold the roof and lever in the up position.
When not in use, carry the lever in a rack at the front of the
trailer. See the photo and drawing for details.
Folding Bunks
Two folding bunks can be fitted and if necessary, there
is room for a third. The bunks are made of canvas stitched over two 1 1/2-insquare
section fir stringers. When in use the bunks are carried in wall brackets
made of 3/4-in plywood. When not in use, the bunks are rolled and stowed
in the space behind the day bed.
Electric Wiring
Two stop/tail lights, two side clearance lights and a
dome light are fitted and connected to the auto electrical system through
a 5-way plug. A 3-light timer is fitted to the auto turn indicator unit
when the trailer is being towed. See Fig. 5.
A 3-wire grounded exterior type plug can be fitted to
the body of the trailer with internal wiring for 110-volt lighting and
a hot plate.
Water Pump Installation
A trailer-type hand pump can be fitted to draw water from
the under-seat storage tank. The pump is fastened to the rear end of the
cupboard. The sink is fitted with an exterior drain line. See Fig. 1 for
location of the water pump.
Door and Windows
The door is made in two halves separately hinged, with
a lock in the lower half. Weather strip is placed on the lower edge of
the upper door half.
The lower part of the door can be opened with the roof
down. This permits access to the icebox and utensils and is a handy arrangement
for roadside picnic stops. The dome light should be placed on the folding
wall near the door so that it can be turned on with the roof down.
At least three windows should be able to be opened and
be fitted with screens. The large picture window at the rear should be
glazed with clear plastic. This window need not open as the smaller windows
will provide sufficient ventilation.
Painting and Finish Work
The roof should be painted with aluminum paint to reflect
heat If you cover the trailer with aluminum sheeting, the metal should
be carefully cleaned and given two coats of zinc chromate primer followed
by two coats of auto body finish. The complete underbody of the trailer
should be covered with auto undercoating. Make certain that the wheel housings
are well coated. The entire trailer is dustproof and bugproof. Sponge rubber
sealing or weather stripping at all joints will insure this. |
|
Any 2 Vintage Trailer Plans
$19.95 FREE Shipping |
|
Select 2 Vintage Travel Trailer Plans
|
|
|

