Free Shipping
Camping Tent Platform Trailer Plans
Build a Mobile Raised Tent Base with Camp Kitchen

|
Camping Tent Platform Trailer Plans
Build a Mobile Raised Tent Base with Camp Kitchen
 |
PDF Format |
|
|
All Orders Processed
On a Secure Server
|
Price $12.95
|
|
Get a restored copy of these vintage Camping Tent
Platform Trailer Plans with 13 Pages of Enhanced and Enlarged
Figures and Illustrations and Searchable Text.
|
We will email these plans, to the address provided
with your payment, within 48 hours following receipt of your order.
|
|
|More
Vintage Trailer Plans|
|
|

|
|
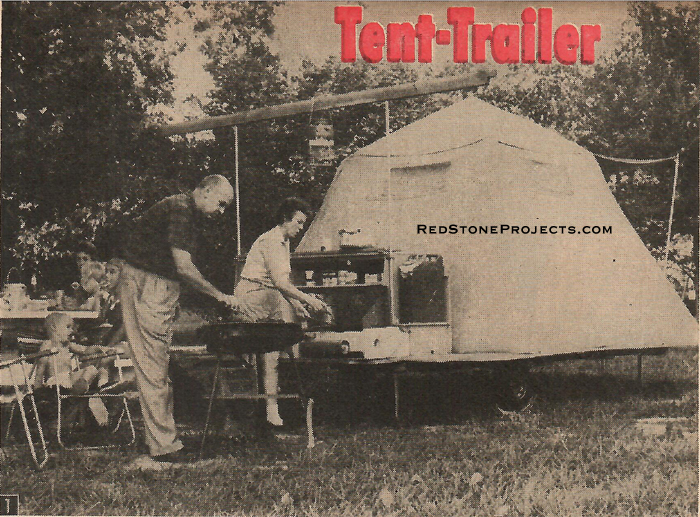
Mobile camping platform provides plenty of high-and-dry
cooking and sleeping area for a family of six on a low-cost camping vacation
By LYLE GILLIOM
|
| The tent trailer platform is designed as the result
of years of family camping experience to haul and store all of your camping
gear, while you and your family ride comfortably without luggage piled
in the car. It has, moreover several surprise extras.
First of all, the storage compartment's sides let down,
providing a platform on which your umbrella tent is mounted ready to be
raised in minutes for off-the-ground tenting.
Cots, air mattresses, and even a full-size bed can be
carried fully made up and ready to sleep in. Camp kitchen cabinet at the
rear has an icebox, stove drawer, and water supply ready for use at any
time with or without unfolding the trailer. |
|
|
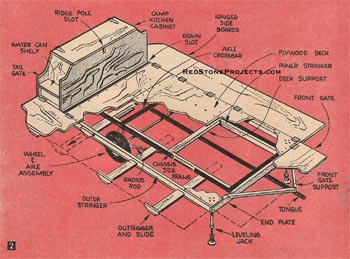
Figure 2. Folding tent platform construction details.
|
| Trailer Chassis Kit
A kit consisting of specially designed brackets into which
you insert welded steel tubing or standard 2-in. black iron pipe, was used
to build the chassis for the original model. The kit (See Materials List)
includes wheels, tires, stub axles complete with rubber torsion springs,
coupler, and U-bolts. Or, if you wish, you can adapt the Tent-Trailer bed
(Fig. 2) to any available 1/2-ton chassis and axle assembly.
Although standard iron pipe is more than adequate for
the purpose, we used welded steel tubing because it weighs only half as
much and is easier to cut, drill, and handle. Usually, however, the tubing
must be ordered from steel suppliers near large cities and will be somewhat
more expensive.
Begin assembly by joining the side frames and the front
and rear crossmembers to the corner sockets, temporarily securing the parts
with U-bolts (Fig. 4). As a separate assembly, install the stub axles (Fig.
4) in 1-in. pipe and insert the ends of the crossbar in the upper spring
arm socket.
Position this crossbar between the side frames so its
center is 54 in. from the rear of the chassis. Secure the subassembly with
U-bolts, being sure the axle pipe ends fit tightly at the shoulders of
the stub axles.
Next center the tongue and tongue socket on the axle crossbar
(Fig. 4) and place the crosstie fitting (Fig. 3C) between the tongue and
the front crossbar.
Make the radius rods by drilling 3/8-in. holes in the
flattened ends of 3/4-in. pipe (Fig. 3). Attach the brackets to the opposite
ends and drill the assembly for 3/16-in. stove bolts. Position the radius
rod brackets on the side frames (Fig. 3B) and then bolt the flattened ends
to the lower spring arm with 3/8-in. machine bolts.
Ready for Welding
After bolting the trailer hitch to the tongue, the trailer
chassis is ready to be towed to a shop for welding where the entire chassis
can be welded in less than 1 hour. When finished, the U-bolts are no longer
needed and should be removed before painting the chassis with a rust-resisting
enamel.
Saw four trailer bed stringers (Fig. 2) to length, then
lay out and cut outrigger notches (Fig. 5). Note that the outer stringers
are the same length as the steel chassis and are ripped to 3 1/4 in. The
inner stringers fit between the front and rear crossbars and are slotted
2 5/8-in. deep to clear the axle crossbar (Fig. 3). |
Get a restored copy of these vintage Camping Tent
Platform Trailer Plans with 13 Pages of Enhanced and Enlarged
Figures and Illustrations and Searchable Text.
All Orders Processed
On a Secure Server
|
Figure
3. Tent Platform Trailer body with dimensions.
|
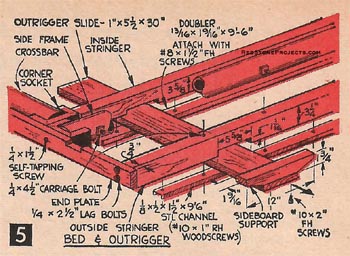
| Doublers (Fig. 5) which form the slots for the outrigger
slides are ripped from 1 x 4 stock and are attached to the inner stringers
with #8 x 1 1/2-in. fh screws. Position the stringers (Figs. 2and 3) flush
with the top of the chassis frame and attach with five carriage bolts through
each frame side. Before tightening these bolts, notch the stringers and
attach the fore deck supports (Fig. 3) to keep the stringers square against
the pipe side frame.
The outer stringers are reinforced and support provided
for the outriggers by two lengths of steel channel (Figs. 2 and 5). First
attach the channel to the underside of the stringers with round head screws,
then drill two 17/64-in. holes through the channel and stringers at each
outrigger slot as in Fig. 5 for carriage bolts to be installed later.
Next rip the end plates (Fig. 2) and attach them to the
chassis by driving one self-tapping screw into a 13/64-in. hole drilled
at each corner socket and 1/4 x 4-in. carriage bolts through the front
and rear crossbars. The outer stringers can now be fitted between the end
plates and are secured with lag screws and washers at each corner.
The V-shaped fore deck support (Fig. 2) is bent from angle
iron. Cut off 1 in. of the vertical flange at each end where it meets the
notches in the end plate and drill for #12 x 1-in. rh screws. Drill a 5/16-in.
hole at the bend and a matching hole through the tongue, then bolt the
support to the tongue with 2-in.-long spacers cut from 3/4-in. pipe. |
 |
|
Figure 4. Camping trailer suspension and axle
assembly.
|
| The Tent Deck
The tent deck is made from three 4 x 6-ft. sheets of 1/2-in.
fir exterior plywood (Fig. 3). Begin by attaching the front and center
deck panels to the end-plates, stringers, and deck supports with #8 x 1
1/4-in. fh screws. The rear piece is cut in two and separated to form a
drain slot between the tent and the cabinet. Do not attach the rear part
of this panel as it is used as the base of the cabinet (Fig. 3C). C-clamps
will aid in positioning and holding the deck panels to the outer stringers
while being attached. Drill 1/4-in. holes in the deck to match the 17/64-in.
holes in the stringers and install the 1/4 x 4 1/2-in. carriage bolts on
each side of the outrigger slots.
Make the eight outriggers (Fig. 5) from 1 1/4 x 6-in.
clear fir and attach the support blocks. Make sure they slide freely in
the stringer slots. To keep the outriggers from extending while traveling,
drill 1-in. holes and install a ball-spring catch in the underside of each
outrigger at the inboard edge of the rear channel. To keep the slides from
being pulled completely out of the inner stringers, drive a screw 1/2 in.
from the inner end so it projects 1/8 in. as a stop. |
|
|
Figure 5. Trailer outrigger assembly.
|
| Before installing the outriggers permanently, tip the
trailer up on edge and paint the underside with a primer such Firzite and
one coat of outdoor enamel. |
|
|
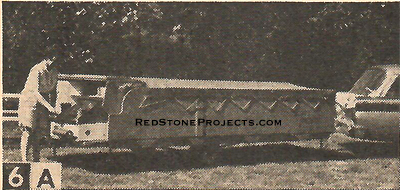
Figure 6A. With a Tent Trailer, you can even have
the luxury of one of Mom’s meals while you’re still on the way to the camp
ground. Just pull off the road, open the cooking cabinet (A), and let down
the table leaf - nothing to untie and fold up.
|
| This is a good time to install the four 3/4-in. pipe
flanges for the screw jacks (Fig. 2) that support and level the trailer
while camped. Bolt these to the underside of the deck, at each corner with
carriage bolts. Hacksaw each of the pipes and the nipples to size, then
assemble and weld as in Fig. 9.
When welding the nut to the pipe, thread the nut on the
shaft and put the shaft in the pipe to make sure they are aligned. In use,
the pipe end of the jack is screwed hand-tight into the flanges and the
threaded rod adjusted to place the pad on the ground. The lower nut is
pinned or welded to the threaded rod so you can raise or lower each corner
of the tent platform by turning the nut with a wrench. |
|
|
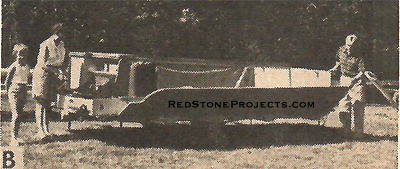
Figure 6B. When you reach your camping site, put
down the screw jacks, remove the tarp, and lay the sideboards on the extended
outriggers (B). Next, crawl in through the tent opening, set up the poles,
arrange your sleeping gear, and you’re ready to go fishing while Mom (working
again?) puts her finishing touches on the camp.
|
| Camping Kitchen
The food storage and cooking cabinet (Figs. 2 and 6) is
erected on the rear deck panel as in Fig 8, using 1/2-in. plywood over
framing ripped from soft pine. After cutting each part and checking its
fit, assemble the cabinet with glue, 1 1/4-in. finishing nails, and #8
fh screws as indicated. |
|
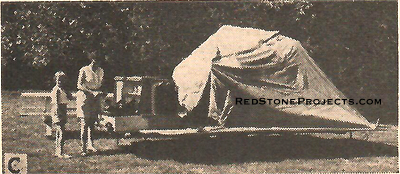
|
Figure 6C. Raising tent on the trailer platform.
|
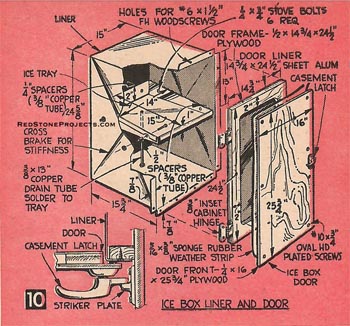
| Make the ice box liner (Fig. 10) from 26-gauge galvanized
metal with a shallow tray of the same material for the ice. Note the ice
tray is bolted to the side of the liner with spacers on the bolts to provide
air circulation. Cut a piece of corrugated metal roofing to lay in the
ice tray to keep the ice from sliding around or covering the drain hole
in the tray. At no time is there any accumulation of water in the box.
The food storage compartment is below this tray on shelves salvaged from
junked refrigerators. |
|
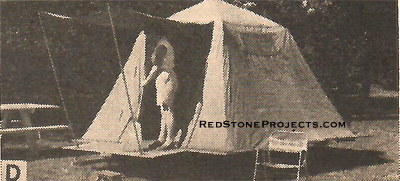
|
Figure 6D. Tent fully raised.
|
| Before installing the liner, calk all open joints inside
the cabinet and paint the wood surfaces with two coats of aluminum paint.
Then line the sides and bottom with 1-in.-thick glass fiber insulation.
Locate and drill a hole for the drain in the deck and position the 1/4-in.
- plywood bottom (Fig. 10). Next slide the liner in place and attach it
with weatherstrip cement and fh screws driven through the flanged edges.
Insulate the top of the liner before attaching the cabinet top. |

|
|
Figure 7. Alternate welded chassis frame.
|
| Check the inside dimensions of the installed liner before
sawing out the door frame (Fig. 10), because it must fit inside the liner
with 1/16 to 1/2-in. clearance. Attach the frame to the door front, allowing
a 5/8-in. projection at each edge.
Paint the inside surfaces with two coats of aluminum paint,
then install the hinges and cover the door with aluminum or galvanized
metal. If you prefer, a hardboard such as Presdwood can be attached with
weatherstrip cement and screws.
Cut the covering the same size as the frame and notch
it around the cabinet hinges.
A seal for the door is provided with 5/16 x 3/8-in. sponge
rubber weatherstrip. This is available at auto supply stores and comes
with a self-adhesive backing. Now hinge the door to the ice box (Fig. 10)
and attach a casement latch for closing. |
 |
|
Figure 8. Food Storage, Cooking Cabinet, and Stove
Drawer.
|
| Install Cabinet
Except for the tailgate and upper cabinet door, the cabinet
is now complete and can be installed (Fig. 2) by driving woodscrews and
bolts through the deck. Hinges for the tailgate are recessed flush into
the tailgate and deck. Support the tailgate in its down position with link
chains connected to eyebolts in the tailgate and cabinet. The upper cabinet
door is built-up of 1/4-in. plywood over a wooden frame, and two suitcase
latches (Fig. 8) are installed to hold the tailgate and cabinet door together
for traveling.
Water storage is provided with two 5-gal., military-type
water cans which set on shelves (Fig. 6) at each side of the cabinet. Water
cans of this type were standard equipment on most army vehicles and have
been readily available in surplus stores. Or you can purchase containers
of the same size and shape in polyethylene plastic at sporting goods stores.
If you use metal cans, you can solder a brass spigot in one can to make
water available without lifting the can from the shelf.
The 3/4-in. fir plywood side boards and front gate (Figs.
2 and 3) project 1 in. beyond each end of the trailer bed and are hinged
to the deck with butt hinges. Recessing the hinges flush with the surface
is recommended but not essential. Use two bolts (Fig. 3C) to attach each
hinge to the 1/2-in. plywood. Sideboards are held in the travel position
with two 1/4-in. hanger bolts and wingnuts at each edge of the front gate
and two into wooden blocks on the cabinet (Fig. 3B). |
 |
|
Figure 9. Trailer Leveling Jack assembly with
dimensions.
|
| Drill matching holes in the side boards and elongate
these as necessary to fit over the hanger bolts.
A ridge pole (Fig. 3A) to support the tarpaulin while
traveling and also act as a support while camp is set up for the cooking
fly is made from a construction grade 2 x 4. In use, it rests in a slot
cut in the back of the cabinet (Figs. 2 and 3) and a shallow notch in the
edge of the front gate.
Except for the painting, which you can do now, the trailer
is ready for installation of the tent. Stretch out the tent with the opening
to the front, then attach the hemmed edge to the deck and side boards with
#10 x 3/4-in. oval-head screws and finishing washers every 15-18 in. Make
up and install sockets (Fig. 9B) on the front gate to hold the tent awning
posts without guy ropes. |
|
|
Figure 10. Ice Box and door.
|
| For travel and storage, the trailer is covered with a
standard 8 x12-ft. tarpaulin (Fig. 6A) in which you have installed extra
grommets so there is one every 15-18 in. Then lace the tarpaulin with rope
through 1/4-in. eyescrews in the sideboards. We used Dot fasteners at the
back to fasten the tarp to the top of the cabinet. The tarp then folds
over in front and is pulled taut by the side lacing so no fasteners are
required there.
Next attach the combination tail light and turn signals
to the tailgate, wrap the wires with plastic tape, and loop them through
a hole in the end plate. Tack the wires in place along the stringers with
insulated staples and then run them through the hollow tongue to the coupler.
At this point, the wires are again taped and are attached to a connector
so the trailer lights can be plugged into the car's lighting system. The
receptacle for the connector plug is permanently attached to the car near
the hitch. |
|
|
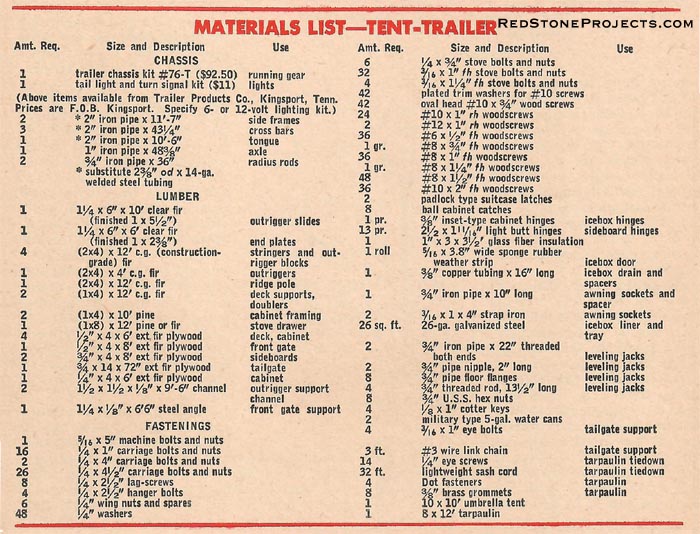
Tent Platform Trailer Materials List
|
| To ready your new camping rig for its maiden voyage,
erect the tent at home and set up the sleeping gear you'll use. When you're
ready to travel, slide the bed and other gear clear of the sideboards,
then collapse the tent, leaving the poles inside. Next fold up the sideboards
and spread an old tarp on top of the tent to protect it so you can stow
the rest of your gear on top.
Avoid sharp corners next to the tent fabric. Pack the
heaviest items forward to balance the cooking cabinet. A properly balanced
load will weigh 80 to 150 lbs. at the coupler. |
Any 2 Vintage Trailer Plans
$19.95 FREE Shipping |
|
Select 2 Vintage Travel Trailer Plans
|
|
|
|