Free Shipping
Build a Collapsible Trailer Plans
Vintage DIY Pop Up Camping Trailer
|
Build a Collapsible Trailer Plans
Vintage DIY Pop Up Camping Trailer
 |
PDF Format |
|
|
All Orders Processed
On a Secure Server
|
Price $12.95
|
|
Get a restored copy of these vintage Do It Yourself
Pop Up Trailer Plans with 16 Pages of Enhanced and Enlarged Figures
and Illustrations and Searchable Text.
|
We will email these plans, to the address provided
with your payment, within 48 hours following receipt of your order.
|
|
|More
Vintage Trailer Plans|
|
|

|
|
|
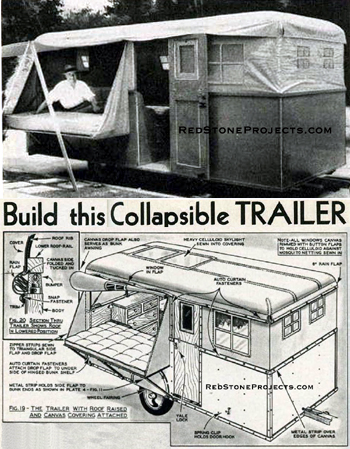
Build This Movie Star's Collapsible Trailer
Cheap, light and easy to build, this is the trailer you
have been looking for. Its collapsible top and out-slung bunks reduce traveling
costs and increase camping comforts of motorists.
|

|
|
Photo above shows Sir Guy Standing, movie star,
and trailer he designed. It shows the roof raised and bunks swung out.
Trailer here is modeled after Sir Guy Standing's trailer. Inset - Drawing
shows trailer with top down and bunk folded. This trailer has only one
bunk on left side.
|
| NOMADS of the open road will hail with delight this trailer
with the one-man collapsible top and the hanging bunks. It has everything!
Designed and originated by Sir Guy Standing, movie star, it was built by
California's leading auto trailer expert, Harry Brampton of Los Angeles.
It is so simple that the average man can build it. It is so light that
it can go anywhere, yet it will stand up under severe usage.
The top lowers onto the bottom body by the simple expedient
of fastening the roof frame to pipes, which slide down into larger pipes
set in the body. To raise, merely lift the top, insert plugs, and the top
is rigid, waterproof, and cool. Slack in canvas. is taken up by merely
adjusting the sliding pipes. In traveling, the top lowers onto the body,
is fastened down with auto curtain fasteners, and you're ready to ramble. |
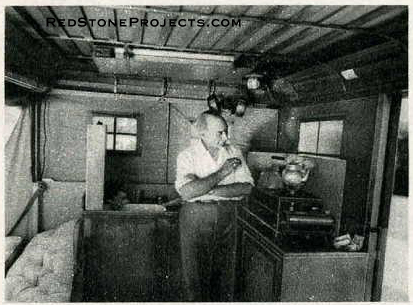
Here is the trim interior of Sir Guy Standing's
trailer. On the sink at the left is the portable
water tank. Note folding table strapped to the roof.
Pipes supporting roof and strengthening
guy wires can be seen in rear.
|
|
The body frame is covered with pressed wood, which is
durable and eliminates "road rumble." The windows of the trailer are celluloid
squares buttoned against mosquito netting, and in addition, a skylight
provides illumination. By hanging the bunks outside, maximum floor space
is obtained and extra ventilation afforded. Those are highlights of the
trailer; now to roll up our
sleeves and make it.
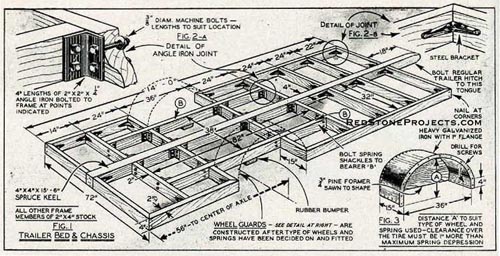
First take a selected 4x4 spruce, 15 1/2â€
long, for the keel. This projects 1 1/2' and provides the tongue, on which
you later fasten a regulation trailer hitch.
A 2"x4" frame is then constructed and attached to the
keel to form the trailer bed or foundation which is 14 feet long by 6 feet
wide. The keel and frame members are braced as shown in Fig. 1 by means
of pieces of angle iron and steel brackets.
By studying Fig. 1 it will be seen that the angle iron
braces are used only to strengthen the truss about the spring bearers.
Fig. 2A shows a typical joint. All remaining joints are strengthened with
steel brackets (Fig 2B). With the diagonally laid flooring in place, as
shown in Fig. 4, this construction will be found sufficiently strong and
rigid to carry any running gear. |
|
LAY the FLOORING DIAGONALLY OVER the FRAME
|
|
Complete details of the trailer foundation are
shown above. Running gear available to the builder is attached to the bearer
Marked B. Flooring, laid diagonally over the frame, helps strengthen it.
Angle iron and brackets
also brace it.
|
| Before nailing these cap strips in place, drill them
at the proper distances for the 1" pipes which should project through the
stripping. These pipes form part of the ingenious system employed in raising
and lowering the roof. They are secured along the frame at the points indicated
by ordinary pipe flanges, sawn off as shown in the detail drawing (Fig.
6) and bolted to and through the flooring with 1 1/2" lag screws. Therefore,
it is necessary to lay the flooring before proceeding further.
The floor should run crosswise to the keel in order to
increase rigidity. Make a neat job laying the grooved wood flooring by
slanting your nails towards the last board laid.
With floor laid and edges trimmed take the eight pieces
of pipe end bolt them in place. Although the specified length is given
as 42 inches, it is best to check this against your body frame so that
no more than 3/4" of pipe projects through the cap strip. The 3/16" plug
holes which you have previously drilled should be in line with the cap
strip. A steel bracket is added to each of the posts forming the door jamb
as shown in Figs. 4 and 7 - screw them directly into the floor. Now for
the pressed wood siding; interior detail, and such items as the door and
the upper jamb. |
|
Framework of The Trailer Body
|
Get a restored copy of these vintage Do It Yourself
Pop Up Trailer Plans with 16 Pages of Enhanced and Enlarged Figures
and Illustrations and Searchable Text.
|
| Better make the latter first. As shown in Fig. 7, and
the detail drawing, Fig. 9, the upper jamb is simply two pieces of 2" x
2" x 30" spruce hinged to the lower posts so that they may be swung down
and inboard when the top is lowered. The lag screw with head cut off (and
preferably rounded by filing) set into the head of the jamb forms a stud
which is used to engage suitable slots or holes in the roof frame. As you
may have wondered why no pipes are specified for the door side of the body,
we will explain that the door jamb posts take the place of pipe supports
on this side.
The door, if you do not obtain one from a sash and door
factory, can be made as shown in Fig. 8. It is in two sections; the bottom
part secured with pin butt hinges, and the upper part attached to the lower
with the type of spring hasp used on auto trunks.
You are now ready for the pressed wood siding. This comes
in large sheets and is sawed to fit. Trim the corners and lower edge of
the body with lightweight angle iron. Wood or brass trimming may be substituted
to save money but angle iron is recommended. Do not trim the top edges
of the body with moulding at this time as it will be utilized to hold the
canvas covering in place when you fit the top.
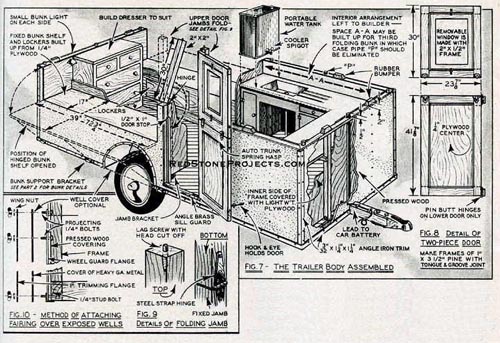
The interior may be finished off with plywood after you
have installed your lockers and other furnishings. The bunk lockers, running
along the sides and over the wheel guards allow for seats and form the
inner part of the bunk shelf. Interior detail is left to the builder. Harry
rigged a clever sink arrangement in Sir Guy's trailer whereby the water
tank, of galvanized iron, can be lifted off and carried to pump or spring
for fresh water. Such a tank is suggested in the drawings (Fig. 7). |
|
THIS ROOMY TRAILER HAS TWO ROOMY BUNKS
|
 |
|
The completed body without hinged bunks and collapsible
roof is shown here. Folding upper door jambs support roof on that side
and are hinged to lower jamb. Detachable wheel fairing in Fig. 10 is simple
and adds to appearance of trailer. Plywood covers exposed portions of interior
and also bunk lockers and other interior details.
|
| The exposed wheel wells can be covered with detachable
fairing if so desired but it is not essential. Simply use heavy gauge metal
sheet out to the exact contour of the opening and drill at intervals to
fit 1/4" stud bolts which are inserted behind the body frame and project
through the wheel guard flange. Slip the fairing over these bolts, add
a trimming strip of brass or aluminum and secure with spring washers and
wing nuts.
Now to tackle the top and complete the bunk. The upper
part and top of the collapsible trailer is held in place by eight 3/4"
pipes which slide in the pipes already set into the side and corners of
the lower body.
The 3/4" pipes are cut in 3 1/2-foot lengths and drilled
with 3/16" holes at six-inch intervals. A heavy eyebolt is welded into
the top of each pipe and it is attached to the lower roof rail by a large
eyehook. The smaller pipes slide in the larger ones and when you raise
the top you hold it up by pushing a large nail or cotter pin through the
holes. |
|
Constructing The Trailer Roof and Bunks
|

|
|
Sir Guy Standing rests on the open bunk of his
trailer. The tent poles hold the bunk flap up.
|
| To raise the roof, one end is lifted about six inches
and pegged, then the other end is raised 12 inches, and so on until the
top is in position. After raising top to test it for position, mark the
smaller pipes, remove and drill additional holes about one inch apart to
provide a means of adjusting the tension of your canvas in case it should
stretch or shrink, or in case of slight errors made when sewing the canvas.
Details of the upper pipe and pin are shown in Fig. 17.
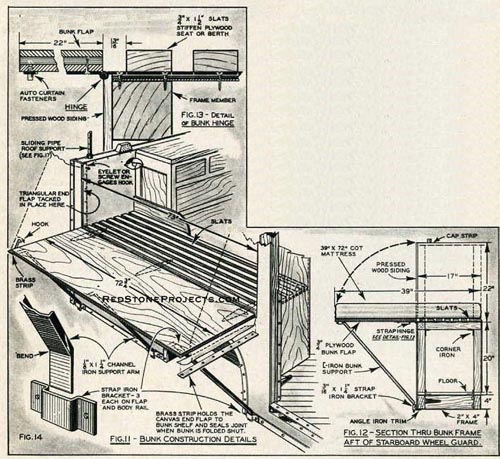
Before proceeding with the roof however it is well to
complete your bunk flaps. As previously explained, the bunk foundation
rests on the locker seats and projects, on hinges, from the trailer body.
The hinged portion, which is fully covered in Figs. 11 to 14., can be built
up to suit or as shown with a simple sheet of 3/4" plywood. Place auto
curtain fasteners under the bottom edge of the flap. These are to hold
the bunk curtain when bunk is extended or the rain flap when top is down
and bunk folded.
Channel iron or angle iron braces are used to support
the bunks when open. Make three for each side bending each end of the brace
as shown and cutting off the flange where the iron fits into the bracket.
Six strap iron brackets are needed for each bunk; three being attached
to the underside of the shelf and three to the lower body moulding. Bolt
or rivet them in place. |
|
|
The bunks are swung out and supported with channel
iron arms while in camp. When traveling, bunk folds flush with body. A
standard cot mattress can be used and store inside when on the road. A
divided mattress is better.
|
| The bunk foundation shown is designed to accommodate
a standard 39" x 72" cot pad. Sir Guy uses a specially made mattress and
those who feel like spending the extra money will find that a divided mattress
is handier and will solve the otherwise difficult problem of stowing the
mattress when the bunk is folded.
Now for the roof. Your first consideration in making the
roof is to lay out the two frames (see Fig. 15), which are of 2" x 2" spruce.
The inner frame stands about 8 inches above the lower and is attached to
it by means of channel iron ribs which are spaced 24" apart.
These ribs should be bent on a radius of 8 inches as shown.
The easiest way to accomplish this is to heat the iron red hot, clamp it
at one end and bend it over a form with a sledge hammer, bending slowly.
Of somewhat larger width and of angle iron, the corner pieces are bent
and crimped to provide smoothly curved supports at each of the four corners
of the roof. For the slats, use straight grain pine, 1 5/8" wide by 5/16"
thick, to run lengthwise of the trailer top. As shown in Fig. 16., the
ribs are run through the top frame members so that slats are flush with
this frame when bolted in place. Use stove bolts to attach the slats. |
|
HEAT ALL CHANNEL IRON RIBS BEFORE BENDING
|
|
Complete layout of the roof framework is shown in the
above drawings. The channel iron ribs should be heated red hot and bent
slowly over the form with sledge
hammer.
|
Get a restored copy of these vintage Do It Yourself
Pop Up Trailer Plans with 16 Pages of Enhanced and Enlarged Figures
and Illustrations and Searchable Text.
|
| It is advisable to leave out the slats within the space
indicated as the skylight which is later sewn into the canvas covering
at this point.
A skylight frame is shown but is not essential as the
slats themselves are sufficient edging at this point.
Now attach the upper pipes to the outer roof frame and
raise in position. This is your final checkup before putting on the canvas
and it is at this time that you mark off the upper pipes and drill the
additional holes mentioned previously. |
|
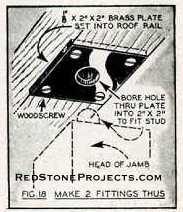
|
This detail shows how door jamb stud is fitted
into a metal plate in the roof rail.
|
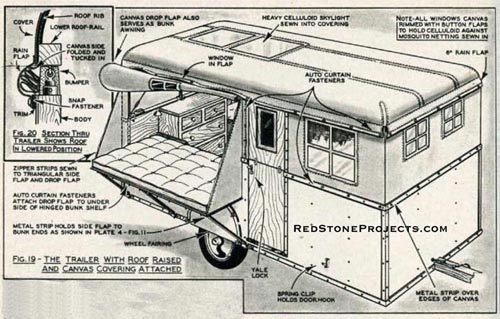
| If you are going to sew the canvas covering yourself,
the windows will probably be your chief difficulty. If in doubt, have them
made up by a tent and awning company.
Windows should be canvas rimmed with button flaps to hold
the celluloid squares against the mosquito netting which is sewn into the
canvas. The skylight, of extra heavy celluloid, is sewn into the covering.
Around the entire edge of the canvas top sew a 6-inch
rain flap and insert auto curtain fasteners as shown (Fig. 19). When the
top is lowered this flap fastens to fasteners set on the trailer body to
hold all snug and tight.
The canvas sides are attached to the lower body by the
moulding which is now applied. To fit, first lay the canvas and raise the
roof to the proper position. Then draw the sides through the moulding (which
is preferably of metal) until it is taut and screw down tight trimming
off the extra canvas with a razor blade. Auto curtain fasteners are placed
along the moulding to correspond with those set along the rain flap. |
|
TRAILER PROVIDES ALL the COMFORTS for TOURISTS
|
|
|
Canvas sides are held firmly to body by metal
moulding. Curtain rolls down and fastens underneath to cover bunk completely,
or can be raised on tent poles. Celluloid windows can be removed letting
in air through netting.
|
After fitting the canvas top you can install your bunk
curtains. They are comprised of two triangular side strips and a curtain
which is sewn to the top and attached to the side strips by lengths of
zipper stripping which is sewn to the canvas. A window is located in the
main flap and auto curtain fasteners set into the lower edge coincide with
the fastener on the underside of
the bunk shelf. |
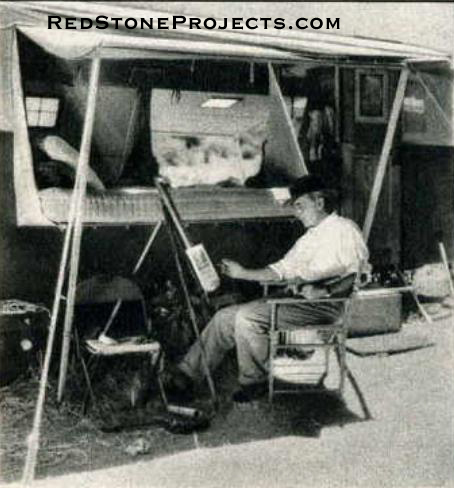
|
Sir Guy Standing, Paramount star, uses his trailer
for fishing and painting expeditions.
Here he is painting in the shade of the bunk curtain
supported by tent poles.
|
| Tent poles, which are easily packed inside when traveling,
and guy ropes raise the flap as a sunshade when set up for camp.
A chest of drawers, such as shown in the illustrations,
is a necessity rather than a luxury and can be simply built. Sink, stove
and icebox you will arrange to your own satisfaction and purse. A folding
table can be strapped to the inside of the roof when not in use.
Lights will be needed of course and you. should install
an outlet plug to carry a lead to your car battery. Or you may pick up
and install a battery in the trailer itself, belting an old auto generator
to one of the trailer wheels for charging purposes.
For added rigidity in high winds you will do well to install
light guy wires crisscrossed at either end of the trailer from roof frame
to body. |
|
Any 2 Vintage Trailer Plans
$19.95 FREE Shipping |
|
Select 2 Vintage Travel Trailer Plans
|
|
|
