Free Shipping
Vintage Calico Truck Camper Plans
Uses Lightweight Wood Laminate Construction

|
Vintage Calico Truck Camper Plans
Uses Lightweight Wood Laminate Construction
 |
PDF Format |
|
|
All Orders Processed
On a Secure Server
|
Price $12.95
|
|
Get a restored copy of these Vintage Calico Truck
Camper Plans with 11 Pages of Enhanced and Enlarged Figures and
Illustrations and Searchable Text.
|
We will email these plans, to the address provided
with your payment, within 48 hours following receipt of your order.
|
|
|More
Vintage Trailer Plans|
|
|

|
|
Start a Rebellion
Build a Calico Camper
Looking for a camper the breaks away from the overweight,
oversize, tin-box syndrome?
Build this one yourself.
By W. B. Breyer
|

|
|
Instant back porch appears when you when
you lower the tail gate, a handy feature in a muddy campsite. Those large
drawer pulls on the on the back of the camper are handholds to help you
make the big step from the ground to the tailgate.
|
| I've always wanted a truck camper. But to my mind most
of the rigs I see on the road are too big, too heavy, too expensive - and
just plain boxy. So, I rebelled and built my own. Its light weight and
low wind resistance make it fun to drive. Its "Calico Conestoga" look
draws stares wherever I go, and that makes it fun to drive too.
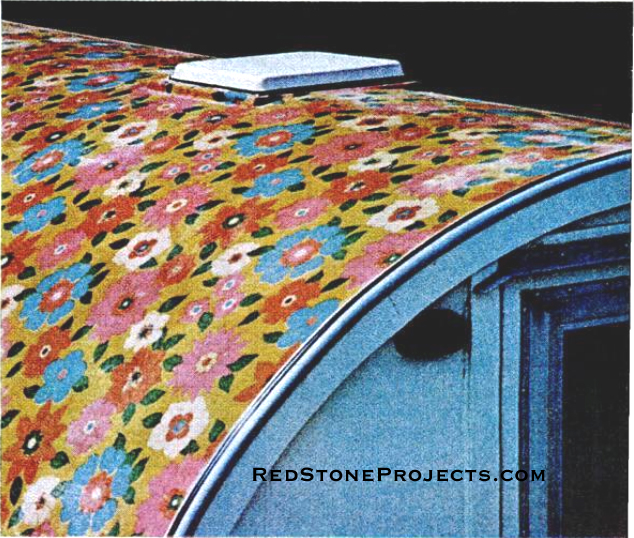
The design is simple. Laminated redwood ribs arch across
the truck bed every 16-in. like top bows on a covered wagon. Over this
you apply plywood wall paneling, good side in. This pre finishes the interior.
Over the paneling I applied cotton duck in a flower pattern, plus fiberglass
cloth and polyester resin. If you don't want a flower-power model like
mine, just leave off the cotton duck. |
|
|
Roof vent/skylight can be opened from the
inside to provide ventilation on a hot day. Here it's installed between
the fifth and sixth ribs, but can just as easily go farther forward, between
the fourth and fifth ribs, if you like.
|
| In my case, the camper is only a shell. You could build
in stove and sink, but this limits interior space to one function. My interior
additions are just a pair of 30-in mattresses mounted crosswise up front.
Side-by-side, they provide queen-size comfort. Stacked, during the day,
they form a davenport and make room for a foursome of cards at night. When
I'm not camping, I lift the beds out and have the entire truck bed to haul
my tools.
You build the camper by constructing subassemblies for
ribs, sills, back wall, matins, and overhang. All assemblies fit through
a standard door, so you can start work in your living room if you have
to. |
|

|
|
Unique is the word for the Calico Camper.
From its unusual profile to its flowered exterior, it's like nothing you've
seen before. Slanting cab overhang and rounded corners cut wind resistance
for easy cruising and good gas mileage. The camper is so light, it barely
affects handling. You'll probably leave it on the truck even when you're
not camping.
|
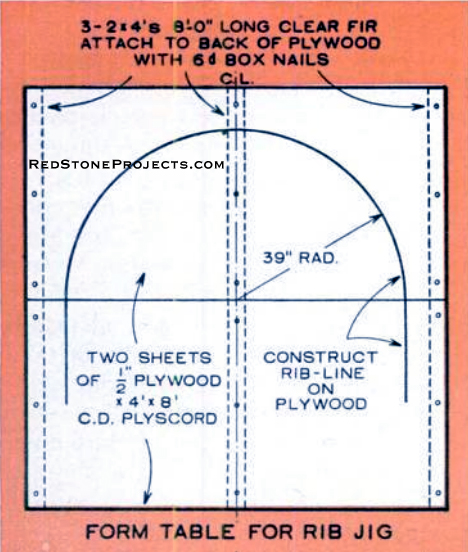
| Begin with The Ribs
Each of these is laminated from eight thin strips of redwood;
the only stuff I could find clear enough to bend without breaking. Fur
accurate bends. you'll need to make a laminating jig, the accompanying
drawings show you how. The plywood and 2 by 4s that make up the jig are
later used as parts in the camper's rear wall and front overhang.
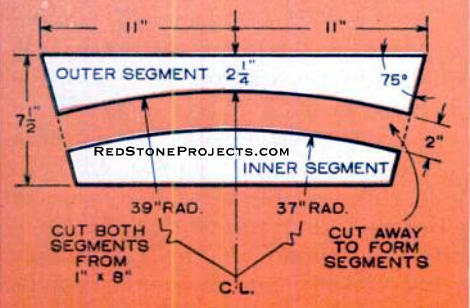
For my truck, a '69 Ford, the outside rib radius is 39-in.;
you may have to modify the jig for your truck. To determine the inside
radius, subtract the thickness of a rib from the outside radius. In my
case, the eight rib plies added up to a total thickness of about 2-in.
This made my inside radius 37-in., so I cut the inside jig forms to that
radius.
Before you laminate a rib, smear some paste wax onto the
jig. The wax acts as a parting medium so you can remove the ribs easily
once the glue dries. Brush glue onto the rib plies, leaving the two outside
faces bare, and place the plies on the jig. Starting from the center of
the curve and working out in both directions, clamp the outer forms in
place.
While you're waiting for the glue to dry, work on the
sill assembly and the front and back walls. Before you start framing, though,
you'll need to know your window sizes. I used ordinary storm windows in
the door and the wall behind the cab. Side and front windows are 6-in x
14-in. trailer units made by If Hehr Mfg. Get them at a trailer parts store.
While you're there, pick up a 9-in. x 9-in. roof vent with screen. |
 |
|
Side windows are small enough to fit between
the ribs without framing modifications. Mounted 18-in above the sills,
they provide plenty of head and foot ventilation while you sleep. The same
type of window is used in the in the cab overhang.
|
| Make the sills and front wall from a sheet of 3/4-in.
AC exterior plywood. Keep the good side up and out wherever applicable.
Glue and screw all joints and half-lap the sill joints. Cut a 3/4-in. x
3/4-in. rabbet along the bottom edge of the front wall and fasten to the
sill assembly.
The Back Wall
Here you need two new sheets of 1/2-in. CD Plyscord. Rout
a half-lap joint on one long edge of both sheets, keeping track of the
faces on the two C sides will be on the outside. Glue the two sheets together
and tack with brads to hold while the glue dries. Keeping the lap joint
vertical, lay out the curved shape (same as the rib curve) and saber-saw
the wall to size. When you've bent the last of the ribs, use the jig framing,
ripped into 2 by 2s, to Frame the rear wall. Glue, nail, and half-lap all
joints. |

|
|
Clearance lights at the front corners of
the camper are an aid for nighttime maneuvering in unimproved campsites.
Note the extruded aluminum trim with plastic insert that's run around the
edges of the camper. It's sold by trailer dealers.
|
|
Figure
1. Calico truck camper assembly with dimensions.
|
Get a restored copy of these Vintage Calico Truck
Camper Plans with 11 Pages of Enhanced and Enlarged Figures and
Illustrations and Searchable Text.
All Orders Processed
On a Secure Server
|
|
| Purlins and edge nailers provide spacers that hold the
ribs at proper intervals, and supply blocking between ribs to nail the
edges of the paneling to. Glue and nail the blocking to the purlins. The
blocking should be cut slightly wider than the thickness of a rib, then
planed down, flush with the ribs once the camper framing has been assembled. |
|
|
Form Table for Rib Jig
|
| Now to go to work on the overhang. Use the two sheets
of plywood from the bending jig, plus another sheet of 1/2-in. Plyscord.
One sheet from the bending jig is cut to the rib radius and forms the wall
of the overhang. The other makes the floor of the overhang. and the Plyscord
forms the slanting nose member. When you've got the overhang roughed into
shape, you are all set to start putting everything together.
Place the sill assembly on a pair of horses, or on the
truck bed. Fasten the rear wall to the sill and attach some temporary bracing
to hold the parts at right angles. Attach the ribs at proper intervals,
running screws up through the sills into the blocking between the gussets.
Run a tape measure from the bottom of a sill up along
each rib and mark the ribs at 48-in., 98-in., and 144-in. Attach the purlins
at these points, making sure the blocking is centered on the marks. Now
plane the blocking flush with the ribs and install the framing for roof
vent and windows.
At this point, set all nails, and spackle all nail and
screw holes. Sand everything that needs smoothing. and seal the framework
inside and out with shellac. If you want to leave the ribs natural, varnish
them. Then paint everything else but the outside of the slanting nosepiece.
This will be glassed later, as bare wood gives better adhesion. |
|
|
Rib Clamps
|
| Next Comes the Paneling
Be sure to use plywood paneling, not the type made from
hardboard. Apply a thin ribbon of panel adhesive to the tops of the ribs,
the edge of the sill, and the edge of the blocking. With the good side
in, start a sheet of paneling at the sill. I used ring-shank drywall nails
at the sill and rear wall, and anodized Ardox spiral nails into the ribs. |

|
|
Rib Laminating Jig
|
| Nail up along the ribs, folding the paneling into the
curve as you go. Don't cut out the window hole; that only makes for problems
when you start to fiberglass. Finish the panel by nailing into the edge
of the blocking. I nailed close; 2-in. or 3-in. apart, at points of high
stress, and about 8-in. apart going up the straight section of the ribs.
Now move on to the second panel, cutting it out to fit
around the roof-vent framing. Apply the third panel, and finally rip the
fourth panel to size (about 15-in. wide) and nail it in place.
Glue and bolt the overhang onto the front rib, using the
stove bolts from the rib jig. With a rasp, fair the edge of the curved
slanting portion of the nosepiece to the proper angle to receive the paneling.
The leftover portion of the fourth panel provides more than enough material
to cover the sides of the overhang.
Adding the "Flower Power"
This is pretty much standard boat-glassing procedure.
The only difference is the decorative cotton duck that goes on before the
fiberglass cloth.
After glassing, cut out the window openings. If you use
power tools, keep in mind the fact that fiberglass dust is highly abrasive
to motor bearings, not to mention your lungs. Be sure to wear adequate
breathing protection. Now you can set in all the windows and the roof vent.
Trim around the bottom of the back wall where the wall
fits inside the truck box with 1-in. aluminum angle. This will prevent
splintering when mounting and unmounting the camper. I trimmed all exterior
edges with aluminum molding, the kind with a plastic-bumper insert. It
cost me 22 cents a foot at a camper parts store.
Before installing the camper on your truck, stick plastic-foam
seal under the sills where they contact the box. You may need a double
layer in some places if your truck box isn't perfectly level around the
top.
When the camper is in position on the box, hold it in
place with C clamps and drill eight evenly spaced 3/8-in. holes down through
the sills and lip of the truck box (four on each side). Slip drilled scrap
blocks under the truck-box lip to prevent metal distortion, and bolt the
camper in place with 3/8-in. bolts. Seal the rear wall of the camper inside
the truck box with furnace-duct tape.
Although Michigan law doesn't require clearance lights
on a truck under 80-in. wide, I added several as aids in maneuvering around
unimproved campsites in the dark. Check the requirements in your state
before you hit the road. |
Any 2 Vintage Trailer Plans
$19.95 FREE Shipping |
|
Select 2 Vintage Travel Trailer Plans
|
|
|
