Free Shipping
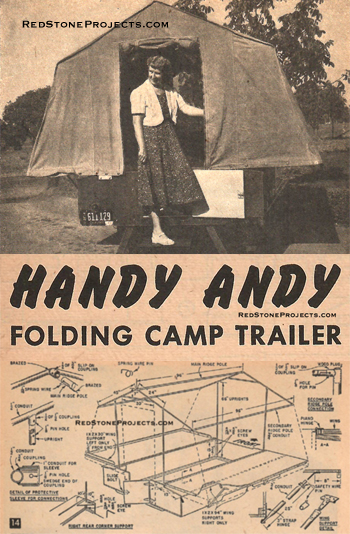
Handy Andy Folding Camper Plans
Build a Vintage 1954 Lightweight Tent Trailer
Part 1.
Build a lightweight trailer that carries everything you
need for setting up camp, fishing, or boating.
By CLINTON R. HULL
|
 |
 |
|
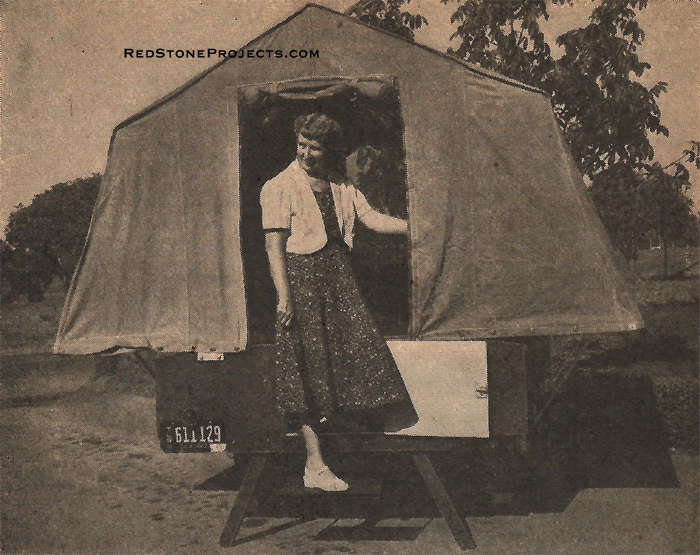
Your camp trailer blossoms out into a full-fledged
"home away from home" in about 10 minutes.
|
| CAMPING out doesn't have to include bugs, rough ground,
water running under the floor and laborious breaking and making camp. With
Handy Andy, you carry your tent with you (taking about 10 minutes to set
up) in a light trailer that tows like a shadow and also carries your boat.
You can build Andy for $250-$275 and it weighs only 640 lbs. Inside there's
sleeping room for three adults or two adults and three children with space
for cooking in bad weather. With its 20-in. road clearance, you can haul
Andy any place you can drive a Jeep or pick-up truck-right back to where
the trout are hungriest. |
|
|
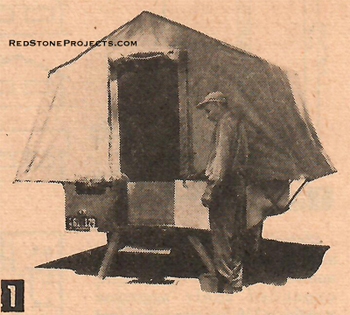
Figure 2. Wings unfold and tent goes up in about
ten minutes, above. Screened windows at front and back keep out bugs, yet
provide plenty of ventilation. Folding to a low silhouette, Handy Andy
carries boats up to 14 ft. long plus an outboard motor. Camping and cooking
gear are stored within handy reach in the wheelboxes.
|
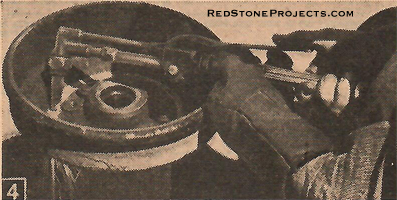
| A 1932 Plymouth's front axle furnished the running gear.
I picked this one because it has more road clearance than other readily
available cars. Make sure the bearings, tires and tubes are still in good
condition. Since the spindles will be welded solid, play at this point
is not important. You should be able to pick up these units in a junk yard
for $15-$20. Strip the axle, leaving only the springs, shackles and wheels.
Burn away the brake drum and steering arms (Fig. 4). Clean off all dirt
and grease. |
 |
|
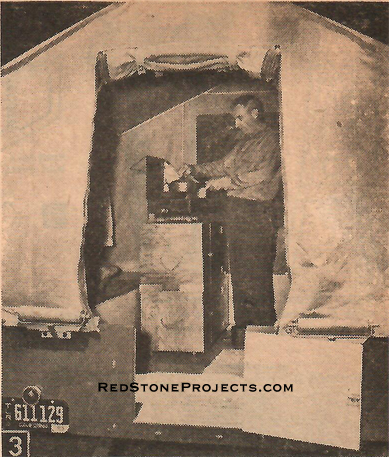
Figure 3. In bad weather there's plenty of room
to cook and eat inside tent. Portable "grub" boxes form table.
|
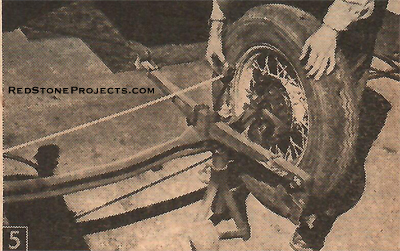
| Set the complete unit on supports so tires clear the
ground (Fig. 5). Drive wooden wedges between axle and spindle housings
to hold wheels steady as you align each wheel fore and aft. Measure from
centering point in the opposite spring to both front and rear edges of
the rims (Fig. 5). Arc weld each spindle-axle joint strongly. Repack front
wheel bearings with grease. |
 |
|
Figure 4. Welding Torch burns brake drums off
wheels.
|
| The trailer frame is welded steel channel (Fig. 6). Lay
out the sides and heat the spot where sides bend to come together at the
front. Notch out cross-members to fit into the channel sides and weld along
both sides. Weld on spring hangers and the eight channel mounting brackets
for attaching body to the trailer bed. |
|
|
Figure 5. Aligning wheels fore and aft before
welding spindles. Measure from opposite centering pin to both sides of
the of the wheel's rim. Wedge wheels while welding. Leave spring shackles
for welding to frame.
|
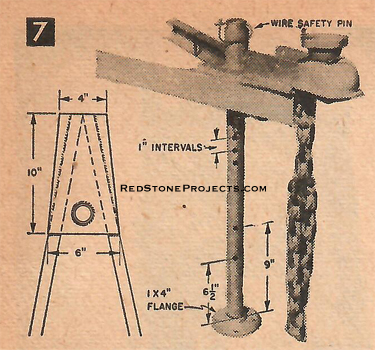
| Tongue stand (Fig. 7) is made from 1-in. pipe cut 26
in. long and threaded at one end. A chunk of 1 1/4-in. pipe welded to the
gusset at the front of the frame channels forms a sleeve for the stand
to slide up and down in. File out ends so stand slides easily. Drill the
holes that allow you to level the trailer on uneven ground and two holes
near the flange to hold it in the Up position; the 9-in. hole is used when
carrying a boat. |
Get a restored copy of these vintage Handy Andy Folding
Camper Plans with 21 Pages of Enhanced and Enlarged Figures and
Illustrations and Searchable Text.
All Orders Processed
On a Secure Server
|
Figure
6. Welded Steel Trailer Frame
|
|
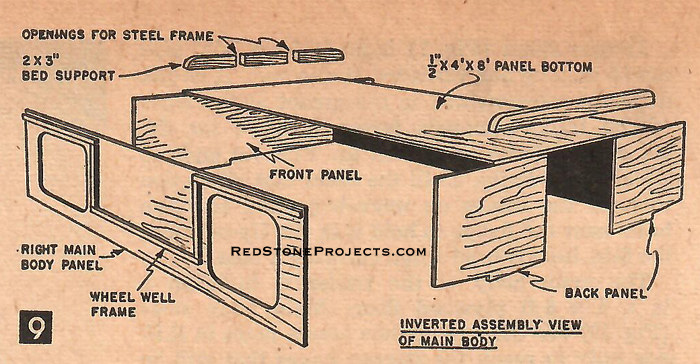
| The main body of the trailer is built on a 1/2 x 4 x
8-ft plywood floor. Main body sides (Fig. 10) are cut and include access
holes in R.H. side only to reach the storage boxes that will be added later.
Glue (Weldwood) and nail (5d) sides to floor and to the ends. Next, add
2 x 3-in. under-bed support beams across the back and front. At the vertical
corners, glue and screw (#10 x 1 3/4-in. fh screws) sides and ends to 2
x 2 corner posts. Round the interior corners of these reinforcing posts. |
|
|
Figure 7. Tongue stand, welded gusset plate with
ball and socket hitch welded to plate and safety chain.
|
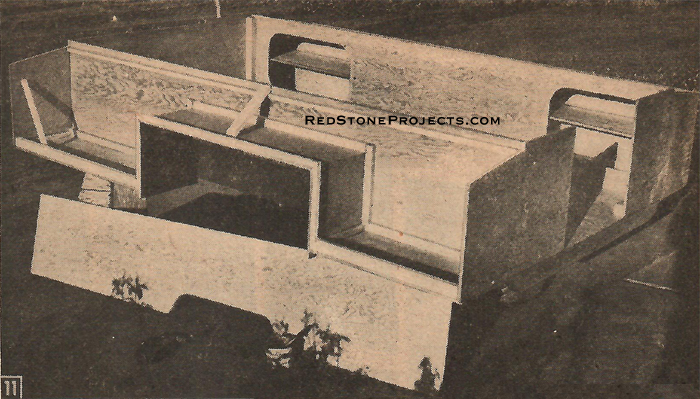
| Storage boxes along both sides and the wheel wells are
fabricated from plywood sections cut according to Fig. 10. Frame the wheelboxes
with 3/4 x 3/4-in. pine nailed to the main body sides with 4d nails driven
clear through and clinched (Fig. 11). Use a heavy hammer with a maul as
a backing block. Drive 5d nails into the edges of the plywood panels. Build
on the bottoms of the wheelboxes and the cover of the wheel well, adding
3/4 x 3/4-in. strips around the outside edges. Clinch nail the wheelbox
sides to the frames as you did to the main body. Reinforce corners with
vertical 3/4 x 3/4-in. posts (Fig. 12). |
|
|
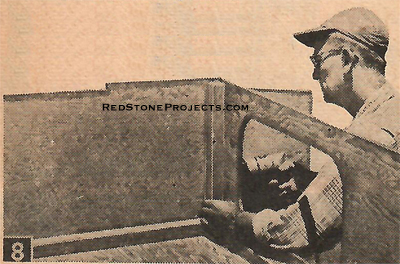
Figure 8. Nailing 2 x2 corner, side and end reinforcing
cleats.
|
| Now is a good time to sand the under-body and prime it
with Firzite followed by two coats of a good grade of auto enamel. For
additional protection against leaking and abrasion from gravel, coat the
undersides with a thick coat of brushing type auto body undercoater (available
from auto supply stores or mail order houses). |
|
|
Figure 9. Inverted Assembly View of Main Body
|
| Slope the top edges of the main body sides with the outboard
side 1/4 in. lower than inboard edge to form a gutter along top edge. This
gutter prevents capillary attraction from wicking moisture inside the main
body. You may have to use braces to bring the top edges of the main body
sides into an in-line position for fastening the bed-wing piano hinges
later (see Part 2). Use caulking compound along joint between wheel-box
cover panels and main body sides. |
Get a restored copy of these vintage Handy Andy Folding
Camper Plans with 21 Pages of Enhanced and Enlarged Figures and
Illustrations and Searchable Text.
All Orders Processed
On a Secure Server
|
Figure
10. Front View of End Panels, Main Body Side Panels, and Wheel Box Panels
|
|
| Removable doors to the left wheelbox only are fitted
to the sawed openings (Fig. 10). Short 1/4 x 1/2-in. wood strips hold tops
of the doors in, and the door push-bolts secure the bottoms. The frame
around the inside of the doors prevent them from leaking. |
|
|
Materials List Handy Andy (Part 1)
|
Plug all exposed nail and screw holes with Plastic Wood,
leaving the plugs a bit high to allow for shrinkage. When dry, sand smooth
and prime trailer body with Firzite. Follow with one prime coat and two
coats of auto enamel.
|
|
Figure 11. Reinforcing 3/4 x 3/4-in. nailing strips
are clinch-nailed around outside of wheelboxes for attaching sides.
|
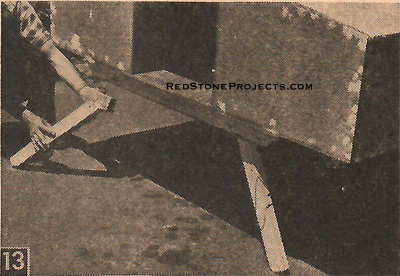
| Retractable leveling legs are cut from 2 x 3-in straight-grained
fir and are mounted with 1/4 x 5-in. carriage bolts through the under-bed
support beams and 2 x 3 x 6-in. blocks centered directly in line with the
carriage bolts (Fig. 13). Secure blocks to main body floor with 8d nails.
Legs should be about 3 in. longer than the distance from trailer bed to
ground. Round off both ends. |
|
|
Figure 12. Corner posts and shelves installed
in wheelboxes.
|
| Drill 1/8-in. dia. holes edgewise about 2 1/2 in. from
each end, drive 16d nails into these holes and clinch them. Saturate lower
ends of legs with shellac. Lift each leg tightly against the trailer floor
and drill a 3/6-in. hole through the ends of the under-bed support beams
and the legs. "Safety pins" bent up from old coat hangers fit through these
holes to keep the legs up in travel position. When down, the legs wedge
into the ground to stabilize the trailer regardless of the ground's contour. |
|
|
Figure 13. Leveling legs swing down and wedge
against ground at front and back, fold up and are held by safety wire against
underside of body while traveling.
|
| Part 2 will tell how to build the frame for the
canvas top, finish the top of the trailer and fit it for hauling a boat. |

|
|
Part 2.
|
| WHEN the main body and wheelboxes are completed (Part
1), you'll be set to add the wings that fold out to form bed space and
the tent top. Bed wings are each 34 in. wide, but a 1 x 2 support rib runs
lengthwise approximately 19 in. from edge of the right wing, while shorter
ones run across the ends of the left wing. When in the outstretched position,
1 x 2's are under right wing and on top of left wing, so they will fold
together. |
|
|
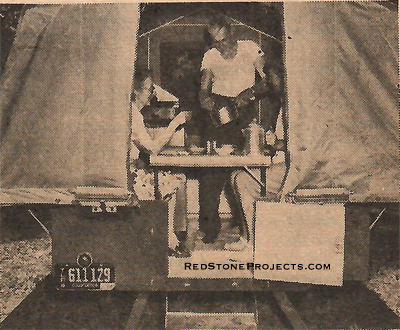
When bad weather forces you to cook and eat inside,
a folding table fits neatly in the aisleway.
|
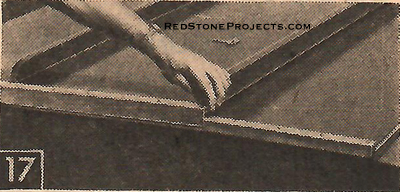
| When the bed wings are assembled, sand edges smooth and
prime wings with two coats of Firzite followed by one coat of matching
enamel. Screw the continuous piano hinge to the edges of the wings, then
lay them together on the main body in the closed position, with left wing
folded under right wing. Caulk along the top edges of the body between
hinge and sides, align the tops and screw fasten hinge. |
Get a restored copy of these vintage Handy Andy Folding
Camper Plans with 21 Pages of Enhanced and Enlarged Figures and
Illustrations and Searchable Text.
All Orders Processed
On a Secure Server
|
Figure
14. Trailer Tent Frame
|
|
To prevent leaking at the fore and aft edges of the bedwings
while traveling in a rainstorm, screw on 1 x 1 x 34-in. angles bent up
from 20-gage galvanized sheet iron or aluminum at each end of the left
wing. Install 1 x1 1/2 x 34-in. angles on the right wing which overlaps
the left (Fig. 17). Round off exposed corners to prevent chaffing the canvas
and set the angles in caulking compound.
|
|
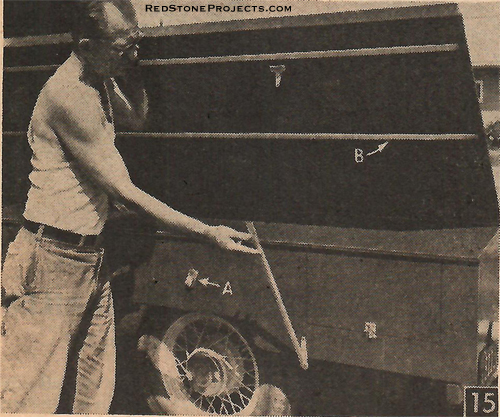
Figure. 15. T-hinges engage the thin wall conduit
supports at each end of the extended bed-wings. Sheet-metal clips mounted
at an angle (A) hold the braces in traveling position. Adhesive tape painted
with aluminum paint or lacquer over rubber strips (B) protect right wing.
Angles over ends of wings to rainproof interior.
|
| When the angles are in place, apply a strip of 3/8 x
3/4-in. adhesive rubber weatherstrip (the kind that is sold in auto supply
stores to replace car door weather stripping) to the top of the closed
left wing 3 in. from the edge and another strip 18 in. from the hinge plus
a bridging strip between them at the front only. To prevent discoloration
of the paint on the right wing, which rides on the rubber strips, cover
the strips with 3/4-in. adhesive tape and coat the tape with two applications
of lacquer. |
|
|
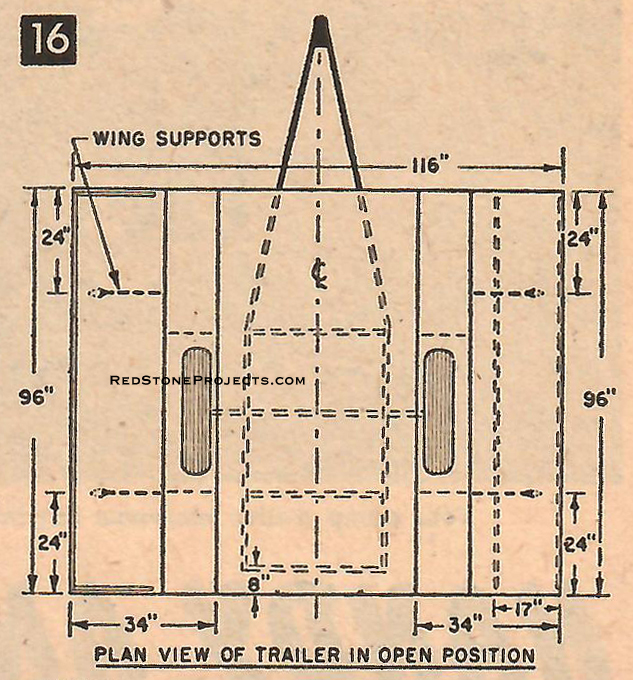
Figure 16. Plan View of Trailer in Open Position
|
| Fig. 14 shows the construction of the tube braces that
support the bed wings in the out position. The thin wall conduit tubing
is flattened at the bottom and bolted to the hinge. At the top, the hinge
slips into the flat end of the tubing to support the wings, and a bent-wire
safety pin keeps it from flying up in a high wind. Bent sheet metal clips
(1 x 8 in. x 20 ga galvanized steel) holds the braces alongside the wheelboxes
in travel position (Fig. 15). |
 |
|
Figure 17. Bed wing overlap and edge treatment.
|
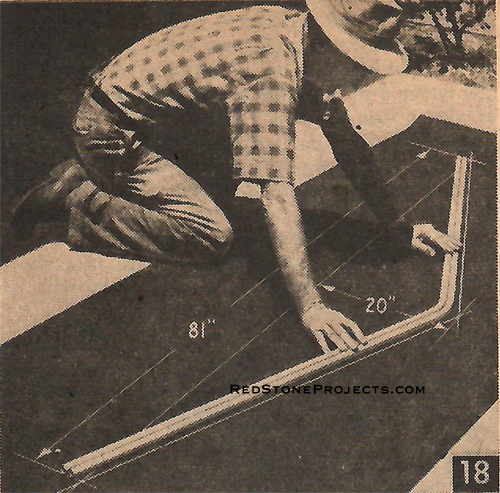
| Now, let's get at the metal frame that supports the tent
top (Fig. 14). Lay out the top angle on a piece of plywood or roofing paper
according to Fig. 18 as a guide for bending the galvanized thin wall electrical
conduit. Cut two 1/2-in. slip-on conduit couplings on a 63-deg. angle and
slip them onto the upper ends of the four upright tubes that support the
sloping roof pieces. Clamp these 1/2-in. couplings in a vise and fit them
to the roof support tubing with a half-round file. Mark the correct welding
positions as in Fig. 19 to assure the center of the roof peak will be over
the center of the trailer's body. |
|
|
Figure 18. Laying out angle for end frames to
support tent.
|
| To support the ridge pole that runs fore and aft between
the peaks of the end supports, cut and fit 3/4-in. couplings to the aft
side of the forward peak and to the forward side of the aft peak. Secondary
ridge poles support the side edges of the tent roof and include 1/2-in.
couplings on each end of the secondary ridge poles to slip over the ends
of the end frame. |
 |
|
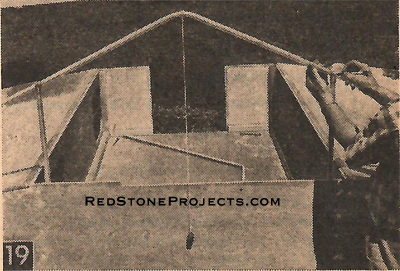
Figure 19. Plumb bob and short columns aid in
marking points for couplers along end frame for brazing.
|
| When all the couplings are fitted, braze them to the
end supports, making sure the column support couplings are vertical and
the ridgepole couplings are horizontal. One way to do this is to insert
a short piece of conduit in the ridge-pole socket, while brazing the socket
to end frame laid horizontally on a floor. Check to keep the short conduit
vertical in both directions as you braze the coupling to the end frame.
Be sure to remove the stub piece to keep them from becoming brazed fast.
Braze the 30-in. cross-braces at the same time. With the ridge-pole sockets
brazed on, support the end frame on stub columns and braze on the column
connectors. |
|
|
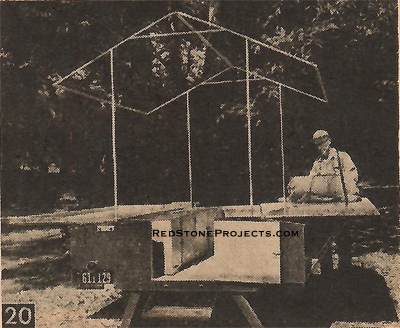
Figure 20. Completed thin wall frame, ready to
spread canvas.
|
| Also braze the couplers onto the secondary ridge poles.
To protect these sockets from being crushed in hauling, slip scrap pieces
of 3/4-in. conduit over the 1/2-in. couplings and short pieces of 1-in.
conduit over the 3/4-in. center ridge-pole sockets. These protective sleeves
should be 1/8-in. shorter than the sockets, so you can swedge out the in-side
socket to hold the sleeves in place. The ball end of a ball peen hammer
makes a good swedging tool. |
Get a restored copy of these vintage Handy Andy Folding
Camper Plans with 21 Pages of Enhanced and Enlarged Figures and
Illustrations and Searchable Text.
All Orders Processed
On a Secure Server
|
Figure
21. Trailer Tent Cover Details
|
|
| File and sand smooth all tubing sockets and conduit ends
which enter the sockets. Set up the frame on the trailer to make sure everything
fits okay. Vertical supports at the back corners fit in the plywood gusset
and screw-eye as shown in Fig. 14 and in two screw-eyes at each corner
in front. You should have to force the end frames apart slightly to accept
the 3/4-in. ridge pole and pull in the ends to meet the sockets on the
secondary ridge poles. |
|
|
Materials List - Handy Andy (Part 2)
|
| When everything fits right, disassemble the frame and
set it up again on the floor without the upright columns. Drill a 1/8-in.
hole into the inner side of the sockets and end frames where the wire hooks
(Fig. 14) can hold the frames together without any projecting points to
damage canvas. Color code matching ends, so you can assemble them quickly
without fumbling. When traveling, wrap the ends of the frames, columns
and ridge-poles with cloth or burlap and put them in the bottom of the
trailer. |
|
|
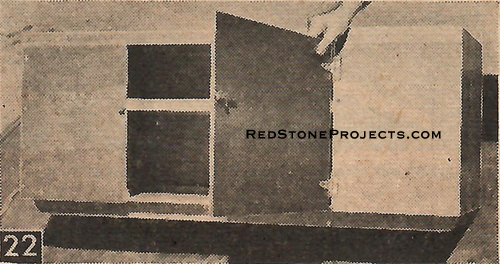
Figure 22. Storage boxes for food and utensils
can be stacked for table or stove rest, and can be easily carried outside
to cooking area. In aisle they form part of the bed.
|
| For those finishing touches, fit, but don't install the
rear trailer door and the inside doors to the wheelbox. Plug any new exposed
holes with wood dough, sand all body and door surfaces smooth and apply
a seal coat of Firzite. After this coat is dry, follow with one coat of
enamel undercoat and two coats of enamel. Apply white shellac only on the
inside of the wheel-boxes. When paint is thoroughly dry, install the tail
and stop lights, wiring and license plate and hang the rear and wheelbox
doors.
The canvas cover or tent should be made from 10-oz. preshrunk
weather and mildew treated canvas (Fig. 21). You can probably save yourself
much trouble by having your local awning shop make this part of Handy Andy
for you. In order for the fasteners at the ends of the left wing to clear
the angle weatherstrips on the right wing, it is necessary to locate them
on the inside of the 1 x 2 transverse support frames (Fig. 21). Match these
fasteners with grommets set into 3 x 24-in. canvas flaps sewed to the inside
of the cover 6 in. up from the bottom edge. |
|
|
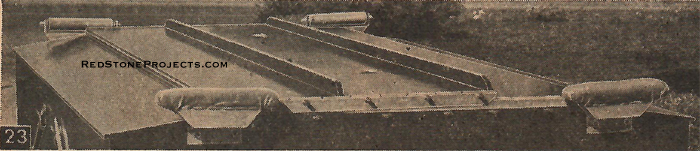
Figure 23. Washing machine rollers, at rear, help
you slide boat onto trailer and rest on pads at front. Rollers and pads
mount on 1/4 x 3 x 3-in. steel angles 6-in. long bolted through end panels.
|
| There is also a 4-in. no-draft shirt-tail flap of canvas
left around the inside of the bottom hem. Along the bed-wing edges, use
canvas fasteners of wood-screw type and pilot drill clearance holes for
them through the metal angle along the edges. Where the plywood is not
backed up by bracing, use fasteners attached with two short wood screws
or small bolts. Fasteners will be available from the tent or awning maker.
The "grub boxes" are simply made from 1/2-in. plywood
backed up with 3/4 x 3/4-in. molding. The 15 x 17 x 42-in. size allows
you to stack them on top of each other to form a 30-in. table or stove
rest (Fig. 22). Placed separately along left side, they form a bed extension.
The boxes store food supplies and utensils so you can quickly set up a
kitchen outside in good weather or inside if the weather turns bad.
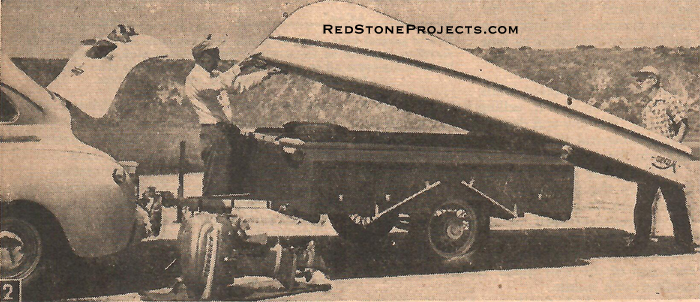
To take your boat along atop the folded trailer, mount
a pair of old washing-machine wringer rolls on brackets made up from 1/4
x 3 x 3 in. angle iron 6 in. at the rear (Fig. 23). Roller mounting angles
should clear the bed wings when they fold out. Padded 2 x 4 x 12-in. cradles
support the boat at the front. |
Any 2 Vintage Trailer Plans
$19.95 FREE Shipping |
|
Select 2 Vintage Travel Trailer Plans
|
|
|