Free Shipping on All U.S. Orders
All Orders Processed on a Secure Server
Build a 6-Wheel ATV
Complete Plans For Building Your Own Amphibious All Terrain Vehicle

Cover of Build Your Own ATV Plans
Build a 6-Wheel ATV Complete Plans For Building
Your Own
Get these vintage trailer plans PDF Format
All Orders Processed
On a Secure Server
Price $12.95
Get a restored copy of these 6-Wheel ATV Plans with 23 Pages of Enhanced and Enlarged Figures and Illustrations and Searchable Text.
We will email these plans, to the address provided with your payment, within 48 hours following receipt of your order.
|More Vintage Project Plans|
Now! - Build Your Own ATV
What's an ATV? it's an All-Terrain Vehicle, that's what. And the most popular now fun vehicle on the scene. Here are complete plans for building your own.
SPECIALIZED vehicles can be a ball but all of them bring to mind one immediate drawback - cost. For something you may not use too often, justifying the expense could prevent your having a lot of fun. The Marauder licks this cost problem and adds safety features not found on other ATVs at the same time.

$1,500 is par for the course for an ATV, but you can build this one for less than $500. If you have some usable parts on hand, it can cost a whole lot less, but about $500 is tops.

The Marauder is built like a tank and has similar controls. Two sticks start, shift and reverse the six wheels. To go, you push both levers forward. Pull back on them and you reverse. Push one and pull the other to change direction in the length of the machine as one set of wheels goes forward and the opposite set go backwards. Let go of both handles and you come to a stop automatically.

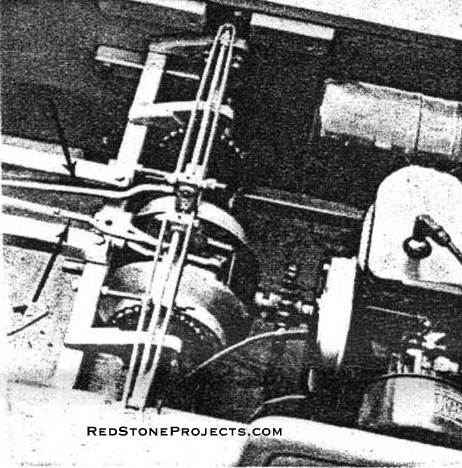
The Transaxle Automatic Transmission, or TAT as it's called, works this magic with an infinite number of gear ratios from High to Low. The TATs cone-shaped drive discs hold the secret that makes it a clutch, variable speed transmission, and differential all in one. You don't have to build or assemble the TAT for your Marauder; you buy it and install it as a unit.

Throttle control is only used when starting up the 8-hp, 4-stroke engine. The TAT takes care of all speed and direction change requirements.

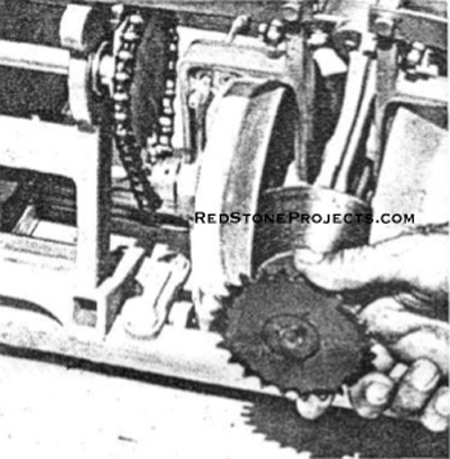
Chain drive units outside the body of the vehicle mean that you can't get a hand or even a pants leg caught in the works - a safety feature not found on all other ATVs. Outside chain drive also permits large diameter gears for greater power through increased gear reduction.

Outboard sprockets mean you can use dead axles eliminating the need for ball-bearing axle shaft supports. Turfsaver tubeless tires fitted on offset wheels cover and protect the drive chains.

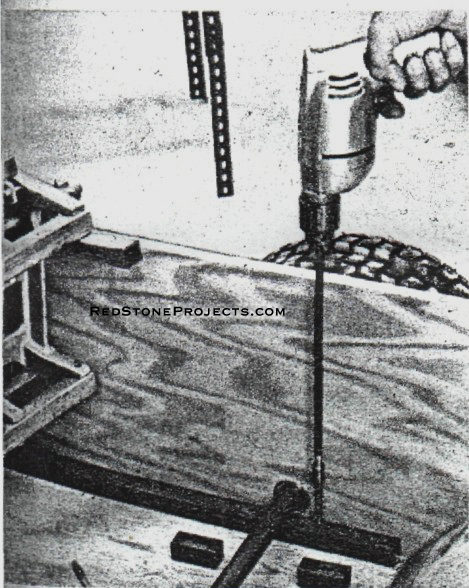
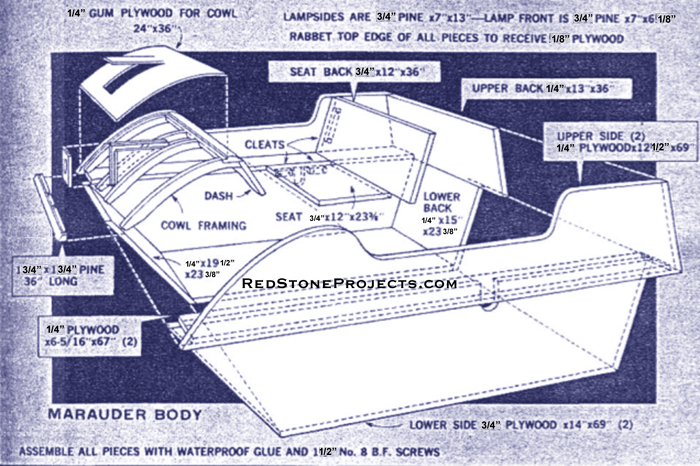
Body and Chassis are built from 3/4-in.plywood and square section steel tubing. These materials are easy to work and available locally.
 

Get a restored copy of these 6-Wheel ATV Plans with 23 Pages of Enhanced and Enlarged Figures and Illustrations and Searchable Text.


All Orders Processed
On a Secure Server
Marauder Body Details

All mechanical parts including engine, wheels and drive units come from one source (The Armor Co., Box 290, Deer Park, N.Y. 11729) which simplifies parts procurement.

The lower body section is built first. Cut plywood to size, bore the holes, and assemble using screws and waterproof glue. Follow the plans and pictures. When locating holes, note that those through the sides for the center axle area little lower than the ones for front and rear axles. This slight seesaw effect gives longer tire life and increased maneuverability, especially on dry pavement as the vehicle tends to pivot on the two center wheels.

Steel Tube Framing goes in when the lower body section is completed. Cut, drill and mount it in place using 5/16-in.bolts with washers under the bolt heads where they bear on plywood. You need lock washers on all nuts to keep them from vibrating loose.

DRILL EXTENSION makes it easy to transfer from chassis to Marauder's Plywood body within 1/2-in. of vertical side.
DRILL EXTENSION makes it easy to transfer axle bolt holes from chassis to Marauder's Plywood body within 1/2-in. of vertical side.
Spacer blocks and 1/4-in. bar stock hold the 1-in. dead axles to the chassis. The holes in the spacer blocks are a little larger than those in the chassis so you can shim the spacers to set up chain tension correctly. Chain idlers for the runs to the four outer wheels take up more slack. 

Adjust chains to the two center wheels by shimming the TAT unit to raise or lower the drive sprockets as required. Once you get the chain tension properly set up, you should find little further adjustment required.

STEEL STRAPS on square steel tubing spacers hold dead axles securely in place. Outboard chains make the dead axles possible.
To compensate for any slight inaccuracies in the body, it's best to drill axle bolt holes after the TAT is in place and the chains are tensioned.

Bolt the axle mounting tubing to the plywood floor and then install the 1-in. axles. Be sure to use a flat washer as spacer between the collar and the square tubing so the outside of the shaft collar comes flush with the outside of the body. Tighten the collar set screws with an Allen wrench through the access hole drilled in the floor.

ALLEN KEY tightens axle locating collar working through access hole in plywood.
The sprockets for the center wheel must be reworked so a second sprocket can be added. Remove the sprocket from the hub and drill four equally spaced holes on a 6-in. circle.
FLEXIBLE COUPLING at rear of TAT hooks up to front of 8-hp engine output shaft.
Clamp the sprockets together before drilling to ensure perfect alignment even if the hole position varies slightly. Mark both sprockets in each pair. Assemble to the wheel with the new sprocket next to the tire. Spacers 1 in. thick stand the original sprocket off the new one for chain clearance. You may have to let some air out of the tire to make finger room for locating and holding the nut and lock washer. Once the nut tightens, the lock washer will hold it while you tighten the bolt from the top.
TAT (left) coupled to engine (right) is controlled by rods from hand lever (arrows).
The engine, a 4-cycle 8-hp Kohler, mounts on blocks to align its output shaft with the TAT. Two 3/4-in. plywood blocks work fine. Glue these blocks together and then locate the four mounting holes using the engine base as a template. To locate the holes in the floor panel, hook up the engine output shaft with the TAT input using the flexible coupling. Make sure the engine doesn't bind on the rear axle.
 
Marauder Body Assembly

 
The exhaust port faces the seat back so you'll have to route it to the rear using pipe and fittings as shown.

 
Get a restored copy of these 6-Wheel ATV Plans with 23 Pages of Enhanced and Enlarged Figures and Illustrations and Searchable Text.


All Orders Processed
On a Secure Server
Marauder Chassis and TAT Placing Details

Twin control handles are linked to the TAT by a pair of push rods. Note that one rod connects above the pivot on the controls bracket and the other below. A threaded clevis gives fine adjustment.
TEMPORARY CLEATS keep body sides aligned while installing engine and drive.
Mount idler sprockets only after all drive chains are in place. Locate idler bolt hole by engaging the gear in the chain taking up the slack, and marking the center of the sprocket. Use flat washers on both sides of the wood and shake-proof nuts on the idler bolts. Throttle control attaches to the side of the body and goes in any convenient position.
NOSE FORMERS are assembled using screws and glue. Be sure glue is waterproof.
The Plywood Upper Body is shaped with curved formers at the front. Formers have a 1/8-in. setback from side panels to allow for thickness of the plywood skin.

 
TRIM NOSE to final shape with a plane before filling, finish sanding, and painting.
Cut the plywood to size making the cut out for the light housing. Be sure to lay it out so surface grain on plywood runs from side to side so the panel will take the curve Groove the nose piece to take the plywood cowl. This eliminates the need for clamping when gluing this edge. Clamp the top edge only. Position the lamp housing box before adding cowl, then glue and screw down permanently.
Get a restored copy of these 6-Wheel ATV Plans with 23 Pages of Enhanced and Enlarged Figures and Illustrations and Searchable Text.


All Orders Processed
On a Secure Server
Marauder Dual Controls

Final Finish calls for a plane and router to round all edges. Then sand smooth, seal and apply several coats of exterior enamel. Pick a bright color to make your Marauder easier to spot should you get lost in the, boondocks.
Headlight Housing Details
Decorative striping adds the final touch to your machine. Do it the easy way with 1/8-in. black plastic tape. Trimmed with a razor blade, tape is almost impossible to tell from painted striping and it's a lot neater than most hand painted stripes.
Save with Vintage Plan Deals
|See More Vintage Plans|
Any 2 Vintage Plans
$19.95 FREE Shipping
Select 2 Vintage Plans


Any 3 Vintage Plans
$24.95 FREE Shipping
Select 3 Vintage Plans
 
 
3

 
Any 4 Vintage Plans
$29.95 FREE Shipping
Select 4 Vintage Plans


4
Any 6 Vintage Plans
$36.95 FREE Shipping
Select 6 Vintage Plans


RedStoneProjects.com Home
SAVE With Multi-Plans Deals!
Project Plans
Concealment End Table Plans
Quilt Rack Plans
Crossbow Plans
Catapult Plans
Craftsman Style Plans
Water Screw Plans
Tobacco Pipe Rack Plans
Reloading Bench Plans
Brass Cleaning Bench Plans
Small Reloading Bench Plans
Corner Reloading Bench Plans
Two Sided Shooting Bench Plans
Nativity Stable Plans
No Weld Trailer Plans
No Weld Teardrop Trailer Chassis
No Weld Utility Trailer
Vintage Trailer Plans
Vintage Travel Trailer Plans Collection
16 Foot Canned Ham Vacation Trailer
Craftsman Hardside Folding Camper Trailer Plans
1947 Thousand Addresses Travel Trailer Plans
Bungalow Folding Tent Camper Trailer Plans
1937 Runlite Lightweight Travel Trailer Plans
1947 Treadrop Trailer for Two Plans
1935 Pullman Trailer Plans
1940 14 Foot Cabin Trailer Plans
1951 Lightweight Sportsman's Trailer
1956 18 Foot Family Vacation Trailer
1934 17 Foot House Trailer
DIY Pop Up Camper Trailer Plans
1960 Fold Up Trailer with Slide Out Plans
1953 Wild Goose Kamp Master Trailer Plans
1935 Jim Dandy Cabin Cruiser Trailer Plans
Vintage How To Build Trailers eBook
Hardside Pop-Up Camper Plans
Wanderbug Lightweight Vacation Trailer Plans
Streamline Family Vacation Trailer Plans
Tent On Wheels Folding Trailer Plans
Lil Guy Micro Camper Trailer Plans
Traveler Wood Framed Travel Trailer Plans
Vintage Roadside Chuck Wagon Trailer Plans
Pickup Truck Pop Up Camper Plans
Hardside Roof Top Pop Up Sleeper Plans
Low Profile Pickup Truck Camper Plans
Vintage Streamline Teardrop Trailer Plans
Vintage 1956 Camp Trailer Plans
Modern Conestoga Trailer Plans
1947 Trail Scout Camper Plans
Vintage Bolt Together Tent Trailer Plans
Vintage 1947 Wanderer Canned Ham Trailer Plans
Mobile Vacation Home Plans
Lightweight Expanding Trailer Plans
Simple and Rugged Truck Camper Plans
Sleeps 4 Expanding Truck Camper Plans
Build Your Own 3-4 Berth Caravan Plans
Vintage Hardtop Popup Camper Plans
Jeep Woody Camper Plans
Handy Andy Folding Camp Trailer Plans
Telescoping Vacation Cabin Trailer Plans
Camping Tent Platform Trailer Plans
Quick Folding Car Top Camper Plans
Folding Station Wagon Penthouse Plans
Vintage Calico Truck Camper Plans
Vintage 1970 Truck Camper Plans
Easy To Build Folding Camp Trailer Plans
How To Put a Tent On Wheels Plans
1953 Auto Roof Pop Up Tent Plans
Telescoping Truck Camper Plans
Ideal Outdoorsman's Trailer Plans
Cruisemite Deluxe Travel Trailer Plans
Collapsible Camper Trailer Plans
Build Your Own Motor Caravan Plans
Vintage Project Plans
Mini Steam Engine Plans
Power Cycle Mini Bike Plans
Roller Action Bending Brake Plans
All Wood Clock Plans
Build a 6-Wheel ATV Plans
Vintage Boat Plans
Sea Craft 25 Foot Cabin Cruiser Plans
21 Foot "Luxury" Shanty Boat Plans
20 Foot Budget Houseboat Plans
2-Berth Towable Cabin Cruiser Plans
8 Foot Camper Boat Plans
10 Foot Folding Boat Plans
DIY Project Books
Build Three Working Model Catapults
Build Five Craftsman Style Tobacco Pipe Racks
Build a Reloading Bench and a Reloading Brass Cleaning and Sorting Bench
Vintage Trailer Mugs
Trailer Articles
Pulling a Motorcycle Trailer
Building a Motorcycle Trailer
DIY Tent Trailer
Build a Budget Tent Trailer
The Trailer Grows Up
Luxury Trailers Create an Army of Modern Gypsies
Motorcycle Rallies
Americade Motorcycle Rally

 
Contact Us Privacy Policy Plans License