Free Shipping
Build a Four Harness Jack Loom
Plans and Instructions For Building and Operating a Hand
Weaving Loom
|
Weaving Loom Plans
Complete Plans and Instructions For The Building and
Operation of a Hand Loom.
 |
PDF Format |
|
|
All Orders Processed
On a Secure Server
|
Price $12.95
|
|
Get a restored copy of these Weaving Loom Plans with
22
Pages of Enhanced and Enlarged Figures and Illustrations and Searchable
Text.
|
We will email these plans, to the address provided
with your payment, within 48 hours following receipt of your order.
|
|
|More Vintage Project
Plans|
|
|

|
|
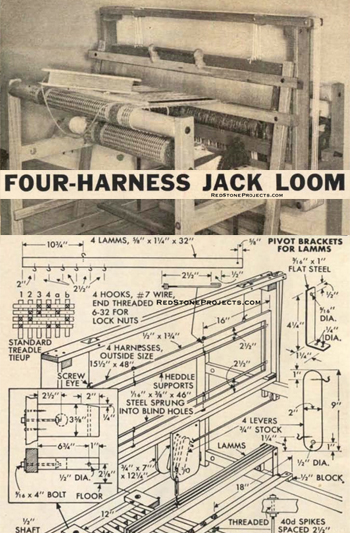
Build a Four Harness Jack Loom
Part 1
Enno r. Haan
|
|
|
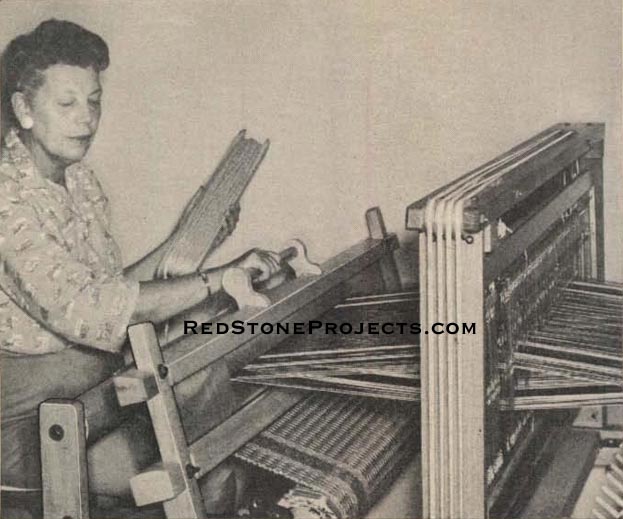
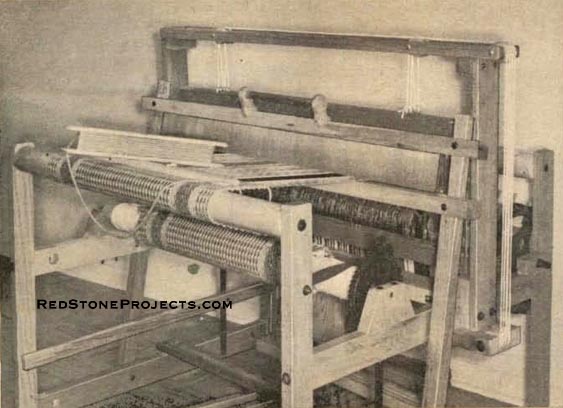
Figure 1. On the Jack Loom, all harnesses are
raised by treadling. To weave, you depress the treadle, and "throw" the
shuttle.
|
| |
| You can weave all kinds of fabric, lace and rugs up to
45 in. wide with this loom, Fig. 1, and produce an endless variety of attractive
designs. Hand-woven articles are always in demand and you can make spare
time profits with this interesting hobby.
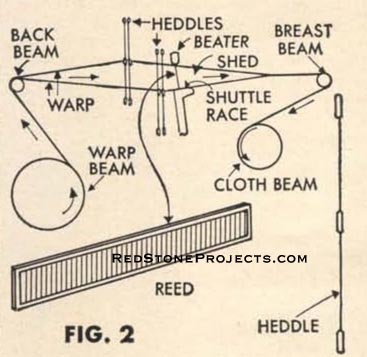
Fig. 2 shows parts of a loom and the terminology. When
a loom is set up for weaving, a number of parallel cord, or threads, called
"warp" are stretched between the back beam and the breast beam, Fig. 5.
The warp is wound on the warp beam first. Fig. 3. Then it is brought over
the back beam, through heddles held in the harnesses, through the reed,
(a comb-like guide on the beater to keep the warp evenly spaced), and then
to a canvas apron attached to the cloth beam. |
|
|
Figure 2. Parts of Loom and Terminology
|
| In weaving, you depress a treadle, Fig. 7, to separate
some of the warp, thus forming a space or "shed" through which a shuttle
is passed or "thrown". The shuttle introduces the cross threads or "weft".
With the shed still open, you pull the beater forward to force the last
strand of weft tightly against previously woven fabric. Then you depress
another treadle to separate another combination of warp threads, and you
return the shuttle through the shed in the opposite direction, and again
pull the beater forward. The same operations are repeated using other treadles.
As fabric is woven you wind it on the cloth beam after
releasing the brake on the warp beam. This unwinds a length of warp equal
to that of the fabric wound on the cloth beam. When the brake is again
set, tautness of the warp is maintained by a ratchet wheel and pawl on
the cloth beam.
Generally preferred by most weavers, a jack loom offers
a much greater variety of pattern possibilities than a counterbalanced
loom. This is because the harnesses of a jack loom can be raised singly
or in multiple whereas those of a counterbalanced loom work in pairs. A
four-harness jack loom has fourteen different treadle tie-ups, while a
four-harness counterbalanced loom has only six.
The reed and heddles, Fig. 2, are items that you purchase.
The divisions of a reed are called "dents"'. You can obtain reeds with
almost any number of dents per inch. For beginners a 12 or 15-dent reed
is best. To double or triple the number of warp threads per inch you simply
run two or three adjacent threads through each dent. |
|
|
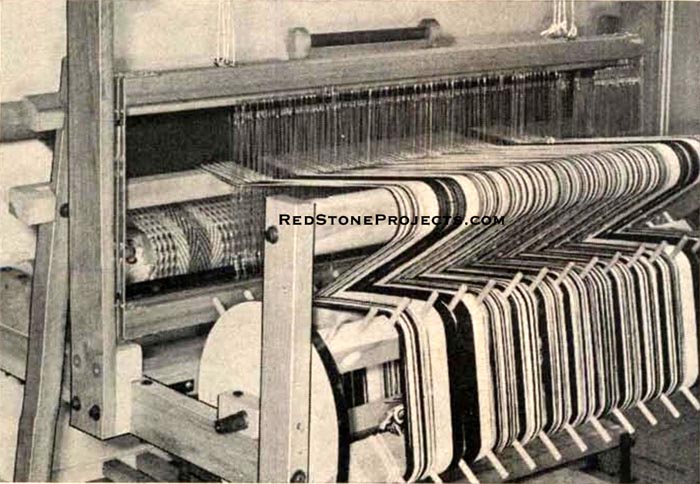
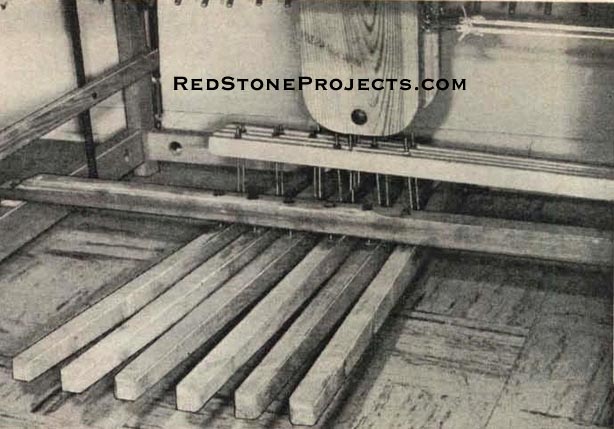
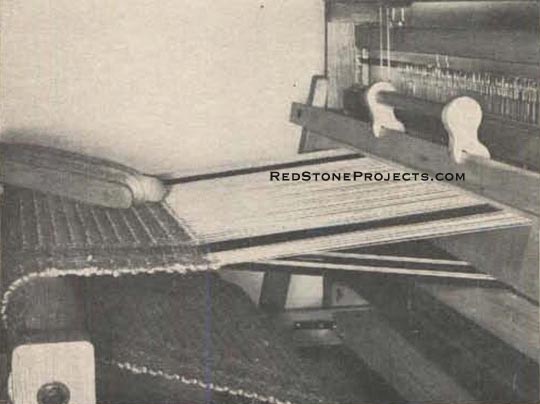
Figure 3. Rear view of loom shows enough thread
on warp beam to weave ten 54 in. long rugs. Warp beam rotates.
|
| Make the loom of hardwood such as oak for the frame,
and close grained hardwood for other parts. Cut and join the parts accurately.
Sand and finish the wood so that threads will not catch. The front of the
loom is the end where the breast beam is located, which you face when weaving.
The right and left sides of the loom are at your right and left as you
face the loom.
Make the two side frames first, as in the upper details,
Fig. 4, The only difference between them is that the vertical center member
of the right frame extends farther below the upper rail, and is recessed
to hold V-pulleys. To assemble the frame, install the two center cross
members first, then the rear rail. The lower center cross member is bolted
like the frame joints. Such joints are extremely rigid and can be tightened
at any time to compensate for wood shrinkage. The joints must be at perfect
right angles. Cutouts in the upper cross member each accommodate four 1/2
X 2 in, V-pulleys held by 1/4 in. bolts. You can purchase metal pulleys
or turn them out of hardwood. The small blocks screwed to the cross members,
in the corners, are stops for the harness travel.
In construction of the loom follow the drawings. Some
details vary from those shown in the photos, but were made for simplification
and improvement. |
Get a restored copy of these Weaving Loom Plans with
22
Pages of Enhanced and Enlarged Figures and Illustrations and Searchable
Text.
All Orders Processed
On a Secure Server
|
Figure
4. Four Harness Jack Loom Construction (Sheet 1.)
|
| The back and breast beams shown in Fig. 4 have tongues
at their ends to slip into slots of the corner posts, permitting easy removal
to facilitate "threading" the loom. These beams are identical except for
the slot in the back beam which will be explained in Part II In the photos,
round back and breast beams are shown.
The cloth beam may be square or round. Two blocks bolted
to the upper side rails hold the cloth beam above your knees when weaving.
A home-made ratchet wheel is shown in the upper detail, Fig. 6, but a cast
iron wheel is shown in the photos. The pawl, either flat steel or wood,
is pivoted to the corner post. Fig. 6 also details the canvas apron on
the cloth beam. The method of attaching the warp to the apron will be explained
in Part II. |
|
|
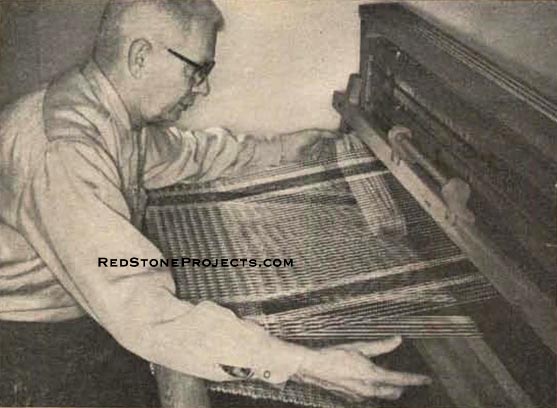
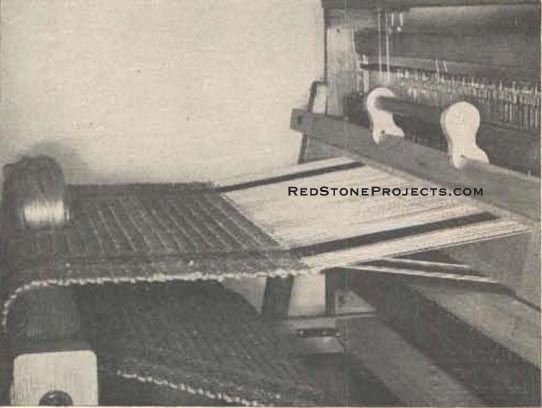
Figure 5. Front view shows woven portion of rug
over breast beam, partly wound on cloth beam. Beater carrying reed rests
against center uprights.
|
The beater pivots on the two lower side rails. Each leg
is slotted at the end as in the right lower detail, Fig. 4, to permit quick
removal when threading. An easily movable nail, which is slipped through
a hole under the pivot, keeps the legs from coming off. A metal sleeve
over the threaded part of the bolt prevents excessive wear on the wood.

|
|
Figure 6. Four Harness Jack Loom Construction
(Sheet 2.)
|
The cross members of the beater are grooved to hold a
reed from about 5 to 6 in. wide. The upper cross member is movable up and
down, the bolts riding in vertical slots. Wing nuts can be used on these
bolts, but the bolts of the lower cross member are tightened with a wrench.
The upper cross member has a handle at its center with which the beater
is pulled forward. Both cross members are notched similarly at the ends
to straddle the legs and hold the assembly rigid. The lower cross member
is wide to form a shuttle race under the warp to take the weight of the
shuttles as they are being passed through the shed.
The center details of Fig. 6 show construction of the
warp beam. Four cross bars, drilled for dowels before assembling, are bolted
to plywood or hardwood disks turned to true circles. To prevent the bars
from turning out of position, a wood screw is driven into the ends of each
one. Two pipe nipples extend from floor flanges, (both 1/2 in. pipe), which
are bolted centrally to the outside of the disks. The nipples turn in blocks
bolted to the upper side rails at the rear corner posts as in Fig. 4. Ends
of the nipples are hammered square and filed to a slight taper to fit a
crank, detailed in Fig. 6. The crank is used to wind warp on the warp beam.
The right disk of the warp beam is grooved for a sash chain brake installed
as shown in the lower detail. Fig. 6.
|
|
Figure 7. Six treadles, uniformly spaced by "spiked"
guide transfers 1 1/2 in. downward pull through lamms.
|
| The treadles. Fig. 8, pivot on a shaft held by two wooden
blocks bolted to the rear cross rail. Use wooden spacers between the treadles
to spread them uniformly. To space the front ends of the treadles the desired
3 1/4 in. on centers, you install a cross piece having six 40d spikes,
altered as shown, projecting down through holes in the treadles. To prevent
the spikes from binding, the holes are widened at the top and bottom. Each
treadle has four screw hooks at the locations shown for connection with
turnbuckles to the four lamms extending across the treadles. Use heavy
steel screw hooks that will not easily bend, and drive them into pilot
holes so the hooks will come close to the wood.
The lamms pivot on a bolt held by two steel brackets screwed
to the lower right side rail directly under the lower center cross member.
They then will line up with the small levers held between two wooden plates
that are screwed to the cross member. Each lamm has four screw hooks projecting
down for connection to the treadles, and a single screw hook projecting
upward for connection to a lever above. Be sure to get all these parts
in perfect alignment.
The perspective drawing shows only a single turnbuckle
between a treadle and lamm, and one between a lamm and lever. Actually,
each treadle connects to two lamms as shown in the tie-up detail, upper
left Fig. 8. In Fig. 7 long, slender bolts are shown as these were used
instead of turnbuckles, each bolt having two nuts to lock adjustment. |
Get a restored copy of these Weaving Loom Plans with
22
Pages of Enhanced and Enlarged Figures and Illustrations and Searchable
Text.
All Orders Processed
On a Secure Server
|
Figure
8. Four Harness Jack Loom Construction (Sheet 3.)
|
|
| The levers pivot on a 1/2 in. bolt. Their purpose is
to transform a vertical movement of approximately 1 1/2 in. to a horizontal
movement of about 5 1/2 in., the distance the harnesses need to be raised.
The turnbuckles make it easy to adjust the linkage so there is an equal
pull on the harnesses. A nut on each turnbuckle locks the adjustment. If
there is any tendency for the turnbuckles to come off the screw hooks,
bend the hooks to make the opening smaller. Place washers between all the
levers. A length of dowel glued in holes drilled in the plates, provides
a stop to hold the levers in alignment when you tie them to the harnesses.
You make four harnesses, as in Fig. 8, or you can purchase
ready made harnesses. Make them of cedar or redwood. Blind holes in the
ends. Fig. 8, permit two thin steel heddle supports to be sprung into them.
Heddle supports of this length require a couple of hooks to keep them from
bowing when subjected to the pull of taut warp.
Each harness is tied to a corresponding lever with traverse
curtain rod cord. When tying, hold the harnesses down firmly with a block
wedged between them and the upper cross member. Use a block similarly to
hold the lamms up so that the levers will rest against the stop dowel.
The lamms then should be horizontal with the treadles hanging on them so
that the front ends of the treadles come about 5 in. above the floor. From
back to front the treadles then will slope upwards. Tie one end of the
cord to the left screw eye of the harness, run the cord over the pulleys
and loop it over the screw hook on the corresponding lever, then return
over pulleys to the right screw eye of the harness, tying the cord here
so it is taut.
Part II will cover the heddles, shuttles, a warp spool
rack, a loom bench, and will explain how to thread the loom and start weaving. |
Build a Four Harness Jack Loom
Part 2
|
| This installment details a number of accessories you
will need, and briefly explains how to dress the loom and start weaving. |
|
|
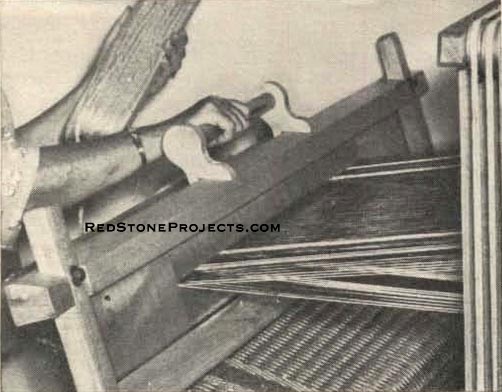
Figure 1. "Throwing" the shuttle through the "shed"
formed by raising some of the warp with a treadle. Shuttle is supported
by shuttle races.
|
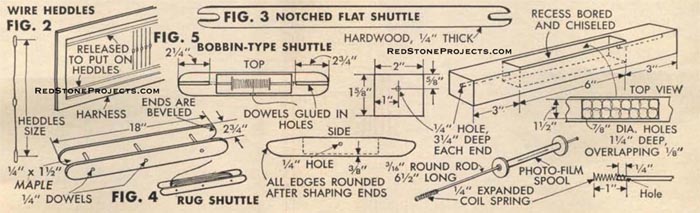
| For a six treadle jack loom, as detailed in Part I, you
will need 540 10 in. heddles, The size of a heddle is the center-to-center
distance between the eyes at the ends. The flatware type shown in Fig.
2 cost about $1.50 per hundred. The end eyes engage the steel heddle supports,
and the center one holds the warp thread. To install heddles on harnesses
you disengage one end of the steel heddle supports and remove the hooks
temporarily.
The cross threads or yarn, called "weft", are held on
shuttles. You will need as many shuttles (or bobbins of bobbin type shuttles),
as the number of colored weft threads to be used in a weaving project.
Fig, 3 shows the simplest kind of shuttle; a thin, flat stick about as
long as the width of the fabric. This shuttle is pushed through the shed
rather than "thrown". Fig, 4 shows a shuttle used for heavy yarn and is
called a rug shuttle. It can be thrown. To do so, you rest it on the shed
floor as in Fig. 1, then give it a quick push to propel it through the
shed, catching it with the other hand as it emerges. A length of weft a
little longer than the width of the fabric is unwound before throwing the
shuttle.
A bobbin type shuttle, Fig. 5, is speedier to use for
finer weft, as the thread unwinds automatically. Bobbins are wound with
a bobbin winder or by means of a small motor having an extension shaft
to hold the bobbin. All shuttles should be sanded very smooth and given
a few coats of lacquer or varnish, then waxed so they will glide easily
over the warp. |
|
|
Weaving Loom Figures 2, 3, 4, and 5. Wire Heddles,
Notched Flat Shuttle, Rug Shuttle, and Bobbin Type Shuttle.
|
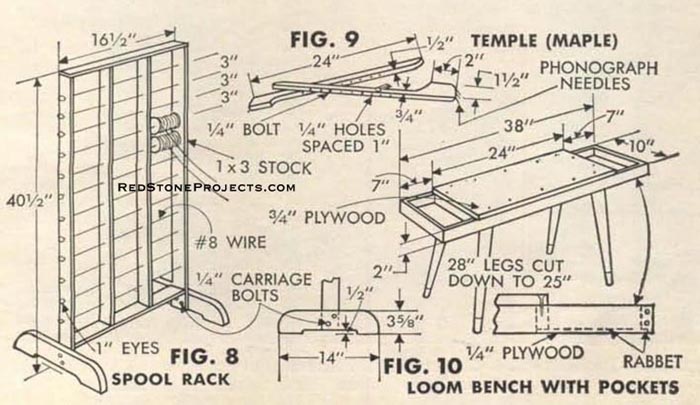
| For threading the loom, you need a rack to hold the spools
of warp. The 36 spool rack shown in Fig, 8 has removable wires passing
horizontally through a number of uprights.
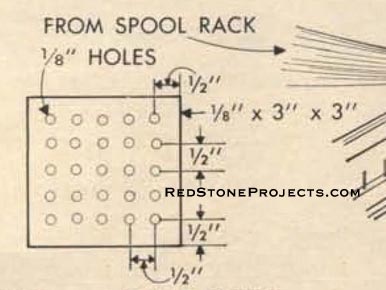
A warp thread guide, Fig, 15, consists of a small piece
of tempered hardboard, fiber or metal, 1/8 in, thick, having a number of
1/8 in, holes drilled equidistantly in vertical and horizontal rows.
A temple, Fig. 9, is helpful for beginners to keep edges
of heavy fabric such as rugs from being drawn inward while weaving and
forming a "waist". In use you press the point at the ends into the edges
of the fabric, push the temple down flat and turn the turn button to hold
it. The use of a temple should be avoided on fine fabrics, as it leaves
telltale holes.
A suitable stool or bench enables you to have both feet
free for operating the treadles. Its height should be approximately 26
in., but can be varied to suit the user, A bench having convenient pockets
at its ends is shown in Fig. 10. The tapered wooden legs are purchased.
They turn into steel plates screwed to the underside of the bench.
The arrangement and number of warp threads for weaving
patterns are given in printed or drawn threading drafts. These are read
from right to left - the same order in which the warp ends are to be installed
in a loom. The right side of a loom is your right side when facing it at
the breast beam. |
|
|
Figure 6. Pulling beater toward breast beam, shed
still open after throwing shuttle wedges weft between upper, lower threads.
|
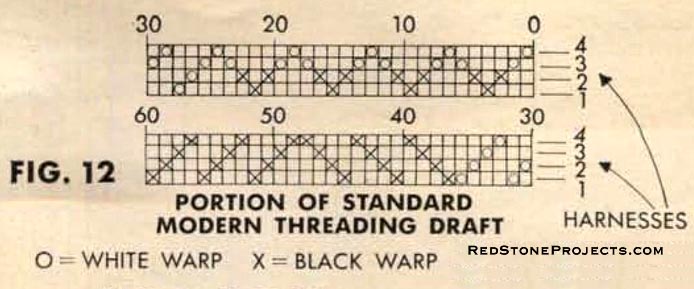
| Fig. 12 shows a portion of a standard modern draft. The
horizontal spaces which are numbered at their right represent harnesses,
No. 1 being the harness closest to the breast beam. Each vertical row represents
a single warp end and the markings indicate the harness that controls it.
The squares formed by the horizontal and vertical lines may be blocked
in solidly, contain a cross, circle or other symbol indicating the color
of the warp.
There are other styles of drafts also with which you should
become familiar. In most of these the harness numbers are placed in the
spaces, which is helpful in avoiding errors, especially when threading
looms having more than four harnesses, A symbol close to each number indicates
the color of the warp. In Scandinavian drafts the numbering of the harnesses
is
reversed, No. 1 being the closest to the back beam, A
draft usually is given in its entirety; if not, you repeat what is given. |
|
|
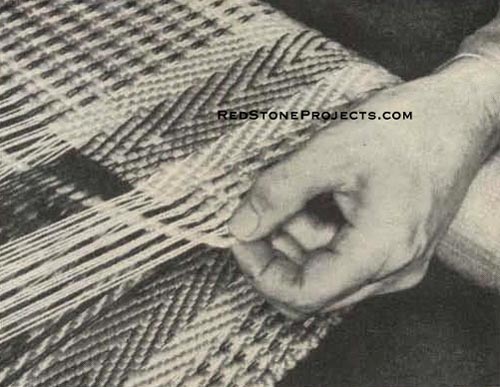
Figure 7. Before beating down weft, you carefully
adjust extending double portion of weft along edge to produce straight
edge.
|
|
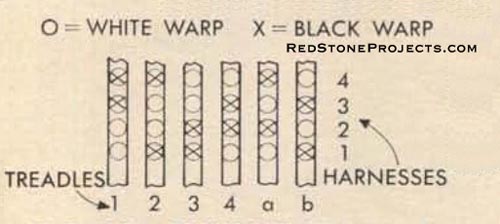
| The standard treadle tie-up, (connection from treadles
to harnesses), for a six treadle jack loom is shown in Fig, 13, The crosses
in the circles indicate the connections. If the tie-ups for a weaving project
differ from this, it is usually given with the threading draft. |
|
|
Figures 8, 9, and 10. Spool Rack, Temple, and
Loom Bench with Pockets.
|
| The treadles are identified by numbers and letters. The
treadles produce the weaving patterns of which an example is shown in Fig,
11, The lettered treadles produce a plain weave or "tabby" weave, as shown
in Fig, 14, The treadle tie-ups often are arranged so the treadles can
be operated in a "walking" motion as follows: No. 1, left foot; No, 3,
right foot; No. 2, left foot; No, 4, right foot. |
|
|
|
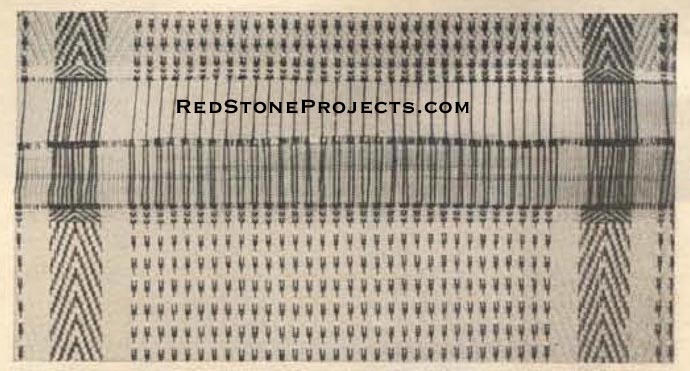
Figure 11. Two rugs joined; note weaving design,
also use strips of cardboard to assure enough warp to form fringe.
|
| To determine the number of warp threads to be wound in
each section of the warp beam for fabric as wide as the reed (called "dressing"
the loom), you divide the total number of warp ends by the number of sections
of the warp beam. For fabric of lesser width, you use as many sections
as are about equal to the fabric width, planning the work to be centered
in the loom. Then divide the number of warp ends used for this width by
the number of sections. |
|
|
Figure 12. Portion of standard modern threading
draft.
|
| Reeds of 12 or 15 dents per inch produce a rather coarse
weave but can be used for a fine weave having twice or triple the number
of warp threads per inch. To do this, two or three warp threads are run
through each dent, although a single heddle is used for each. |
|
|
Figure 13. Standard treadle tie-up for jack loom.
|
| To transfer warp from spools to the warp beam, you set
up the spool rack a few feet behind it. Place spools on the rack from top
to bottom, starting at the right top corner, in the same order as that
in the threading draft. Then run as many threads through the warp guide
plate as are to be wound in the first section of the warp beam. The first
section is the one in line with the right edge of the fabric. Set the guide
plate in the slot of the back beam directly above the section to be wound.
After bringing warp threads through the guide, tie them together as shown
in Fig, 16. Then slip the knot through the chalkline loop on one of the
cross bars. |

|
|
Figure 14. Tabby Weave
|
| Next, release the brake on the warp beam and rotate the
beam with the crank in the direction indicated by the arrow in Fig. 16.
The length of warp to wind depends on the project. For example, a job of
weaving ten rugs, each 62 in, long (including allowance for shrinkage),
will require 620 in, of warp plus the excess from warp beam to apron (about
6 ft.), making a total of about 58 ft. As each complete turn of the warp
beam of this loom equals 3 ft., you will require 20 turns of the beam for
the ten rugs. Wind the warp taut. To do so, grasp the collection of threads,
referred to collectively as a "bout", with one hand while turning the crank
with the other. |
|
|
Figure 15. Warp Thread Guide
|
| After winding, cut and tie a slip knot at the finish
end of the bout and fasten it temporarily to one of the dowels to hold
it in place. Wind successive sections the same way and in accordance with
the threading draft. If the second section is an exact repeat of the first,
you need not rethread the guide. If the requirements are different, you
rethread the guide. Be sure to wind all sections the same number of turns;
if one section is short, the entire weaving project will be short. |

|
|
Figure 16. Winding Warp on Warp Beam
|
|
| After all sections have been wound you pull the first
bout under and over the back beam toward the harnesses. Loosen the slip
knot at the first section, arrange the threads side by side in the order
given in the draft, and use removable tape to stick them temporarily to
the top of the back beam in this order. Then you pass the farther most
thread at the right, and successive ones in proper order, through the heddles.
As soon as the first bout has been brought through heddles you again tie
the loose ends together with a slip knot. Continue in the same way with
the other bouts. |
|
|
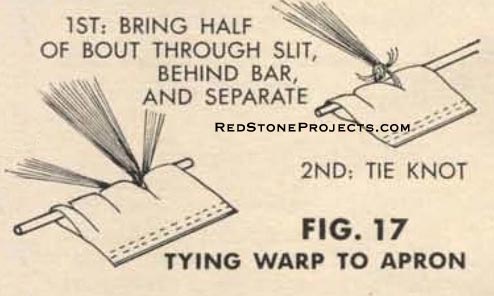
Figure 17. Tying Warp to Apron
|
| When all of the bouts have been brought through the heddles
you start threading the warp through the reed at the right side, progressing
toward the left, according to the sequence given in the draft. The first
thread goes through the reed a distance from the reed center equivalent
to half of the fabric width. A threading hook will facilitate the work.
When all the bouts have been brought through the reed
and the ends are tied with slip knots as before, you set the brake and
start tying the warp to the apron which is brought over the breast beam.
The starting point is figured the same way as the starting point on the
reed.
Divide the first bout into two equal parts for tying them
through two adjacent slits of the apron. The two steps of tying each of
these are shown in Fig. 17. It is highly important to tie the warp to the
apron so that all the threads will be uniformly taut. |
|
|
Figure 18. As weaving progresses, the shed gradually
becomes smaller, tending to interfere with the proper use of the shuttle.
|
| When starting to weave, first use treadles "a" and "b"
alternately to weave in strips of cloth from 1 to 2 in. wide instead of
using the regular weft. This is to produce a straight foundation for weaving.
Weave the foundation 2 or 3 in, wide.
Weaving with regular weft on a shuttle is done as follows:
Depress one treadle to form a shed, pass the shuttle through it and while
the treadle is still depressed, pull the beater toward you. Then depress
the next treadle, pass the shuttle in the opposite direction and beat again.
Sequence of treadling depends on the treadle tie-up. In beating, Fig. 6,
a couple of light taps are better than a single hard one.
For a rug you can use coarse cloth for the foundation.
If the rug is to have a fringe, the width of the foundation should equal
the fringe width. Removal of the cloth strips later leaves the warp extending.
After weaving the foundation for a rug you weave the heading, using a carpet
cord for weft. The heading should be from to 1/2 to 3/4 in, wide if there
is to be a fringe, and 1 1/2 to 2 in. wide if the end is to be bound. After
the heading you start pattern weaving with treadles 1 to 4, using weft
as planned.
After each throw of the shuttle and before beating, adjust
the doubled end of the weft as in Fig. 7 to produce a uniformly straight
edge. Avoid pulling the weft too tightly with the shuttle as this draws
in the edges and forms a waist. Allow the weft to cross the shed at a slight
diagonal before beating, which helps prevent a waist. |
|
|
Figure 19. Size of the shed is restored after
each few inches of weaving by winding up some fabric on the cloth beam.
|
| When changing to a different color of weft, taper the
starting and finishing ends and double those portions when joining them
at the edges of the warp. After weaving about 5 or 6 in, on a large loom,
less than this on a smaller loom, and the shed gradually becomes smaller,
as in Fig. 18, you release the brake and wind up 5 or 6 in, on the cloth
beam. Then set the brake again, pull the warp up taut by turning the cloth
beam a little more. The shed will then be larger again, as in Fig. 19,
and you can proceed with the weaving. These adjustments are made repeatedly.
In finishing a rug, you add a heading as you did at the
starting end, and then allow for fringe if this is desired. However, instead
of weaving in more cloth strips you can substitute two strips of corrugated
cardboard, each as wide as the fringe, as shown in Fig. 11. One of the
strips is for the finishing end of the first rug, and the other for the
starting end of the second. When a rug is removed from the loom you tie
the fringe warp tightly against the heading in groups of six threads each.
Then trim the fringe to uniform width. |
Any 2 Vintage Plans
$19.95 FREE Shipping |
|
Select 2 Vintage Plans
|
|
|
