Free Shipping
Build a Modern Workbench
Plans for an All Purpose Bench for The Home Craftsman
|
Modern Workbench Plans
Build a Multi-Function Workbench for Your Home
Shop
 |
PDF Format |
|
|
All Orders Processed
On a Secure Server
|
Price $12.95
|
|
Get a restored copy of these Modern Workbench Plans
with 17 Pages of Enhanced and Enlarged Figures and Illustrations
and Searchable Text.
|
We will email these plans, to the address provided
with your payment, within 48 hours following receipt of your order.
|
|
|More Vintage Project
Plans|
|
|

|
|
| This workbench combines something of the old with something
new. The old is the substantial top made of 2 x 3s glued face to face,
more rigid than the commonly used planks or plywood. Also old is the quick-acting
woodworker's vise, home-built for economy, as is the tail vise. The latter
is generally unknown to the present generation, but was indispensable to
old-time cabinetmakers. It holds a board solidly with no lug or screw above
the surface of the stock. |
|
|
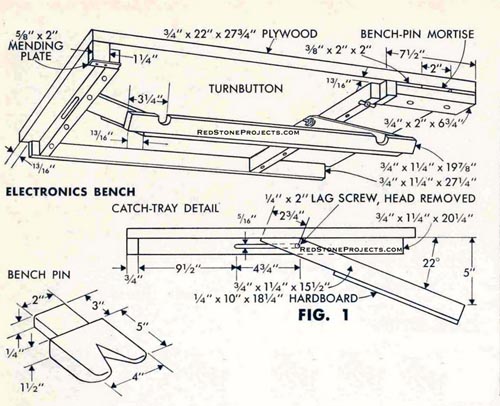
Figure 1. Slide Out Electronics Bench and Catch
Tray Details
|
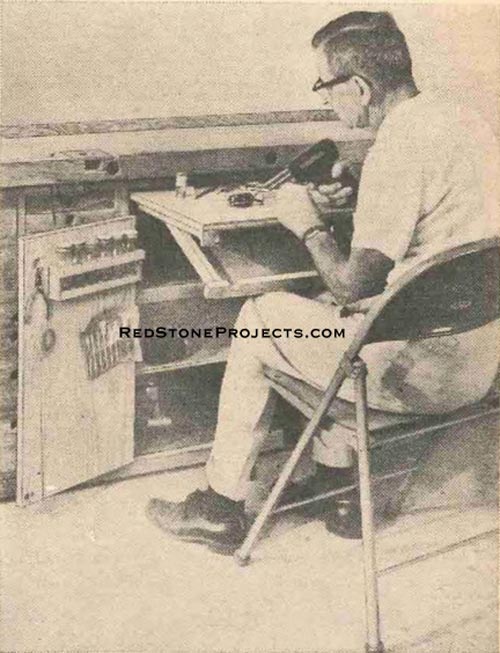
One of the new ideas is the pull-out shelf with a "catch
tray" for kit builders and model makers. Small parts will drop into the
tray rather than being lost on the floor. The doors of the shelf compartment
provide storage for containers of nuts and bolts, and there is an easy-to-reach
holder for soldering guns and hand grinders.
|
|
Figure 1. Slide Out Electronics Bench and Catch
Tray
|
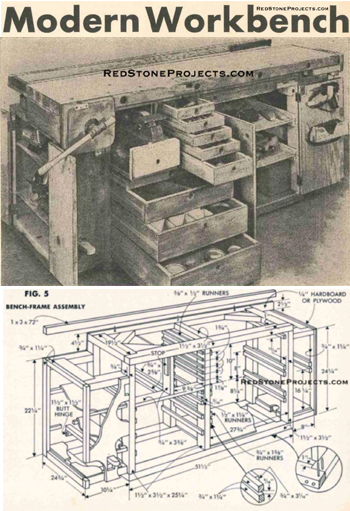
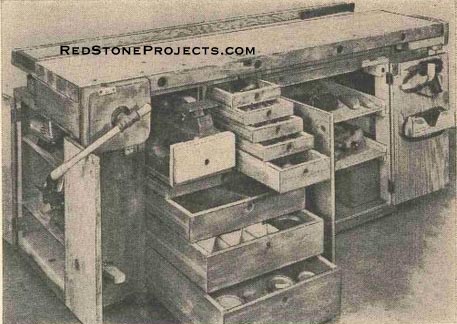
Quite modern are the shallow drawers for holding files,
chisels and other thin tools; the drawers can be placed on the bench top
for permitting quick selection. Optional, very modern, features are a multi-position
vise, Fig. 4, and snap-on surface clamps, Fig. 7, that can be fitted on
the top, and removed in a moment when not needed. |
 |
|
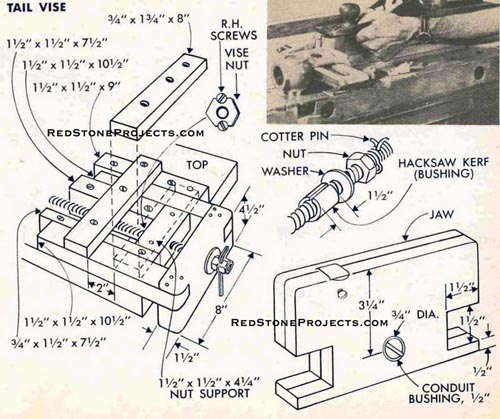
Figure 2. Tail Vise Assembly
|
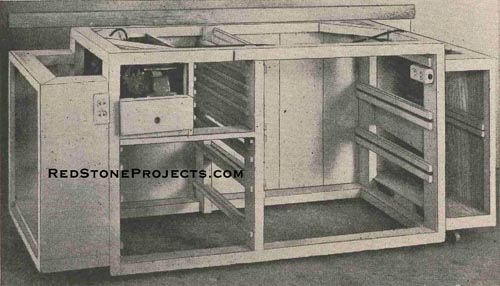
| Assemble the framing of the bench first, Fig. 5; it then
can be used as a worktable to construct the top. Rip lengths of 2 x 4 to
1 1/2 x 3 1/2 in. and notch the end rails, top and bottom, into th front
and rear rails as indicated. Join them with glue and 16d box nails; the
box nails are smaller in diameter than regular nails and will minimize
splitting. Add the diagonal bracing and the framing for the end sections.
Note that the left section is set back 1/4 in. so the plywood panel will
be flush with the bench front.
Install the framing, vertical and horizontal, between
the cabinets, then install the various drawer runners. The latter can be
sized according to the stock on hand. Set them back 5/16 in. from the front
of the framing to allow for the drawer fronts that are made flush. Lubricate
runners with paraffin. |
Get a restored copy of these Modern Workbench Plans
with 17 Pages of Enhanced and Enlarged Figures and Illustrations
and Searchable Text.
All Orders Processed
On a Secure Server
|
Figure
3. Woodworking Vice Assembly.
|
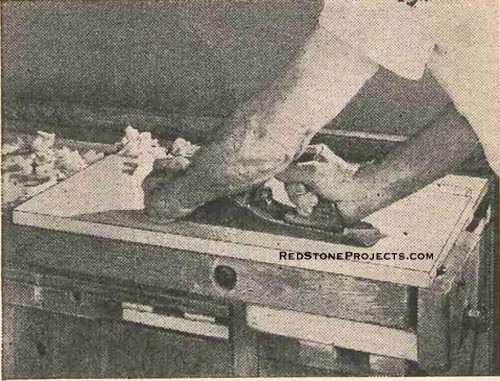
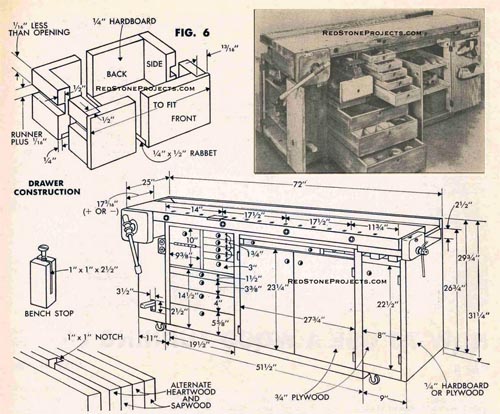
| Now build the top. Select six clear, straight-grained
2 x 6s, hardwood or softwood, and rip down the center. Plane all four faces
flat and true. Match up the strips sapwood to sapwood and heartwood to
heartwood; this alternating will minimize warping. (Note the grain pattern,
Fig. 6.) Clamp them together and drill 5/16-in. holes through them four
places, Fig. 6. Counterbore the outer strips to recess the nuts. Also notch
the strip second from the front for the stops, as shown.
Test the strips for fit by clamping on the rods that can
be threaded stock or plain rods threaded about 1 in. on each end. Apply
glue to the joining faces of the strips, clamp together loosely and align
the top surfaces of the strips. Tighten the rods, and also use bar clamps
if youhave them. Wipe off excess glue and put the top aside for the glue
to dry. |
|
|
Figure 4. Multi-Position Vice is handy because
it will work at various angles, can be removed completely from top.
|
| First make the quick-acting woodworker's vise, Fig. 3.
Purchase a vise nut and cut it in half lengthwise and mount the halves
on the arms.
Glue and nail the hardwood wedges at the fronts of the
arms, and pivot the arm on lag screws as indicated in Fig. 3. The nut-closing
device is alock fork that carries matching wedges, and which is hinged
at the back to drop down. The arms of the fork are joined with a plywood
strip to which the release cord, a length of 1/16-in. airplane shock cord
or picture wire, is attached.
On either side of the fork attach strips 1 1/2 in. square
to the bench top. Protect the vise nut from clamping strain by facing the
end with a piece of steel angle ground to clear the vise screw. Fit this
under the guide tie where it grazes the end of the nut.
The rear tie carries a stiff flat spring, such as a Shop-Smith
hold-down, held with the heads of three roundhead wood screws. The spring
is shimmed to tilt downward, the curved end resting on the fork-lift bridge
with a rubbing plate of sheet metal beneath it, Fig. 3.
Get a restored copy of these Modern Workbench Plans
with 17 Pages of Enhanced and Enlarged Figures and Illustrations
and Searchable Text.
All Orders Processed
On a Secure Server
|
Figure
5. Bench Frame Assembly
|
Make the vise jaw of two pieces of 3/4-in. plywood glued
together. Before joining them mortise the inner piece for the dog and the
outer jaw to accept the nut of the dog-adjusting screw. Also, bore the
screw hole and notch the top to accommodate the bent-over top of the dog.
When the jaw is assembled, bore the hole for the vise screw, and counterbore
for the handle washer and
cut mortises for the ends of the vise rails. |
|
|
Figure 5. Bench Frame Assembly
|
|
| Use hardwood for the rails, tenon the ends, kerf them,
then glue and wedge them tightly in the jaw. Trim any projections of the
rails after the glue has set. Fit the sliding members and coat with grease.
The vise screw, handle and washer are purchased as a unit. |
|
|
Figure 6. Drawer Construction
|
| As the tail vise, Fig. 2, is not quick-acting the rails
move between guides screwed to the underside of the bench top. The screw
is made from threaded 5/8-in. rod. Bush the jaw hole with a piece of 1/2-in.
thin wall tubing split lengthwise and spread to fit over the screw. Secure
the screw in the jaw with a nut and washer inside and two nuts and a washer
outside. Drill a small hole behind the inner nut and fit a cotter key.
Turn the two outer nuts tightly together, drill between them and insert
a stiff wire - a long-handled Allen wrench would be good - for a handle.
For the vise nut, mortise a nut and washer into the back of the wooden
support and hold it with roundhead wood screws at the edges. |
|
|
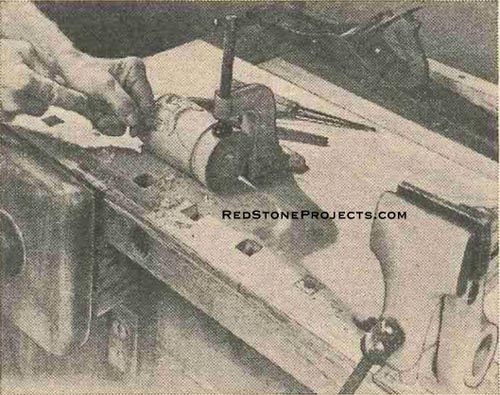
Figure 7. Surface Clamps, such as this one holding
carving, are held by bolts that fit in T-slot in clamp. Bolt drops flush.
|
| Turn the bench right-side up after notching the frame
rails to clear the release parts for the quick-acting vise. Hinge the pedal
and attach the cable. Pressure on the pedal releases the nut halves for
quick action, releasing the pedal permits clamping the work.
Bench stops are blocks of wood, as in Fig. 6, split 4/5
their length with a large flathead wood screw inserted. Turn in the screw,
slip the stop into a bench hole and tighten to lock. |
|
|
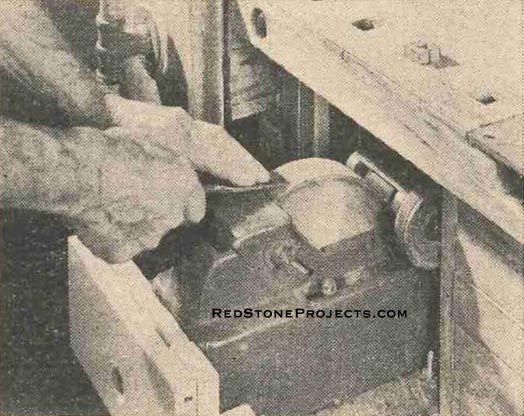
Figure 8. Grinder - wet type in this case - pulls
out from the bench ready for use. Oilstone is stored behind the grinder
on the shelf.
|
The electronics bench, Fig. 1, is a plywood shelf running
on cleats under the bench top. The catch tray is made and attached as indicated.
Place removable shelves in the left bench compartment; a good place for
sanders, jig saws, etc. Notch the shelves to clear the release cable. Shelves
of 3/4-in. plywood are installed under the electronics shelf. Hang doors
with 1/16-in. clearance all around. Attach a 1 x 3 to the bench frame at
the back, fill in with a board to make a tray.
|
|
Completed Modern Workbench
|
|
|
Any 2 Vintage Plans
$19.95 FREE Shipping |
|
Select 2 Vintage Plans
|
|
|

