Free Shipping
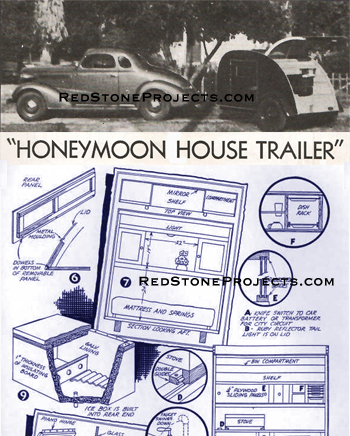
Build The Honeymoon House Trailer
How To Plans For Building The Original Teardrop Trailer
|
Honeymoon House
Trailer Plans
Build The Original Teardrop Trailer
 |
PDF Format |
|
|
All Orders Processed
On a Secure Server
|
Price $12.95
|
|
Get a restored copy of these Vintage How to Plans
For Building The Honeymoon House Trailer with 23 Pages
of Enhanced and Enlarged Figures and Illustrations and Searchable
Text.
|
We will email these plans, to the address provided
with your payment, within 48 hours following receipt of your order.
|
|
|More
Vintage Trailer Plans|
|
|

|
|

|
|
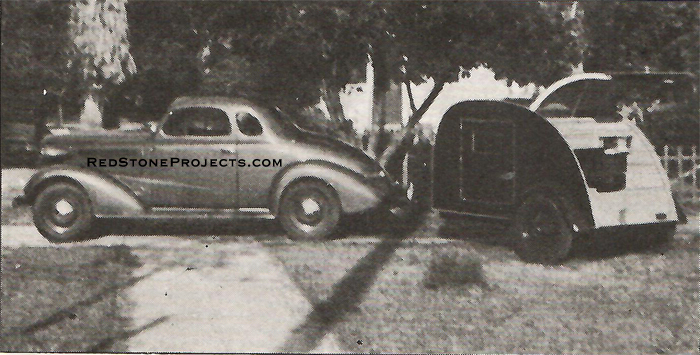
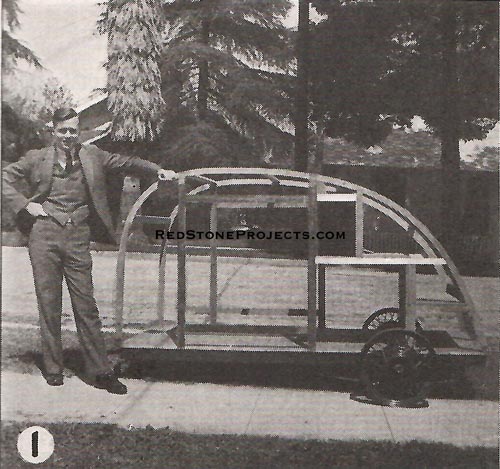
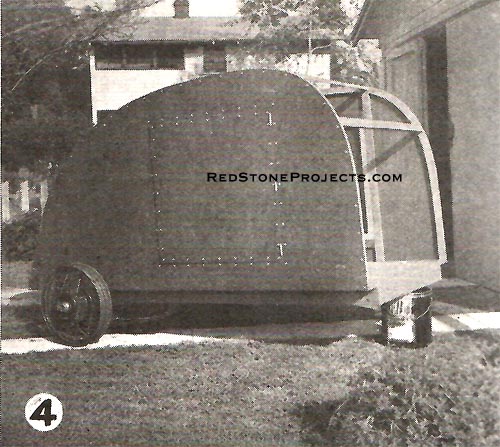
Note tiny proportions compared to the modern car.
The exterior is varnished.
|
BY HI SIBLEY
Built With Dimes; Total Cost $60
|
| THIS trim little trailer, designed and built by Louis
Rogers of Pasadena for his wedding trip, has proved its practicability
in long service on the road. Mr. Rogers pursued a unique method of saving
the money for the material. Each time he changed a dollar bill he put any
dimes received into a small bank, so that the trailer literally was built
with dimes. Total cost for material was slightly over sixty dollars, and
this modest investment was the result of many trips to various junk and
wrecking yards. Odd pieces were picked up here and there, and the prospective
builder of one like it should bear in mind that he need not use identical
material if something different serves the purpose just as well. For instance,
a tee-beam is used for the tow bar on the original, but an I-beam, or even
a heavy timber can be used instead. |
|
|
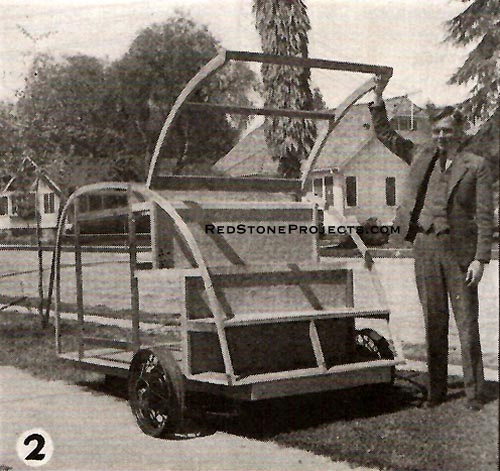
Trailer handles easily and turns in small space.
|
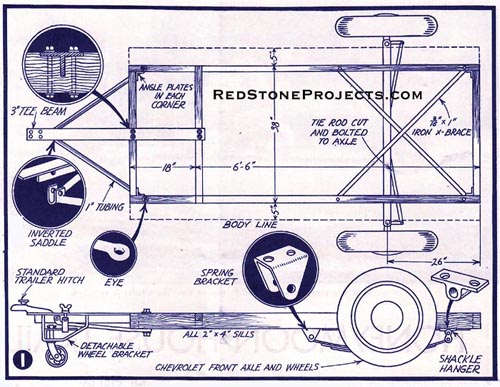
| A Chevrolet front axle with 28 in. wheels was used in
the Roger's trailer, the tie-rod being cut and bolted to the
axle, as in Fig. 1. It is important that the wheels are properly aligned
before drilling holes for the bolts. If you are equipped for the job, the
ends of the tie-rod may be welded in place. Chassis frame is of pine two-by-fours
with angle plates in the corners, secured with bolts. A cross member 18
in. back of the front end carries one end of the tow bar, and a "wishbone"
of 1 in. tubing reinforces the former in the manner illustrated. Sturdy
strap iron x-braces give rigidity to the frame. |
|
|
Figure 1. Honeymoon House Trailer Chassis
|
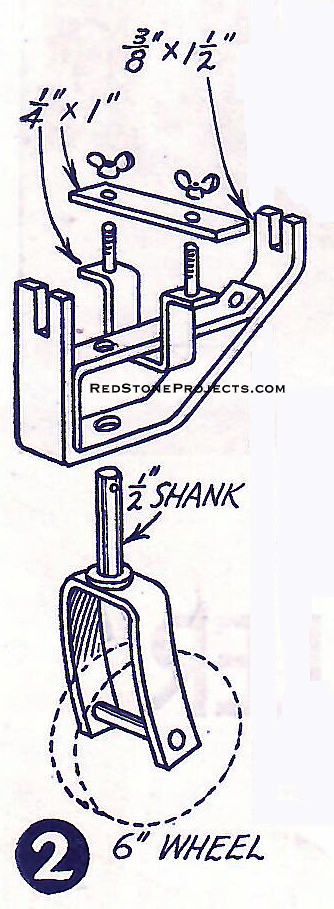
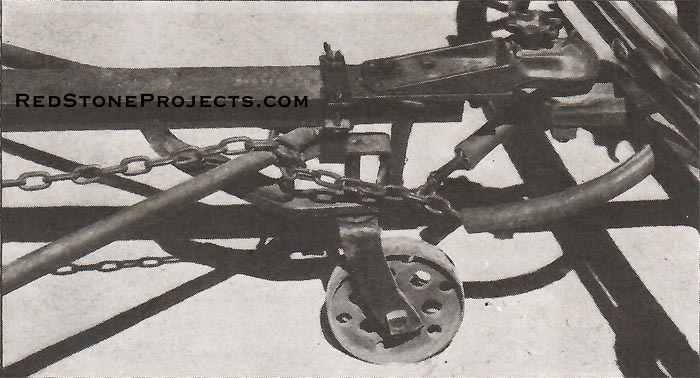
| A caster-wheel bracket for supporting the tow bar when
not attached to the car is made of flat bar iron as illustrated in Fig.
2. A 6 in. iron farm implement wheel is used in this case; any other wheel
of about this size will be satisfactory. Note that two wing nuts are unscrewed
to remove the caster from the tow bar. Any standard trailer hitch is satisfactory
for this job, and the chain required by some states can be secured to one
of the bolts through the tow bar and two-by-four. Note that the wheels
are set pretty well aft, making for smooth towing. Chevrolet 1926 fenders
are installed, as this type does not require cutting into the body. The
floor plan is just four by eight feet, and tongue-and-groove flooring is
laid over the chassis frame. Screws instead of nails should be used throughout
in construction, and casein waterproof glue where applicable. |
|
|
Figure 2. Caster Wheel Assembly
|
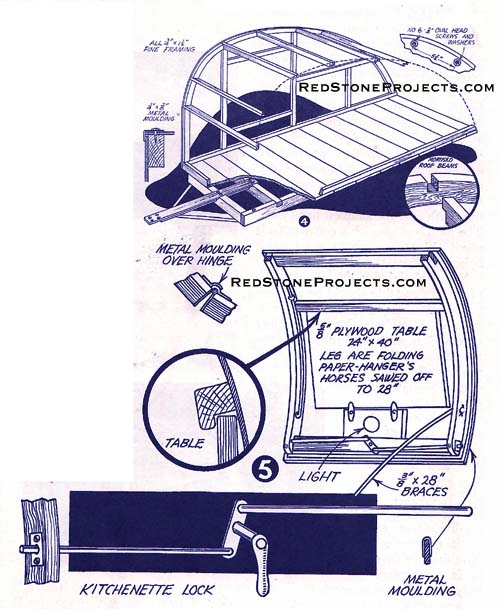
| Profile of the side wall is given in Fig. 3, the squared
diagram. This also gives location of various frame members. The doorway
is cut slightly larger than the frame opening so that the edges of the
door close against it. The cutaway perspective, Fig. 4, shows frame assembly.
All framing is 3/4 in. by l 1/2 in. pine, and tempered presdwood of 1/8
in. thickness is used for sheathing. It is secured to the framing-work
with 3/4 in. No. 6 oval head screws and washers, spaced 5 1/2 in. apart. |
|
Figures
2 and 3. Trailer Sidewall Profile Trailer Door(s) Framing
|
Get a restored copy of these Vintage How to Plans
For Building The Honeymoon House Trailer with 23 Pages
of Enhanced and Enlarged Figures and Illustrations and Searchable
Text.
All Orders Processed
On a Secure Server
|
| The ceiling beams are notched into the side members as
shown. Sides are each cut from a single panel 4 ft. by 8 ft., and are identical.
A panel of the same size forms front end and roof, in one piece, and the
lid over the kitchenette takes a panel 4 ft. by approximately 4 ft. 3 in.
Below this is a removable panel of the same material. |
 |
|
Removable Caster for Tow Bar (Used when disconnected
from car.)
|
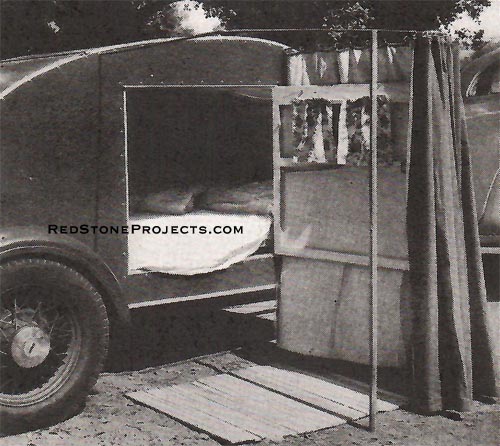
| Space for the mattress and springs is 6 ft. 4 in. long,
and the bed must be installed before the rear partitions are put in. The
partition above the ice box and water tank, however, is so constructed
that it can be removed by taking out the screws, in case there is occasion
to take out the bed. The joint at corner of roof and side wall is covered
with aluminum or other metal molding, secured with screws, as shown in
the sectional drawing. |
|
|
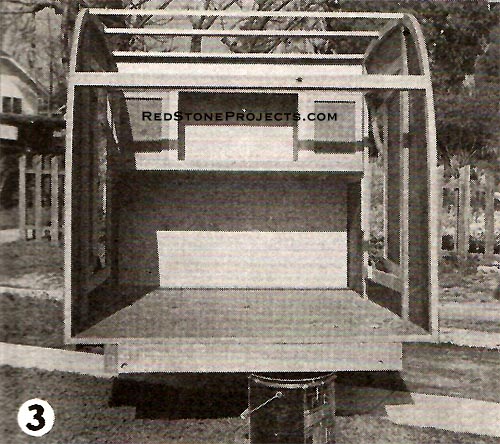
1. Incredible as it seems, this tiny trailer has
7 ft. 4 in. space in the sleeping compartment, which extends from the front
end to upright frame member just behind the wheel. Framing is of 3/4 in.
x 1 1/2 in. pine. Gusset are used on the original, but plans are otherwise.
|
| The hinged lid over the kitchenette is shown in detail,
Fig. 5. It is hinged at the top with standard butts, and a curved metal
strip placed over the joint to keep out the rain. Two iron rods hold the
lid up when open, and swing back under when closed. A rack is provided
for the table. When in use the latter is supported on two paper-hanger's
horses which have been cut down to 28 in. These fold up neatly and are
stowed in the bin or compartment above the kitchenette. An automobile door
handle with lock is used for the locking device fitted with two bars, as
illustrated. There is a light under the lid, and on top, the tail light
mounted on a strap iron bracket which also supports the license plate.
Below the lid is a removable panel made as shown in Fig. 6. Three dowels
in the bottom, set in holes in the floor, and the upper end is kept in
place by the overlapping molding of the lid. |
|
|
2. Framework of lid over kitchenette. Note 1/4
in. plywood partitions under low shelf, water tank is installed at left,
ice box at right. Louis Rogers, builder demonstrating.
|
| Just at the rear end of the door a dresser is built in,
Fig. 7, with two compartments with doors, and a mirror in back. A light
is installed above. Note that the bed slides under this dresser, with ample
body room between it and the bottom of the dresser to move about. |
|
|
3. View looking aft, before roof is installed.
Showing dresser with two side compartments. A mirror is to be set against
the middle panel in back.
|
| Dimensions of the kitchenette compartments can be taken
from the squared diagram, Fig. 3, and construction details are shown in
Fig. 8. At the bottom left is a built-in water tank, having a faucet that
swings up out of the way of the lid when the latter is closed. Two drawers
are provided, just to the left of center, and an ice box is built in on
the right side. The stove slides out on wooden rails with grooves at right
angles, preventing its shaking off when in motion. Above it are two panels
sliding in rabbeted guides, and a dish compartment built to accommodate
the dishes. The panels have brass finger-sockets to set in, and the guides
should be sufficiently wide to prevent binding in damp weather. Give both
the guides and edges of the plywood panels a thorough application of wax.
In the dish rack, glasses set in holes in a shelf, and rabbeted grooves
take care of the plates. Above this is a bin the full width of the trailer,
suitable for curtains, table horses, etc. |
 |
|
4. Sides and top are sheathed with hard pressed
board 1/8 in. tempered presdwood. No. 6 oval head screws, 3/4 in., with
washers are spaced 5 1/2 in. apart.
|
| The ice box is of galvanized iron insulated with two
thicknesses of half-inch insulating board, and built into the trailer.
Details are shown in Fig. 9. The lid is also insulated, and when closed
serves as a workbench for the cook. A 1/4 in. copper tube drains direct
to the ground, and a low partition prevents ice from sliding over onto
the food adjoining. |
|
|
Figures 4 and 5. Trailer Frame and Rear Kitchenette
Lid Assemblies
|
| It goes without saying that the cover must fit neatly
and snugly.
As stated before, both doors are identical, but one is
fitted with a Yale lock, and the other fastened from the inside with an
icebox handle taken from an old refrigerator.
Construction of the door is shown in Fig. 10 and Mr. Rogers
has devised a very ingenious window fastener and bracket combined. This
consists simply of a coiled screen-door spring passing through two eyes
set at right angles, as in Fig. 10.
|
|
Figures
6 through 11. Honeymoon House Trailer Construction Details
|
Get a restored copy of these Vintage How to Plans
For Building The Honeymoon House Trailer with 23 Pages
of Enhanced and Enlarged Figures and Illustrations and Searchable
Text.
All Orders Processed
On a Secure Server
|
| By pushing the spring out through the eye, it opens the
window from the inside and holds it in any position. When closed, the end
of the spring is put on a hook at one side, making an effective lock.
The spring passes through a hole in the copper screen.
The window is hinged at the top with a piano hinge, and the glass is held
by a frame made of galvanized sheet iron bent as shown in the sectional
drawing, and mitered and soldered at the corners. Painted over brown of
the same shade as the sheathing of the trailer, it makes a neat appearance. |
|
|
Two rods, pulled out from the trailer body, along
with a third rod, support the curtains forming the dressing room. Note
handy “roll up†wooden “rugâ€
on the ground.
|
| Aluminum molding is placed over the door sill, with a
small eavestrough of the same material above the door, as shown in the
sectional drawing. In forming these pieces as well as all other sheet metal
work it will be necessary, for a neat job, to have your local tinsmith
do the work with his shop equipment. It shouldn't cost much. |
|
|
|
Mrs. (Lois) Roger gets a jar from the ice box.
At lower left, note the water faucet made from old gas light fixture parts.
|
| With a trailer of these compact dimensions, dressing
is best done outside, and Mr. Rogers has rigged up a very satisfactory
dressing room at the door with a curtain. This is supported on two rods
which slide out from the top of the body on either side of the door, Fig.
11, and are just 4 ft. long, the width of the trailer. A third rod, fitted
with sockets at each end made of copper tubing, joins the other two and
is held up by a wooden pole.
Curtains strung along this make a very satisfactory dressing
room, especially when a wood floor is provided. This last (see photo) is
made of slats something on the order of Venetian blinds and can be rolled
up and stowed in small space. |
|
|
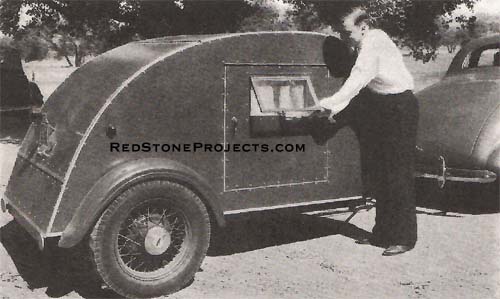
Louis Rodgers of Pasadena, designer and builder,
demonstrates the novel window bracket. Normally, it is worked from the
inside.
|
| Lighting on Mr. Roger's trailer is from the car battery,
but one could be put in the trailer itself independent of the car. There
are six bulbs installed, one under the shelf at the forward end of the
sleeping compartment, one over the dresser, one under the kitchenette lid,
one tail light and two blue clearance lights. A knife switch is provided
to throw on current from car battery, or switch over to city 110-v circuit
through a transformer. |
Any 2 Vintage Trailer Plans
$19.95 FREE Shipping |
|
Select 2 Vintage Travel Trailer Plans
|
|
|

